Submarine S.M. U-9 from "Das Werk"
First: Sorry for the horrible English, but my school English is a bit rusty. That's why I used the Google Translator to help.
When the kit appeared in January of this year, it was immediately clear to me that I had to have it. After all, it fits perfectly into my collection of WWI planes and ships. But first something about the history of the U-9. The German submarine SM U-9 is probably the most famous submarine of the Imperial Navy in World War I, along with the SM U-20. While U-20 under the command of Kapitänleutnant Schwieger achieved rather dubious fame through the sinking of the British passenger steamer RMS Lusitania, U-9 under Kapitänleutnant Otto Weddigen achieved through the sinking of 4 warships (HMS Aboukir, HMS Hogue, HMS Cressy, and HMS Hawke) known beyond the borders of Germany. U-9, like the small cruiser SMS Emden, was the only one to receive the Iron Cross from the Kaiser for its service. U-9 was the first of four series 9 submarines, and the only one that was not sunk. It was broken up in England in 1919. All other boats were lost to enemy action. The 9 series were boats with a length of 57.38 m and a width of 6 m. The hull was constructed as a two-hull ocean-going boat. The maximum possible diving depth was 50 m. They were powered by 1000 HP petroleum motors for overwater travel and 1160 HP electric motors for underwater travel. The armament was 4 torpedo tubes (two in the bow, two in the stern) with a total of 6 torpedoes. There were also up to two deck guns. Built at the Imperial Shipyard in Gdansk, the boats were stationed on Heligoland in order to reach their operational areas on the east coast of England from the English Channel to the Dogger Bank. Irony of fate, on their first patrol, S.M. U-29 sunk by HMS Dreadnought under Kapitänleutnant Weddigen in 1915 by ramming. Incidentally, this was the first and only combat action of the HMS Dreadnought during the entire war.
But now to the construction. First the two halves of the hull were glued together. The spacers inside were glued in on one half, and then the other half was fitted. Unlike in the assembly instructions, the spacers were then also provided with glue on the other side, as otherwise the hull cannot be aligned properly. Tamiya Extra Thin Cement was used for gluing, as hardly any adhesive residue can be seen (the hull fits very well). After drying, only a slight sanding of the glue seam was necessary, which of course benefits the countless rivets.
While the hull was drying, I already tackled the tower. Here, too, everything fit perfectly.
With the tower there is the possibility of adding the hatch open or closed. To get both options, the lid was drilled through at the hinges and fitted with 0.3mm brass tubing.
Furthermore, the tower can be provided with two types of railing. Once as a mere railing, or provided with a tarpaulin. Both types can later be exchanged on the model without any problems, as they are only plugged in. But I decided on the Persening variant. (sorry, no picture)
I also painted the wooden walkway on the tower roof in a lighter mahogany. Unfortunately, there is no information about which wood this grate was made of, but as an old shipbuilder, only mahogany, teak or oak are likely (hardwood, and therefore more weather-resistant than other types of wood).
The installation of the deck also went off without any problems.
The chimney with a separate ventilation pipe is foldable, so it can also be lowered into the hollow on deck (sorry, no picture).
This was followed by the two drive shafts with their shaft pants and brackets.
The downruds themselves also got their color, but not yet plugged in so as not to be in the way when painting etc. With that the shell construction was already completed. What followed was the real challenge, the painting. First, all parts were given a black primer. (On the second picture you can see the chimney and ventilation pipe)
As expected, there is actually only one color, namely gray. But in different grades. I started with a light gray from Vallejo, which I darkened a little with a little dark blue gray. So everything above the KWL (construction waterline) including the tower was brushed.
After the paint had dried well, it was time to mask the brushed areas.
After all areas had been masked off, the hull and deck were given German Gray, a very dark gray (almost anthracite). In the construction instructions, the ship's bottom color is called RAL 7016, although it is of course not certain whether this is the historically correct color, as the RAL color system was only introduced in 1927.
And again I had to wait until the paint was dry. So enough time to paint the persening. Using a light sand tone, ocher, very light gray and beige, I tried to give the persening a weathered character.
Now it was time to mask the pressure tanks and individual segments of the deck, and show the non-slip gray linoleum covering. German Gray was used again, albeit a little brighter. The ventilation pipe also got its dark gray color. Unlike in the instructions, the chimney was brushed light gray, as can be seen on the historical pictures of the submarines of that time.
Now the protection bars for the elevator and screws could also be attached.
Since the colors used are all matt, the entire model has now been covered with a clear lacquer silk gloss in order to be able to start washing etc. For this purpose, the tower was now also glued to the deck, and the four red mountain buoys glued into the recesses provided for this purpose. This was followed by the application of the decals. These were also covered with decal varnish.
After the paint had dried well, I started with a black wash (I have to admit that the following work steps were a bit new territory for me, as I never tried to age my previous models so intensely). I mainly did the washing on the light gray areas, as they wouldn't have made much sense on the underside of the fuselage. A subtle chipping has now been carried out on the upper part of the hull and tower with rust from Revell, and then given a rust wash. The last point was a salt streaking (by AK) of the upper hull area and the deck.
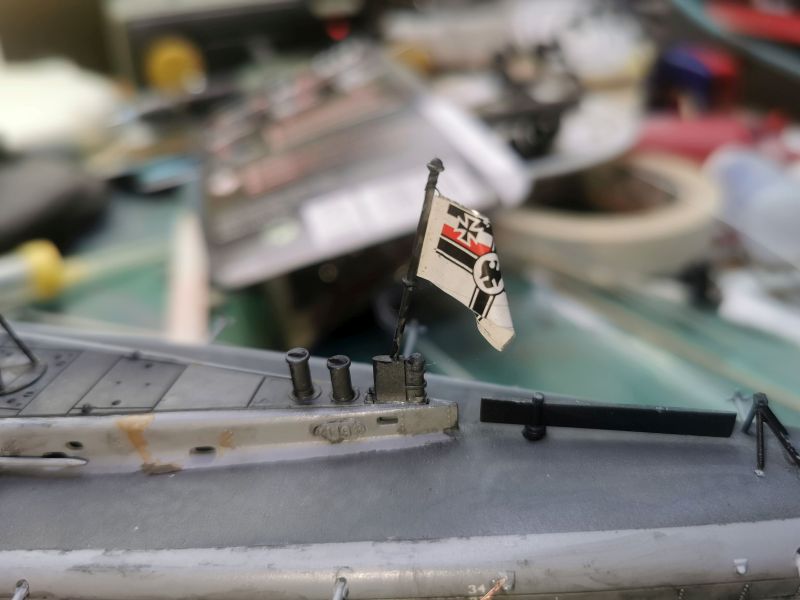
The imperial war flag was also available as a decal. To make it a little more natural, the decal was drawn on aluminum foil and brushed with a lot of Decal Soft. Now it was possible to shape the flag as desired without the decal splintering or even coming off. Now attached to the aft flagpole.
Now the last, tricky construction phase could begin. Since I might want to buy Uschi van der Rosten's dry dock later, I also wanted to attach the masts including the rigging. The masts are the big problem if you also want to rig. The material is simply too soft and therefore tends to bend very quickly when rigging. On the one hand, since I didn't have the right brass pipes and on the other hand the anchor points for the rigging are difficult to build, good advice was expensive. The solution is so simple. I got myself 0.2 mm silver wire, cut it to the required lengths. And attached with UV glue. Because of this little cheating, the masts stayed straight and still connected to each other with tension. Now the wires were painted with metallic black,
and the U-9 was ready. This construction was a lot of fun thanks to the good starting point.
Jürgen aka Chowhound
Click here for the finished model :
https://forum.ww1aircraftmodels.com/index.php?topic=11973.msg223305;boardseen#new
