Author Topic: No 1A de Haviland: 1/32 stripdown Airco DH 1A  (Read 17786 times)

Offline Alexis

  • Hero Member
  • *****
  • Posts: 7947
  • Love the self
Re: No 1A de Haviland: 1/32 stripdown Airco DH 1A
« Reply #15 on: April 04, 2020, 10:25:46 AM »
Really nice job on wiping that up Stephen , most excellent  :)


Terri
Hurra ! , Ich Leben Noch
Body and life is a vessel we use to travel the planet . Femininity is the gift , The miracle comes from what we do with it .

Offline Europapete

  • Sr. Member
  • ****
  • Posts: 433
Re: No 1A de Haviland: 1/32 stripdown Airco DH 1A
« Reply #16 on: April 05, 2020, 01:46:52 AM »
Hi Steven, I just checked my books and unfortunately I don't have anything that isn't already covered by your Datafile. Regards, Pete in RI

Bughunter

  • Guest
Re: No 1A de Haviland: 1/32 stripdown Airco DH 1A
« Reply #17 on: April 05, 2020, 04:09:53 AM »
How did I miss this so far? Stephen, what you're cooking here is just the way I like it. :)
Wooden propeller and soldered frame - thumbs up!

I will follow closely,
Frank

Offline lone modeller

  • Hero Member
  • *****
  • Posts: 5300
Re: No 1A de Haviland: 1/32 stripdown Airco DH 1A
« Reply #18 on: April 06, 2020, 07:47:07 AM »
Evening All,

Thanks Ken, Rick, Terri, Pete and Frank for the supportive comments, they are truly appreciated.

Pete there is no need to worry about the details of the interior, if you read on you will find out why.

I have already described how G. de Haviland had been heavily involved in the design of the RAF FE 2a and later 2b before he left the Royal Aircraft Factory to join the Aircraft Manufacturing Company as the chief designer. I have also stated that I do not have drawings of the interior of the DH 1/1A, but both the FE 2a and the DH 1 were powered by 100hp Renault engines, and the FE 2b and DH 1A were powered by 120 hp Beardmore engines. I spent a morning and more earlier this week trying to make plausible drawings for the interior of the DH 1A based loosely on the FE 2b and thought that the engine installation should be similar on both the 2b and 1A. One of the key differences between the RAF and DH machines was that the former had a bulbous forward nacelle which tapered rearwards whereas the DH nacelle had parallel sides. The engines in both machines were mounted on frames inside the rear nacelle. It was only today when I closely compared the drawings of the two nacelles that I realised just how similar they were - even down to the length! Then the penny dropped! The DH 1A was almost a copy of the FE 2b although de Haviland made some modifications based on what he must have learned from the test flights of the prototype FE 2b. Now I have worked out without much difficulty the probable construction of the engine mounts and fuel tank, radiator installation, etc in the rear of the DH 1A and it must have been very similar to the FE. I suspect that the same applied to the cockpits - after all why try to reinvent the wheel? Ken: I have had a lesson in creativity and practicality

This means that I have had to modify the fuselage frame somewhat: I have taken out the rear upper cross member and installed two extra vertical supports at the rear. These vertical supports would have been anchor points for cross members which were below the engine, which in turn would have carried two longerons on which the sides of the engine rested - just like the FE 2b! Doh!! The horizontal pieces and engine bearer longerons will be added from plastic strip later - they can be held with CA as they will only be supporting a plastic engine, so the main fuselage frame now looks like this:


Now I can fit the engine and I know roughly where the fuel tank will go, so I think that I have worked out the key elements of the interior and can now make the different parts. Sometimes it is only by doing something that the blindingly obvious becomes visible!

I have been fiddling with the engine in order to work out the precise dimensions and location of the bearers, and discovered that the parts tree for the Wingnutwings engine does not have an oil tank or exhaust pipe. I made up an oil tank from a piece of thick sprue and have found another piece of the correct diameter for the exhaust pipe, which I will make later. I have also made the blanks for the radiator from a sandwich of 2 x 80 thou card. I am trying to think about what to use to represent the mesh on the front and rear of the radiator - if anyone has any ideas I would be pleased to read about them. In the meantime here are the radiator blank, oil tank, lower part of the engine and frame:


The second picture shows that the parts will fit as they should when the various sticking out bits on the rear, (forward end in the photo - because the engine was mounted as a pusher the front end of the engine is at the rear of the aircraft), are put into place later.

More to come if you have not lost interest already.

Stephen.

Offline kensar

  • Hero Member
  • *****
  • Posts: 2503
  • Reshaping the world - one piece at a time.
Re: No 1A de Haviland: 1/32 stripdown Airco DH 1A
« Reply #19 on: April 06, 2020, 09:28:44 PM »
Not having seen the radiator on the real thing, I can suggest representing it with either a photoetch radiator face from the car modeling realm, or fine wire mesh.  You will have to get creative again on where to find such a thing - maybe a tea ball or strainer of some sort.

Online RAGIII

  • Hero Member
  • *****
  • Posts: 18794
Re: No 1A de Haviland: 1/32 stripdown Airco DH 1A
« Reply #20 on: April 06, 2020, 11:22:13 PM »
Nice work on the radiator to date! Good to see that all will fit in place!
RAGIII
"A man has to know his limitations": Harry Callahan

"Don't slop it on" Lynda Geisler

Bughunter

  • Guest
Re: No 1A de Haviland: 1/32 stripdown Airco DH 1A
« Reply #21 on: April 08, 2020, 06:33:29 AM »
Stephen, that is a very nice arrangement!

I forgot to mention last time:
These were glued with Evostick wood glue which dries clear, and the piece put under a press overnight:


Books can be heavy, but I can recommend a bench vice. It allows even higher forces in a very controlled way.


I am trying to think about what to use to represent the mesh on the front and rear of the radiator - if anyone has any ideas I would be pleased to read about them.
In the last years I found the finest mesh in the form of very modern pyramid tea bags which are made of polylactide, a bioplastics. One example:

I used this material in my Bristol Fighter the first time.

Cheers,
Frank

Offline lone modeller

  • Hero Member
  • *****
  • Posts: 5300
Re: No 1A de Haviland: 1/32 stripdown Airco DH 1A
« Reply #22 on: April 09, 2020, 06:08:39 AM »
Frank,

Normally my improvised press is good enough for my needs - the more so as I lack space for many specialist tools (partly because I have so many books!!)

The idea with the tea bag looks just like the answer that I was looking for. I will certainly try out that idea. Thanks for the tip.

Stephen.

Offline RichieW

  • Hero Member
  • *****
  • Posts: 1966
Re: No 1A de Haviland: 1/32 stripdown Airco DH 1A
« Reply #23 on: April 13, 2020, 05:12:10 AM »
Sorry to be late joining this one Stephen, still finding my way round the forum. Another very interested follower here.

Very impressed by how quickly you get things together. Love the propeller too!

Offline Old Man

  • Hero Member
  • *****
  • Posts: 600
Re: No 1A de Haviland: 1/32 stripdown Airco DH 1A
« Reply #24 on: April 18, 2020, 06:12:45 AM »
You know, Sir, that you are mad. Stark, raving, bounce off the walls mad. Good to see you have relaxed and are enjoying the problem.

Great work on one helluva project. Sharing your research and deductions is much appreciated.

Offline lone modeller

  • Hero Member
  • *****
  • Posts: 5300
Re: No 1A de Haviland: 1/32 stripdown Airco DH 1A
« Reply #25 on: April 21, 2020, 09:18:28 AM »
Evening All,

Thanks Ken, Rick and Richie for your interest - it is good to have you along. Richie - no need to worry about finding your way around the site - there is a huge amount of material on the site and it takes a long time to find it all!


You know, Sir, that you are mad. Stark, raving, bounce off the walls mad.

OM: that is one of the best remarks I have been given for a very long time!!! I completely agree with you - anyone who scratch builds pushers must be verging on the edge of complete insanity, and I seem to scratch build more of them than most!

Stephen.

Offline lone modeller

  • Hero Member
  • *****
  • Posts: 5300
Re: No 1A de Haviland: 1/32 stripdown Airco DH 1A
« Reply #26 on: April 21, 2020, 09:19:43 AM »
Evening All

The snail continues to move forwards - just. I am still in the process of making the wing ribs - and there seems to be plenty of them! However they are not very photogenic, (see one and you have seen them all), so not much to show there. In between times I have been working on parts of the cockpit interiors which are modelled on the FE 2b for reasons given in the previous post and form the subject of this update.

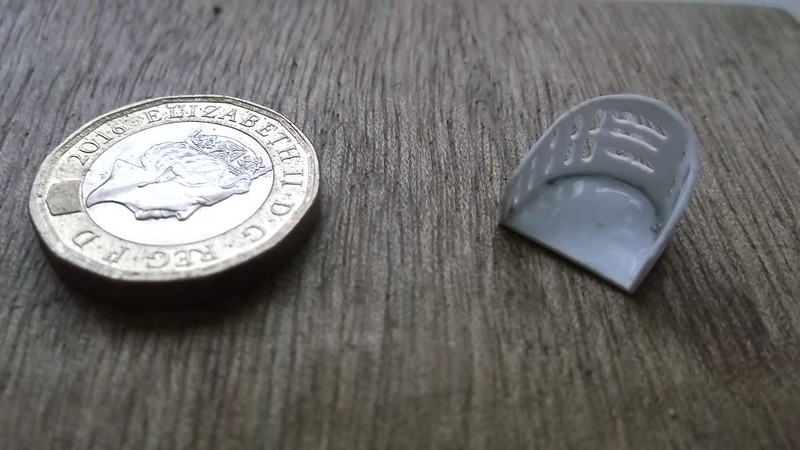
First up is the pilot's seat. These were constructed from aluminium and had holes and slots to make them lighter. I used a piece of 30 thou card for the flat and 20 thou for the back. These were joined with liquid cement - in two stages so that stage one involved half of the seat back only. This was held while the cement dried. The the second half could be pulled around the curve of the seat rear and cemented and held with an old hair clip. The result was that the back was properly aligned with the seat. Only when this was really set did I proceed to drill the holes in the sides and the slots in the rear:


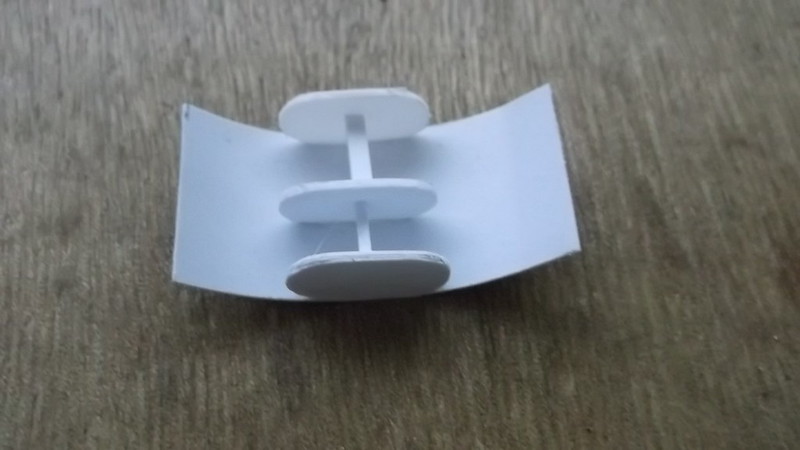
Next was the fuel tank. This was a 35 gallon container - the same as on the FE 2b so I was able to use the 1/32 scale drawings in the DataFile no 147 to work out both the size and shape. A piece of 20 thou card formed the ends and body, and three 30 thou formers were made to strengthen it. The faces of the 20 thou end pieces were embossed by using the blunt end of a nail file. These were cemented to two of the 30 thou formers. The formers were cemented on to the centre of the card which will form the body of the tank:


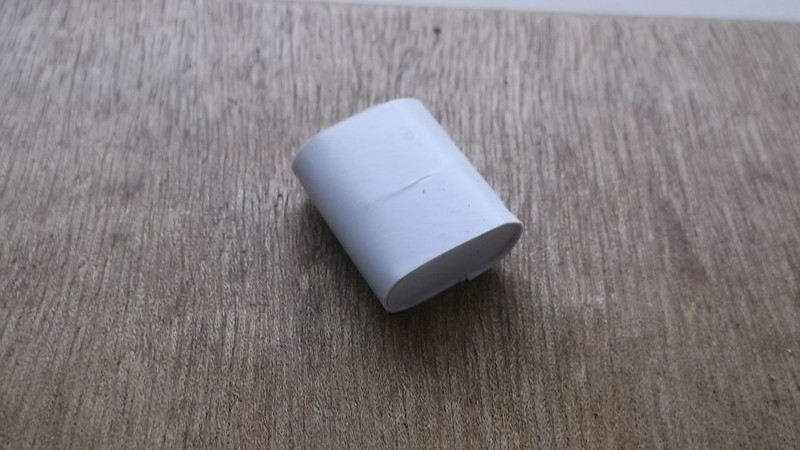
Note the same method was used here as for the pilot's seat - only part of the unit was made so that the formers could be rigidly attached to the card body. When these were properly set the card could be wrapped around half of the formers and held while the cement set. Finally the other side of the card was bent around, excess card cut off and the remainder cemented into place and held until it too had set. A little filler in the gaps and all was finished except for the filler pipe:


The exhaust pipe was made from a piece of sprue - it came from the same piece as the oil tank described in an earlier post. I have still to drill the exit holes in the end and make the pipes which will connect it to the top of the engine cylinders:


The pilot's seat was probably fixed via runners to a box structure from which protruded rudder foot boards. The box was easily constructed from card as were the rudder foot boards. The rudder bar pivoted on a small pedestal: this was made from 60 thou card. I will make a rudder bar later form a piece of plastic strip. There was a bulkhead between the pilot and observer cockpits: I modelled mine on the FE 2b and initially made it in one piece. A hole was later cut in the lower part which allowed the pilot's legs to pass through to operate the rudder bar: a box would have covered the pilot's feet and formed a seat for the observer as per the FE 2b, although the shape of the de Haviland seat appears to have been different as shown in photo 28 in DataFile 148. This seat, and the floor of the observer's cockpit will be made later as I need to make these parts to fit and can only do so when I have assembled more of the nacelle structures.


The image above shows from left to right:

the bulkhead between the pilot and observer cockpits prior to finishing;

the box for the pilot's seat;

the rudder foot boards and pedestal for the rudder bar;

the pilot's seat.

I made a compass from another small piece of sprue and an instrument panel from 20 thou card, which I scored and bent. A small semicircular platform will support the instrument panel which will sit in front of the upper part of the bulkhead between the pilot and observer. I have also made two semicircles from brass rod which formed a frame for nose cone on the original aircraft: these are waiting to be attached to the main nacelle frame: the upper (smaller) one will be soldered in place later. The parts have been set alongside or in the nacelle frame in the next images but there is an error because I think that I have put the fuel tank filler pipe in the wrong place! I am still not sure where it should properly be but I am inclined to think that it should extend forward because there were two access doors on the sides of the nacelle just behind the pilot's cockpit: if this was the position the pipe would have been rather long but the only rear view of the aircraft in the DataFile 147 shows no sign of any pipe at the rear.


If you have been, thanks for looking.

Stephen.

Offline Borsos

  • Hero Member
  • *****
  • Posts: 3315
Re: No 1A de Haviland: 1/32 stripdown Airco DH 1A
« Reply #27 on: April 21, 2020, 04:28:53 PM »
Great stuff, Stephen!
Andreas
"Deux armées aux prises, c'est une grande armée qui se suicide."
Barbusse.
"Ein Berg in Deutschland kann doch einen Berg in Frankreich nicht beleidigen. Oder ein Fluß oder ein Wald oder ein Weizenfeld."
Remarque.

Offline RichieW

  • Hero Member
  • *****
  • Posts: 1966
Re: No 1A de Haviland: 1/32 stripdown Airco DH 1A
« Reply #28 on: April 21, 2020, 05:05:54 PM »
Great work Stephen, it's taking shape nicely already. Lots of good tips here too. I imagine the wing ribs are keeping you very occupied!

Can I ask where you buy your materials from?

Online RAGIII

  • Hero Member
  • *****
  • Posts: 18794
Re: No 1A de Haviland: 1/32 stripdown Airco DH 1A
« Reply #29 on: April 21, 2020, 09:59:33 PM »
Beautiful work on the seat,tank, and the rest of the bits Stephen! Looking superb!
RAGIII
"A man has to know his limitations": Harry Callahan

"Don't slop it on" Lynda Geisler