Author Topic: RAF FE8, Scaleplanes 1:72  (Read 44020 times)

Online RAGIII

  • Hero Member
  • *****
  • Posts: 18793
Re: RAF FE8, Scaleplanes 1:72
« Reply #180 on: August 14, 2020, 04:24:02 AM »
Your striving  for perfection is admirable to say the least! Looking Great....Again!
RAGIII
"A man has to know his limitations": Harry Callahan

"Don't slop it on" Lynda Geisler

Offline Alexis

  • Hero Member
  • *****
  • Posts: 7947
  • Love the self
Re: RAF FE8, Scaleplanes 1:72
« Reply #181 on: August 14, 2020, 08:57:45 AM »
On the tail end of my booms I ended up adding pins so when the tail was mount there was more bite to the assembly and it took me a few tries on getting everything lined up right . So I'm impressed Ian by your willingness to get her correct !


Terri
Hurra ! , Ich Leben Noch
Body and life is a vessel we use to travel the planet . Femininity is the gift , The miracle comes from what we do with it .

Offline NinetythirdLiberator

  • Hero Member
  • *****
  • Posts: 1587
Re: RAF FE8, Scaleplanes 1:72
« Reply #182 on: August 22, 2020, 04:06:19 PM »
Wow, Ian.  That about covers it!  :o
Extremely well done...Dan  ;)

Offline IanB

  • Hero Member
  • *****
  • Posts: 2435
Re: RAF FE8, Scaleplanes 1:72
« Reply #183 on: September 04, 2020, 10:05:33 PM »
Has it really been 3 weeks since my last update? Blimey!

It's not that nothing has been happening, it has. Just very slowly!


When we left this the booms and tail had been fitted and the cross-bracing from the outer wing struts had been fitted.


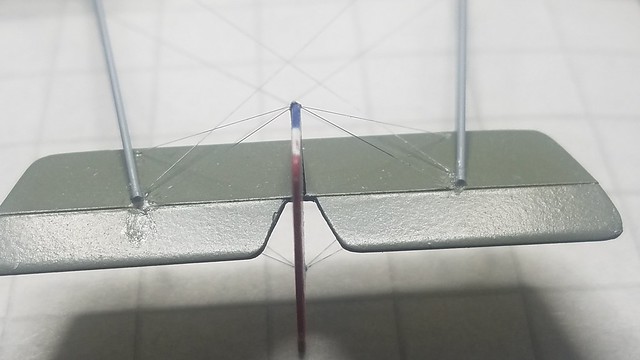
That meant the next step was to fit the cross bracing between the upper and lower booms on each side. I had thought about this a lot and had already fitted the wires at the front end, trapped under the booms when they were attached. They can be seen n the pic above, taped to the top of the upper wing to keep them out of harm's way. My plan was then to tension the lines and secure them before slipping the struts in to secure everything. There are 3 wires involved each side - the first is already fitted, the cross-bracing from outer struts to rear of opposite boom. Then there's the side bracing mentioned above, trapped under the boom at the front end and needing to be tensioned and secured on the boom at the exact point the strut will be attached. The 3rd is the side-to-side cross bracing between the upper and lower ends of the struts.


My first attempt was to do all 3 at the same time. I tensioned the fore-and-aft wire and taped it to hold it secure, then held the side-to-side one across it to pull all the wires against the boom so I could add a tiny drop of CA to secure them all. 

Another high-tech jig was employed to ensure the attachment was at the correct place, and would be equal both sides.


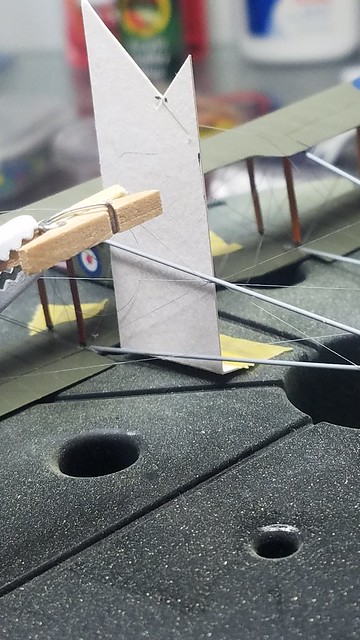
This approach didn't work too well, at least on the first side, so I decided to attach two lines, one at the top and one at the bottom, to one of the struts as per this pic.


That meant I had one less variable while adjusting everything, and worked much better.


Part of the reason this update has taken so long is because my method required one small operation to be done, then I had to wait for it to dry properly before the next small step. Another is that I kept destroying work already done! 

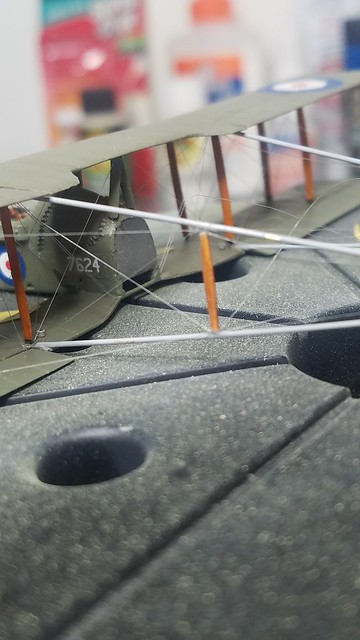
Here's the first strut in place.


That worked ok and was happy with it so proceeded to the other side. While tensioning that I got careless and pulled the entire strut off again, along with the associated wires.


Oh bother, said I. 


and left it alone for a few days.


The strut and wires were eventually refitted, and left alone again.


next step, repeat the process on the other side. Without pulling it all off again!


Instead I pulled the wire out from under the lower boom.


Oh bother I said, once more.


and left it alone again.


It took a few attempts to resecure that line, but eventually it was done and I could progress.

The lower boom attachments were done first. The wires tensioned and taped in place, then a tiny dab of CA applied to secure them.


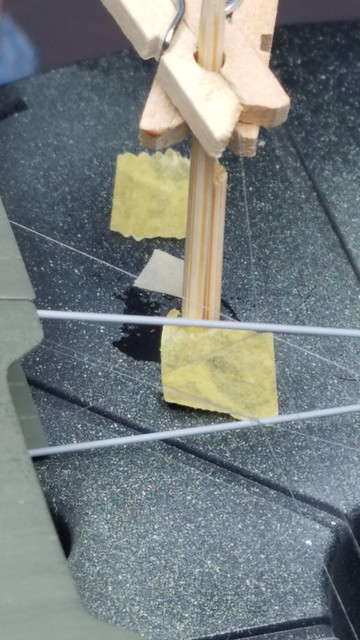
I then resorted to yet another high-tech jig to hold the upper wires in place while they cured: two tiny clothes pegs and a cocktail stick.


The upper cross wire was held by one peg which was slipped over the cocktail stick. The second peg secured the first at the desired height to hold the tension. The fore-and-aft wire was trapped between the cross wire and tensioned, and then all 3 were adjusted to cross the boom at the same point, making sure that point was level with the ones on the other side and the lower one on the same side.


Once that was hardened I could trim and fit the second strut!


Done!


Next step now is to tension the rear half of the side cross-bracing (between the struts and the tail) and add the small strut at the rear end. That SHOULD be far simpler...


Provided I don't pull the struts off....


Time for a beer.


Thanks for dropping by, stay safe!


Ian

Offline Alexis

  • Hero Member
  • *****
  • Posts: 7947
  • Love the self
Re: RAF FE8, Scaleplanes 1:72
« Reply #184 on: September 04, 2020, 11:52:24 PM »
I would say it is time for a beer after all that maybe even two ! ;) .

 Well done on getting the struts in place and how you tackled the rigging . Never seen it done in that manner but it did work out well for you . Excellent work Ian !


Terri
Hurra ! , Ich Leben Noch
Body and life is a vessel we use to travel the planet . Femininity is the gift , The miracle comes from what we do with it .

Online RAGIII

  • Hero Member
  • *****
  • Posts: 18793
Re: RAF FE8, Scaleplanes 1:72
« Reply #185 on: September 07, 2020, 04:13:12 AM »
Even after reading your explanation I have No Idea how you did the struts and rigging but they look Fantastic  8)
RAGIII
"A man has to know his limitations": Harry Callahan

"Don't slop it on" Lynda Geisler

Offline IanB

  • Hero Member
  • *****
  • Posts: 2435
Re: RAF FE8, Scaleplanes 1:72
« Reply #186 on: September 08, 2020, 10:36:27 PM »
Thanks Terri!

Rick, I'm not sure I really understand myself how it all worked, but it did so I'll save the method for future reference!


A day off today, so I forced myself to finish off the boom rigging. 


Two small pieces of .4 x .75mm (.015 x .030") rod to make the small rear struts which should have holes in but I didn't bother drilling them. They were actually brackets for the adjustable tail plane. The leading edge of which could be moved up or down and bolted through the respective holes in these brackets to fix it in place. The wires were tacked in place in the same fashion as before and the brackets were then CAd in place between the wires to secure them. A little thin CA was thin added to ensure a secure bond and fill any small gaps.


The brackets need to be painted grey, and there is some touching up to be done on the struts and booms but nothing major. After that has been taken care of the next step will be rigging the elevators and rudder.


More fiddly fun!


Thanks for looking in, and stay safe!


Ian

Offline kensar

  • Hero Member
  • *****
  • Posts: 2503
  • Reshaping the world - one piece at a time.
Re: RAF FE8, Scaleplanes 1:72
« Reply #187 on: September 08, 2020, 11:17:11 PM »
Shouldn't there be an engine in there somewhere?  Hope you don't undo some of that work fitting it in!

Offline IanB

  • Hero Member
  • *****
  • Posts: 2435
Re: RAF FE8, Scaleplanes 1:72
« Reply #188 on: September 08, 2020, 11:22:46 PM »
The engine will simply  be glued to the flat rear of the nacelle. It won't be a problem to fit it after rigging. I'll place the aircraft on its wing leading edges, nose down into the hole in the centre of the stand to allow it to set at the right angle.

Ian

Offline lcarroll

  • Administrator
  • Hero Member
  • ******
  • Posts: 8547
Re: RAF FE8, Scaleplanes 1:72
« Reply #189 on: September 09, 2020, 01:27:07 AM »
Wow Ian, just "WOW"! Rube Goldberg has nothing on you, that sequence of rigging and the use of shims, tape, pins and Lord knows what else is either sheer genius or the greatest of the great grand coincidences known, beautiful to watch and, like Rick, I have no clue how it actually worked! A tribute to your modelling skills, especially given the small scale Sir, and a delight to follow along.
Cheers,
Lance

Offline Alexis

  • Hero Member
  • *****
  • Posts: 7947
  • Love the self
Re: RAF FE8, Scaleplanes 1:72
« Reply #190 on: September 09, 2020, 10:07:27 AM »
Fantastic job on rigging ! :)


Terri
Hurra ! , Ich Leben Noch
Body and life is a vessel we use to travel the planet . Femininity is the gift , The miracle comes from what we do with it .

Offline NinetythirdLiberator

  • Hero Member
  • *****
  • Posts: 1587
Re: RAF FE8, Scaleplanes 1:72
« Reply #191 on: September 10, 2020, 08:05:26 AM »
Holy Cow...gotta agree with Terri et al.!

Dan

Offline Old Man

  • Hero Member
  • *****
  • Posts: 600
Re: RAF FE8, Scaleplanes 1:72
« Reply #192 on: September 17, 2020, 01:03:28 PM »
This is simply wonderful, Ian.


"That's the stuff to give the Hun!"

Online RAGIII

  • Hero Member
  • *****
  • Posts: 18793
Re: RAF FE8, Scaleplanes 1:72
« Reply #193 on: September 21, 2020, 01:53:25 AM »
Looking Fabulous Ian!
RAGIII
"A man has to know his limitations": Harry Callahan

"Don't slop it on" Lynda Geisler

Offline IanB

  • Hero Member
  • *****
  • Posts: 2435
Re: RAF FE8, Scaleplanes 1:72
« Reply #194 on: September 25, 2020, 04:24:35 AM »
Thanks everyone for the feedback, much appreciated!

Progress has been very slow of late, mostly because I really don't enjoy this part of the build, but also because I  have been short of available time. So here is a quick update.

The tail boom rigging is done and the touching up has also been completed. That left me with this...


The next step is to rig the tail control surfaces, and since I had already attached the lines to the nacelle, I simply had to pull them out from their hiding place and attach them.


If only!


After a lot of swearing and adjusting I managed to get them separated and in the correct order to attach them without having them crossing each other. They were then CAd to the pulleys on the lower wings.


The ends were taped to the cutting mat to stop them getting tangled again. Problem there is that masking tape doesn't hold this stuff very well!


I also managed to pull out one of the port wing flying wires. I have no idea how as I wasn't working in that area, but I have still to figure out how to reattach it. I may have to remove it and replace it with wire but that is still open to options.


Finally, after much swearing, I managed to get the upper elevator control horns and wires attached. I'm still not sure about the left side and may remove it and do it again. We'll see how I feel later!


I still can't for the life of me figure out why PE makers make the control horns as separate parts for upper and lower instead of one piece so I could just cut a slot in the elevator/rudder/aileron and slide it into place. It would be so much stronger and so much easier to fit and align! I may well make my own along those lines in future since the first part to come adrift is always a control horn.


Anyway, that's where I am now. Rudder and lower elevator still to do providing I don't break any more wires off!


Thanks for looking in!


Ian