Author Topic: Macchi M-5  (Read 35335 times)

Offline Mike Norris

  • Hero Member
  • *****
  • Posts: 2212
  • RAF Old and Bold
    • Mikes WW1 Aircraft Models
Re: Macchi M-5
« Reply #165 on: February 17, 2020, 06:04:41 AM »
Don't you hate it when that happens  >:(
I know I shouldn't laugh, but ;D

Mike


Retired - 27 years RAF service then 20 years Military Aerospace Technical Author/editor.

Offline Mike Norris

  • Hero Member
  • *****
  • Posts: 2212
  • RAF Old and Bold
    • Mikes WW1 Aircraft Models
Re: Macchi M-5
« Reply #166 on: February 20, 2020, 02:27:43 AM »
Hi all,
The cockpit is now complete.
As I found with the engine, the cockpit required a lot of modifications and additions to bring it up to looking more like the actual aircraft cockpit.
Basically, the modifications and additions made were as follows:

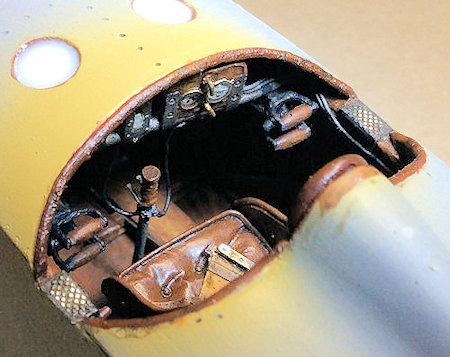
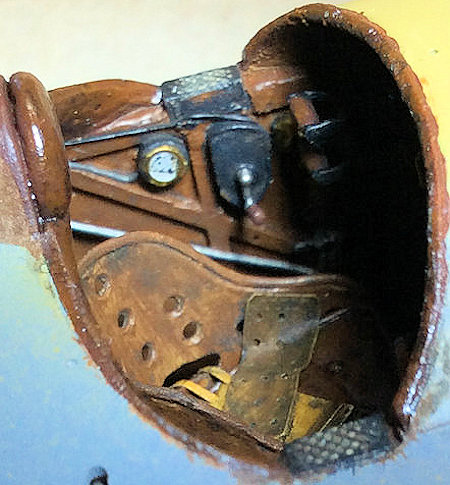
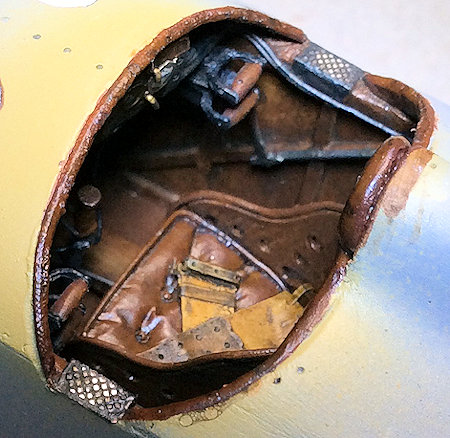
Fuselage inner side walls heavily thinned and both assembled machine guns modified to allow the guns to sit in their correct positions in the cockpit.
Forward bulkhead repositioned as the kit instructions were incorrect.
Support bar for the instrument panel and climb indicator replaced with micro-tube (kit part too short).
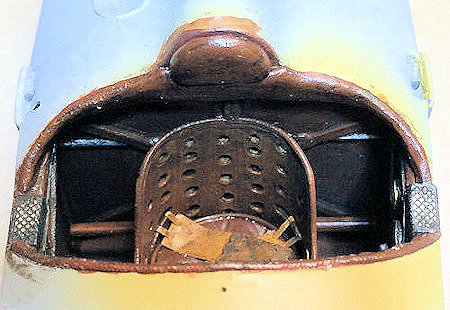
Cockpit rear padding created from ‘Milliput’ (kit photo-etch part unusable).
Cockpit forward edge padding bead added (not in the kit).
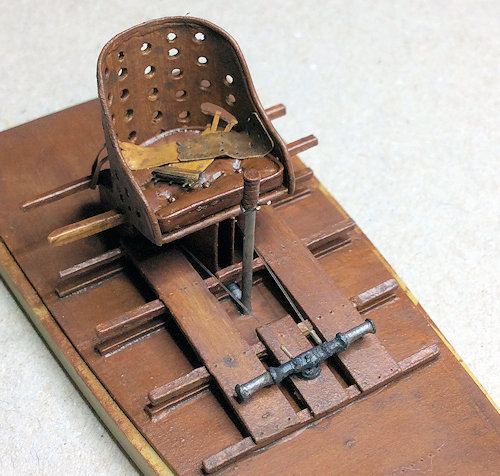
Pilot’s seat – addition holes in the seat back.
Pilot’s seat – slots created for the seat belts.
Pilot’s seat – seat support frame created (not in the kit).
Pilot’s foot board assembly modified to allow the control column to be positioned further away from the pilot’s seat.
Pilot’s seat top attachment to rear bulkhead added.
Panel switches replaced with micro-tube (kit photo-etch unrealistic).
‘Taurus Models’ starter magneto added (not in kit).
‘Taurus Models’ starter magneto safety switch added (not in the kit).
Tachometer ‘scratch’ replaced (kit part too large).
Engine half compression lever and control rod added (not in the kit).
Fuel contents pipe to gauge added – ‘PlusModels’ lead wire.
Oil pressure pipe to gauge added – ‘PlusModels’ lead wire.
Micro-tube used for control rods (Half compression control, Spark advance control, Fuel mixture control).
Cockpit window ports created using clear acetate sheet and in-filled with ‘Krystal Clear’.
Rudder control cables added (0.4 mm Nickel-Silver tube and 0.12 mm mono-filament).
Hole drilled through right side of fuselage (at engine forward right support strut location) – for cockpit controls to engine.
Control column machine gun triggers replaced with micro-tube (kit photo-etch unrealistic).
Machine gun trigger cables added (‘PlusModels’ lead wire).

Other than that, the cockpit was built straight out of the box!!

I forgot to take completion shots of the cockpits internals before closing it up.
However, there is the one shot on the cockpit floor assembly finished.

In the following photographs, the two ‘white discs’ are the cockpit window ports – the ‘Krystal Clear’ was still setting when I took the photographs,

Mike


Retired - 27 years RAF service then 20 years Military Aerospace Technical Author/editor.

Offline ondra

  • Hero Member
  • *****
  • Posts: 910
Re: Macchi M-5
« Reply #167 on: February 20, 2020, 03:15:44 AM »
My hats are off to your attention to details, dear sir!

This build has been a pleasure to watch indeed, keep up the great work.

Cheers

Ondra

Offline lone modeller

  • Hero Member
  • *****
  • Posts: 5317
Re: Macchi M-5
« Reply #168 on: February 20, 2020, 03:22:52 AM »
I completely agree with Ondra. Your attention to detail is second to none and the results show just how carefully you strive to achieve complete accuracy. A wonderfully instructive build log.

Stephen.

Offline Mike Norris

  • Hero Member
  • *****
  • Posts: 2212
  • RAF Old and Bold
    • Mikes WW1 Aircraft Models
Re: Macchi M-5
« Reply #169 on: February 20, 2020, 04:02:07 AM »
Hi all,
Thanks - I had problems getting onto the site after an IT glitch on the forum yesterday, but it seems all OK now.
Talking of build logs, my PDF build log that I'm compiling as I build the model is up to 185 pages already.
I think by the time I'm done it'll be the largest build log I've done to date!!

Mike


Retired - 27 years RAF service then 20 years Military Aerospace Technical Author/editor.

Offline RAGIII

  • Hero Member
  • *****
  • Posts: 18842
Re: Macchi M-5
« Reply #170 on: February 20, 2020, 04:35:57 AM »
The details are gorgeous but the painting really is Outstanding! The seat cushion leather is simply perfect!
RAGIII
"A man has to know his limitations": Harry Callahan

"Don't slop it on" Lynda Geisler

Offline RLWP

  • Hero Member
  • *****
  • Posts: 1494
  • Bodger
Re: Macchi M-5
« Reply #171 on: February 20, 2020, 04:53:39 AM »
Hi all,
Thanks - I had problems getting onto the site after an IT glitch on the forum yesterday, but it seems all OK now.

Yes, apparently yesterday went missing
Hendon for flying - the fastest way to the ground!

Offline bobs_buckles

  • Hero Member
  • *****
  • Posts: 3733
  • Freedom isn't free.
    • Bobs Buckles
Re: Macchi M-5
« Reply #172 on: February 20, 2020, 10:39:58 PM »
I could live live in the cockpit. So warm and cosy  :-*
Keep up the inspiring work.

vB


https://www.bobsbuckles.co.uk/

Last Minute Man Of Faith

Offline RLWP

  • Hero Member
  • *****
  • Posts: 1494
  • Bodger
Re: Macchi M-5
« Reply #173 on: February 20, 2020, 10:44:08 PM »
I could live live in the cockpit. So warm and cosy  :-*

Until you start the engine, then someone begins to throw buckets of water in your face

Richard
Hendon for flying - the fastest way to the ground!

Offline bobs_buckles

  • Hero Member
  • *****
  • Posts: 3733
  • Freedom isn't free.
    • Bobs Buckles
Re: Macchi M-5
« Reply #174 on: February 21, 2020, 02:59:44 AM »
I could live live in the cockpit. So warm and cosy  :-*

Until you start the engine, then someone begins to throw buckets of water in your face

Richard

 ;D ;D ;D


https://www.bobsbuckles.co.uk/

Last Minute Man Of Faith

Offline Alexis

  • Hero Member
  • *****
  • Posts: 7947
  • Love the self
Re: Macchi M-5
« Reply #175 on: February 21, 2020, 12:53:59 PM »
I could live live in the cockpit. So warm and cosy  :-*

Until you start the engine, then someone begins to throw buckets of water in your face

Richard

Well ...until lift off  :-X


Excellent attention to the details Mike . The pit is just out standing . Looking forward on the next up-date


Terri
Hurra ! , Ich Leben Noch
Body and life is a vessel we use to travel the planet . Femininity is the gift , The miracle comes from what we do with it .

Offline kensar

  • Hero Member
  • *****
  • Posts: 2505
  • Reshaping the world - one piece at a time.
Re: Macchi M-5
« Reply #176 on: February 21, 2020, 10:47:45 PM »
Nice work on that office space, Mike.

Offline Mike Norris

  • Hero Member
  • *****
  • Posts: 2212
  • RAF Old and Bold
    • Mikes WW1 Aircraft Models
Re: Macchi M-5
« Reply #177 on: February 27, 2020, 07:40:00 AM »
Hi all,
The fuselage has now been prepared for application of the decals, which hopefully will be a combination of wood effect decals and kit decals.
If that doesn't work out I'll revert to creating the wood effects using oil paints.
The actual aircraft had a Latin legend along both sides of the fuselage - ‘FRANGAR NON FLECTAR’.
Some translation for this are:
'I am broken, I am not deflected'
’I’ll break but will not bend’
'I will break, not bow'
'I am broken, I am not deflected'
This is not supplied as a decal in the kit, which is not surprising given it's not even shown on the kit colour illustrations!!
As there is no aftermarket for this I have to resort to creating a mask set, which I've done on my 'Cricut Air 2' cutting machine.
Hopefully the mask won't peel off and decals or paint when I remove them, as airbrushing this legend is literally the last job on the fuselage.

I've added the 'dome' in front of the windscreen and what appears to be a rudimentary gun sight. The purpose of this 'dome' is unclear.
I've primed the fuselage in white as our own 'Des' noted that the decals were somewhat 'see through', so he had to add a white base under the roundels.
Also the wood effect decals need a white background.
I've added pre-shading along the wood panel nail lines, which I created with a 'Rosie the Riveter' tool.

Mike


« Last Edit: February 27, 2020, 09:58:10 AM by Mike 'Sandbagger' Norris »


Retired - 27 years RAF service then 20 years Military Aerospace Technical Author/editor.

Offline Mike Norris

  • Hero Member
  • *****
  • Posts: 2212
  • RAF Old and Bold
    • Mikes WW1 Aircraft Models
Re: Macchi M-5
« Reply #178 on: February 28, 2020, 03:41:05 AM »
Hi all,
An example below of the 'translucent' decals supplied in the kit.
When applied over other decals or paint, the colour below shows through.
This means a white base colour needs to be applied, both under individual decals as well as for the wood effect decals.
It also means the individual wood decals will need to be cut around the kit decals - tricky, but worth trying rather than using oil paint for wood effect and then painting on a white base under each decal location.

Mike


Retired - 27 years RAF service then 20 years Military Aerospace Technical Author/editor.

Offline RAGIII

  • Hero Member
  • *****
  • Posts: 18842
Re: Macchi M-5
« Reply #179 on: February 28, 2020, 03:53:38 AM »
Nice work on the Dome and I am sure you will get the decals and underpainting all sorted out!
RAGIII
"A man has to know his limitations": Harry Callahan

"Don't slop it on" Lynda Geisler