Author Topic: Aviatik 'Berg' D.I  (Read 32405 times)

Offline FAf

  • Hero Member
  • *****
  • Posts: 1227
Re: Aviatik 'Berg' D.I
« Reply #75 on: October 24, 2019, 04:15:43 AM »
Good work on solving the issues!
Those anchor points for the cross bracing, are they kind of common? Would for instance an Albatros D.V have anchor points in the same place?
/Fredrik

Offline Mike Norris (UK)

  • Hero Member
  • *****
  • Posts: 2514
  • RAF Old and Bold
    • Mikes WW1 Aircraft Models
Re: Aviatik 'Berg' D.I
« Reply #76 on: October 24, 2019, 06:27:41 AM »
Hi Faf,
The cross bracing on this aircraft was between the top of undercarriage front struts to the bottom of the of the struts.
However, as I had to heavily 'modify' the undercarriage assembly I could only fit the bottom bracing anchors to the outer edges of the axle fairing.
Certainly cross bracing was fitted to aircraft of WW1, sometimes only between the front undercarriage struts and sometimes between front and rear struts.

The Albatros D.v had cross bracing fitted but only between the rear undercarriage struts,

Mike
« Last Edit: October 24, 2019, 07:53:23 PM by Mike 'Sandbagger' Norris »


Retired - 27 years RAF service then 20 years Military Aerospace Technical Author/editor.

Offline Mike Norris (UK)

  • Hero Member
  • *****
  • Posts: 2514
  • RAF Old and Bold
    • Mikes WW1 Aircraft Models
Re: Aviatik 'Berg' D.I
« Reply #77 on: October 24, 2019, 06:37:16 AM »
Hi all,
I've been working on preparing the wings, fin/rudder, ailerons, tail planes, elevators and their associated support struts.
The struts should, I think, have steel reinforcing pins moulded through them, but I found the 'Z' shaped cabane struts had ends without pins.
Also the fuselage indents for locating these struts had no locating hole.
The single piece fin and rudder had no locations for attaching it to the fuselage and neither did the tail planes.
The separate ailerons and elevators also has no locating pins/holes.

Therefore I added support pins of 0.6 mm diameter for the wing struts and ailerons and 0.4 mm diameter pins to locate the fin/rudder, elevators and tail planes.

Mike


Retired - 27 years RAF service then 20 years Military Aerospace Technical Author/editor.

Offline FAf

  • Hero Member
  • *****
  • Posts: 1227
Re: Aviatik 'Berg' D.I
« Reply #78 on: October 24, 2019, 06:41:42 AM »
Hi Faf,
The cross bracing on this aircraft was between the top of undercarriage front struts to the bottom of the of the struts.
However, as I had to heavily 'modify' the undercarriage assembly I could only fit the bottom bracing anchors to the outer edges of the axle fairing.
Certainly cross bracing was fitted to aircraft of WW1, sometimes only between the front undercarriage struts ans sometimes between front and rear struts.

The Albatros D.v had cross bracing fitted but only between the rear undercarriage struts,

Mike

Thank you so much for your answer. I know I'm sort of stealing space here in your thread. So normally the anchor point would be on the actual struts... that makes sense I guess. /F

Offline RAGIII

  • Hero Member
  • *****
  • Posts: 19702
Re: Aviatik 'Berg' D.I
« Reply #79 on: October 24, 2019, 09:41:16 PM »
Continuing to be a lesson in Modeling Excellence!
RAGIII
"A man has to know his limitations": Harry Callahan

"Don't slop it on" Lynda Geisler

Offline kensar

  • Hero Member
  • *****
  • Posts: 2513
  • Reshaping the world - one piece at a time.
Re: Aviatik 'Berg' D.I
« Reply #80 on: October 24, 2019, 10:20:22 PM »
I look at kits as just raw material to start with and embellish.  This kit clearly fits in that category and is a kit you have to build - not just assemble.
You are doing it justice, Mike.

Offline Mike Norris (UK)

  • Hero Member
  • *****
  • Posts: 2514
  • RAF Old and Bold
    • Mikes WW1 Aircraft Models
Re: Aviatik 'Berg' D.I
« Reply #81 on: October 25, 2019, 06:38:17 AM »
Hi all,
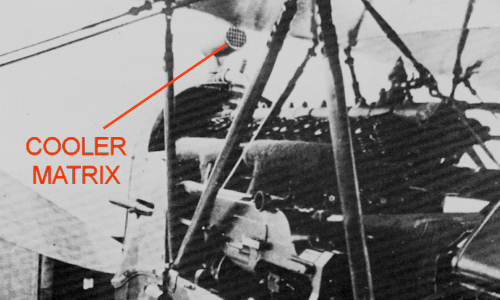
On the top of the fuselage and to the rear of the radiator is a condensation matrix for cooling radiator steam back to liquid and returning it back into the cooling system through a pipe connected to the rear of the assembly.
Apparently this avoided a build up of steam pressure being lost through the filler cap and losing coolant. 
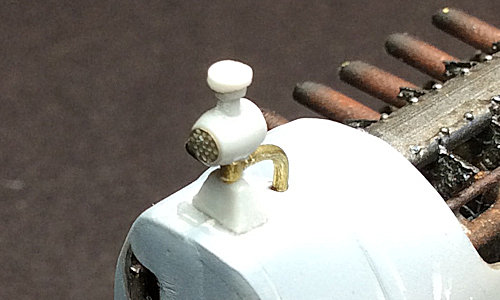
Anyway I wasn't happy with the resin one piece part in the kit.
I felt it was too large at the base and anyway the top was slightly off centre with the bottom.
Also the kit doesn't appear to have the 90 degree pipe at the back of the assembly.
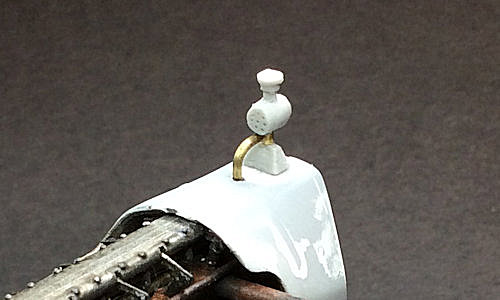
So I cut the part in two, re-shaped the base, connected them with brass tube and added the rear pipe using annealed 0.8 mm brass rod.
Strangely the photo-etch in the kit supplies only one 'matrix' disc for the condensation matrix, which presumably like a radiator, would have the matrix from front to rear?
I used the photo-etch from the front of the matrix (as that will be more visible) and drilled 0.3 mm diameter holes in the rear face to replicate the matrix,

Mike


« Last Edit: October 28, 2019, 07:37:35 AM by Mike 'Sandbagger' Norris »


Retired - 27 years RAF service then 20 years Military Aerospace Technical Author/editor.

Offline Alexis

  • Hero Member
  • *****
  • Posts: 8098
  • Love the self
Re: Aviatik 'Berg' D.I
« Reply #82 on: October 25, 2019, 11:43:55 AM »
most excellent Mike ! :) 8) 8)


Terri
Hurra ! , Ich Leben Noch
Body and life is a vessel we use to travel the planet . Femininity is the gift , The miracle comes from what we do with it .

Offline Juan

  • Hero Member
  • *****
  • Posts: 2476
  • All gave some, some gave all.
Re: Aviatik 'Berg' D.I
« Reply #83 on: October 25, 2019, 12:02:00 PM »
Outstanding Mike, your details really shine.

Offline RAGIII

  • Hero Member
  • *****
  • Posts: 19702
Re: Aviatik 'Berg' D.I
« Reply #84 on: October 26, 2019, 12:21:40 AM »
Stunning work!
RAGIII
"A man has to know his limitations": Harry Callahan

"Don't slop it on" Lynda Geisler

Offline UFAG

  • Hero Member
  • *****
  • Posts: 644
Re: Aviatik 'Berg' D.I
« Reply #85 on: October 26, 2019, 07:32:17 AM »
Getting along very nice..!!

Offline Mike Norris (UK)

  • Hero Member
  • *****
  • Posts: 2514
  • RAF Old and Bold
    • Mikes WW1 Aircraft Models
Re: Aviatik 'Berg' D.I
« Reply #86 on: November 02, 2019, 05:03:31 AM »
Hi all,
Things are progressing slowly right now until I receive some decals I need.
I've applied small serial number decals to the struts and fuselage and painted the condenser assembly on the forward, top fuselage.
The fuselage underside has had wood decals (HGW Models) applied. Very thin and fragile!! Weathering and joint seams yet to be applied.
Tail skid painted and under surfaces pre-shaded and prepared for CDL decals.

In the meantime I'll crack on painting the figure,

Mike


Retired - 27 years RAF service then 20 years Military Aerospace Technical Author/editor.

Offline lone modeller

  • Hero Member
  • *****
  • Posts: 5529
Re: Aviatik 'Berg' D.I
« Reply #87 on: November 02, 2019, 09:20:57 AM »
Just catching up with this one - some absolutley superb details being added here. It may be a kit but you are turning it into a semi-scratch build with all of the extra details.

Stephen.

Offline RAGIII

  • Hero Member
  • *****
  • Posts: 19702
Re: Aviatik 'Berg' D.I
« Reply #88 on: November 03, 2019, 01:10:28 AM »
Really taking shape now. Looks Fantastic!
RAGIII
"A man has to know his limitations": Harry Callahan

"Don't slop it on" Lynda Geisler

Offline Mike Norris (UK)

  • Hero Member
  • *****
  • Posts: 2514
  • RAF Old and Bold
    • Mikes WW1 Aircraft Models
Re: Aviatik 'Berg' D.I
« Reply #89 on: November 03, 2019, 05:46:03 AM »
Hi all,
Austro-Hungarion pilot completed

Mike


« Last Edit: November 07, 2019, 02:18:11 AM by Mike 'Sandbagger' Norris »


Retired - 27 years RAF service then 20 years Military Aerospace Technical Author/editor.