Author Topic: Completed: 1/72 scratch build Caproni Ca 5 Group Build After Build  (Read 12332 times)

Offline gbrivio

  • Hero Member
  • *****
  • Posts: 1681
Re: 1/72 scratch build Caproni Ca 5
« Reply #60 on: August 04, 2019, 07:12:28 AM »
Sorry for late commenting, you make this masterfully and your Caproni is becaming really beautiful.
Ciao
Giuseppe

Offline Bluesfan

  • Sr. Member
  • ****
  • Posts: 456
    • MW Miniature Work
Re: 1/72 scratch build Caproni Ca 5
« Reply #61 on: August 04, 2019, 09:36:31 AM »
I've only just seen the pics of your colour scheme - you've done a brilliant job there!
And I'm very familiar with it from the Munson book, I have all of that series, very heavily thumbed, especially while I've been speculating about the kits we needed to see in injected plastic. And a large Caproni is near the top of my personal list, and here you are making an excellent case for it :)

Cheers
Mark

Offline lone modeller

  • Hero Member
  • *****
  • Posts: 5300
Re: 1/72 scratch build Caproni Ca 5
« Reply #62 on: August 11, 2019, 07:34:10 AM »
Evening All,

Thanks Guiseppe and Mark for dropping by and leaving your kind comments.

There is not too much to show for my recent efforts, but I have rigged the outer wing bays and the bays between the engines and fuselage nacelle: this takes more time than seems reasonable sometimes, but I think that it is easier on a model of this size to rig some of it before carrying on with further details. There will still be more rigging to add to the wings, but that will be finished at a later stage because otherwise it could be easily damaged:


The observant among you will have seem two white bits sticking up from the lower wing undersurface - they are the undercarriage legs. They were made from 60 thou card for the large sections, 30 x 40 card for the supports and 30 thou rod for the struts:


The wheels were mounted in pairs on each side of the axles - making eight in total. These are already ready to fit but again I will not be doing so until later to stop me from accidentally breaking them off while handling the model.

I have also started to make the parts for the rear gunner's platform - this was mounted above the pusher engine in a manner similar to the Ca III. These are the parts cut from card and rod. The rings were cut from 20 thou card using a pair of dividers to score the plastic - a method I first used when I built  Frog Vimy in 1978:


Thanks for looking.

Stephen.

Offline RAGIII

  • Hero Member
  • *****
  • Posts: 18793
Re: 1/72 scratch build Caproni Ca 5
« Reply #63 on: August 11, 2019, 01:49:55 PM »
Sorry I missed your last update so will just comment on both here. Looks great as a biplane and the rigging is superb! Terrific job on the gunners platform parts as always!
RAGIII
"A man has to know his limitations": Harry Callahan

"Don't slop it on" Lynda Geisler

Offline AndRoby67

  • Sr. Member
  • ****
  • Posts: 278
Re: 1/72 scratch build Caproni Ca 5
« Reply #64 on: August 13, 2019, 03:11:35 AM »
Hi!
Rigging this "monster" is a model inside a model. Very well done!!
I saw the code 14610 on the nose, did you find a photo of the original one? It's really new to me.
Fantastic works!
Roberto

Offline lone modeller

  • Hero Member
  • *****
  • Posts: 5300
Re: 1/72 scratch build Caproni Ca 5
« Reply #65 on: August 13, 2019, 04:33:37 AM »
Rick: many thanks for dropping by and leaving your comment - much appreciated.

Roberto: the code is 41610. I found this is Munson's Bombers 1914-1919 p 82-83. The only information given is that it was of the Corpo Aeronautica Militare which is not very helpful! I have found several photographs of different machines on the net but not one of this particular aircraft.

Stephen.

« Last Edit: August 14, 2019, 05:44:27 AM by lone modeller »

Offline AndRoby67

  • Sr. Member
  • ****
  • Posts: 278
Re: 1/72 scratch build Caproni Ca 5
« Reply #66 on: August 13, 2019, 06:23:24 AM »
Hi Stephen,
when I saw the serial on the nose (yes, 41610, sorry!) I started a search in the web, so I came across the three sides color profile in "Bombers". Sincerely, this is an old book and many of the color profiles are out-of-date. Again, take it as references (apart from measures of the aircrafts) is an high risk to make something wrong. Of course, you decide the fate of your model, but scratchbuilding this jewel in my opinion deserve better treatment for final "dress".
My doubts are about the roundels instead of color sections underside of wings and the camo over the wings and fuselages. There was no fixed rules, some of them are comouflaged and some not. Only original photos can say the truth.
"Corpo Aeronautica Militare" means...nothing! The real name was "Aviazione del Regio Esercito" (Aviation of the Royal Army).
Cheers!
Roberto

Offline lone modeller

  • Hero Member
  • *****
  • Posts: 5300
Re: 1/72 scratch build Caproni Ca 5
« Reply #67 on: August 14, 2019, 05:53:56 AM »
Thanks for the comments Roberto. I know that some Ca 5 wings and upper fuselage surfaces were camouflaged with the green mottle because they are clearly visible in photographs. I cannot be certain that 41610 was so coloured - I am taking a guess that it was. With reference to the underside markings on the wings, do you know when the colour sections were discontinued/replaced with roundels? I am aware that colour bands were used on the undersides of Italian aircraft in the early part of the Italian campaign, but I do not know when these were changed to roundels.

I am taking a risk with authenticity re-markings because I do not have enough modern sources to consult, and even then as you write, unless there are photographs or documents which can show otherwise, I am happy to assume that the machine which I am modelling is correct. This is a perennial problem with aircraft markings from this time (and later in some cases) - just what were the colours and individual markings of a given machine at a particular time? Even with photographs there is frequently room for interpretation....

Stephen.

Offline AndRoby67

  • Sr. Member
  • ****
  • Posts: 278
Re: 1/72 scratch build Caproni Ca 5
« Reply #68 on: August 15, 2019, 03:56:07 AM »
Hi Stephen!
We started the war with a simple "circle and bar" painted in black under the wings. This was ordered only for recognizing from the ground, there was official documents about that. Some of our "painter" misleading that and some of our planes had these symbols over the wings too (in the "Volandia" museum there is a Caproni 18 with these markings).
We changed with colored sections in 1916, again with official orders and regulations, of green on starboard and red on port side. Also if I saw color profiles and models with this, we NEVER USED white for the central sections.
This scheme was used until the end of war, and all the aeroplanes that came out from war service retained the colored sections. Coming back to roundels was slowly and involved the aircraft produced after the war or in the middle of building when war finished.
About your Ca.5, you choose a specific nose configuration. This is a limit if you want to change your subject. There are in internet some photos about Ca.5 used in Argentina or USA during a "selling mission" after the war that had your nose. Or the one in "ELTA" (serial 12042), the first meeting in 1920 in Amsterdam for the next Civil Companies future. I have something, [email protected] is my email address, if you need help.
Bye!
Roberto

Offline NinetythirdLiberator

  • Hero Member
  • *****
  • Posts: 1587
Re: 1/72 scratch build Caproni Ca 5
« Reply #69 on: August 16, 2019, 01:50:05 PM »
Hi Stephen,

Like the others, I applaud your Caproni mightily!  Another tour de force of scratch building. Simply impressive...

Cheers,
Dan

Offline PrzemoL

  • Hero Member
  • *****
  • Posts: 4853
  • There was Eru... and he made first the Ainur...
    • Przemysław Litewka
Re: 1/72 scratch build Caproni Ca 5
« Reply #70 on: August 16, 2019, 09:13:09 PM »
Hi Stephen,

Like the others, I applaud your Caproni mightily!  Another tour de force of scratch building. Simply impressive...

Cheers,
Dan

My words exactly.
Ash nazg durbatuluk, ash nazg gimbatul,
Ash nazg thrakatuluk, agh burzum-ishi krimpatul.

Offline lone modeller

  • Hero Member
  • *****
  • Posts: 5300
Re: 1/72 scratch build Caproni Ca 5
« Reply #71 on: August 18, 2019, 06:50:51 AM »
Evening All,

Many thanks Dan and Prez for your kind remarks - I much appreciate them.

Roberto: I intend to leave the nose and markings as they are and will assume that this model represents a post-war machine as trying to make alterations at this stage would be very difficult. Indeed it would probably be easier to start again! However I am very grateful for the information which you have provided, especially about the markings of aircraft, because I for one know very little about this aspect of the subject. I have another Italian aircraft on my to do list and have a DataFile as a source but I may contact you for further advice if/when I get around to making it.

Well I have been rigging more of the wings - almost finished now, so once again a lot of time taken but little of photographic interest so we will move on to the items added which are more photogenic.

The radiators for the engine in the nacelle were mounted in the nose of the nacelle and on the forward cabane struts. Those on the struts have been fitted while I was rigging in this area:
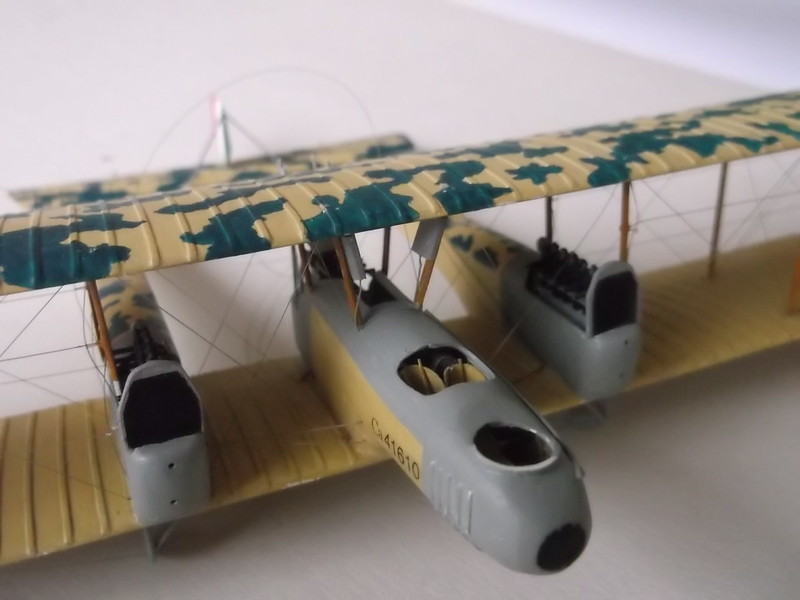


In the above view you can also see the ends of the rigging wires which ran horizontally across the front struts with a second wire running vertically up the end struts. I drilled all of the struts so that I could pass a thread through them and inserted this first. Then I threaded a vertical wire starting at the top, passing it though the hole in the wing with the other bracing wire and exiting via the second hole down in the strut. I repeated this procedure for the lower of the vertical wires, in this case the upper strut hole was the starting point. To make the shallow V shape and represent the reinforced ends of the horizontal wires I pushed through a small piece of thin stretched sprue which sits alongside the horizontal wire: this was glued to the vertical wire and the strut. When the sprue - strut joint was dry I could gently pull the vertical wires taught and CA the ends before trimming them. In all a complex procedure which is difficult to explain and not much easier to accomplish! I just hope that this makes sense. A sane modeller would not have bothered because only anoraks would know about this arrangement anyway!

The second fiddly bit was the gun platform at the rear of the upper wing. Assembly was straightforward - fixing it to the model was rather less so, but I managed in the end:


NB the gun ring has not been added yet - that will be put on later.

Finally I started to put on the rudders. There were three of these so I put the middle one on first because it is easier to work thet way - leaves more finger/tweezer room for the outer ones:


Those pesky threads in the last photo will eventually become control wires - and I will be very happy indeed to put them in place as they are rarely under control at the moment, indeed it seems that much of the time they are out of control!

So if you have been, thanks for looking.

Stephen.

Online lcarroll

  • Administrator
  • Hero Member
  • ******
  • Posts: 8547
Re: 1/72 scratch build Caproni Ca 5
« Reply #72 on: August 18, 2019, 11:04:00 AM »
   As with all of your works Stephen, this is just mind boggling. You may have some reservations regarding the time period the subject carried this pattern however it's beautifully rendered as is the model itself. Great Build and craftsmanship of the tremendously impressive category we've come to expect from you. Wonderful!
Cheers,
Lance

Offline kensar

  • Hero Member
  • *****
  • Posts: 2503
  • Reshaping the world - one piece at a time.
Re: 1/72 scratch build Caproni Ca 5
« Reply #73 on: August 19, 2019, 09:56:33 PM »
Excellent building, Stephen.  The rigging is, indeed, very complex and you are solving the 'problems' very astutely.  This model is really coming together.

Offline RAGIII

  • Hero Member
  • *****
  • Posts: 18793
Re: 1/72 scratch build Caproni Ca 5
« Reply #74 on: August 20, 2019, 12:28:23 AM »
Outstanding rigging and the gun platform looks Terrific! As always your build is a joy to follow!
RAGIII
"A man has to know his limitations": Harry Callahan

"Don't slop it on" Lynda Geisler