Author Topic: Lloyd C.V 1/32 Scratch Build Project  (Read 45077 times)

Offline bobs_buckles

  • Hero Member
  • *****
  • Posts: 3827
  • Freedom isn't free.
    • Bobs Buckles
Re: Lloyd C.V 1/32 Scratch Build Project
« Reply #225 on: June 14, 2013, 10:53:56 PM »
Looking great, Bob!
Keep it coming!!!   ;)

Von Buckle


https://www.bobsbuckles.co.uk/

Last Minute Man Of Faith

Offline pepperman42

  • Hero Member
  • *****
  • Posts: 4507
  • Sergeant, my brown pants.......
Re: Lloyd C.V 1/32 Scratch Build Project
« Reply #226 on: June 14, 2013, 11:25:09 PM »
Wish I could get that much done when Im too busy to model. Amazing work!!!!!

Steve

Offline lcarroll

  • Administrator
  • Hero Member
  • ******
  • Posts: 8660
Re: Lloyd C.V 1/32 Scratch Build Project
« Reply #227 on: June 15, 2013, 02:45:21 AM »
Magnificent Bob, keep at her but easy on the gas pedal. I echo the earlier comment, looks very like WNW's best!
Cheers,
Lance

Offline rhallinger

  • Hero Member
  • *****
  • Posts: 1976
Re: Lloyd C.V 1/32 Scratch Build Project
« Reply #228 on: June 15, 2013, 05:44:48 AM »
Thanks guys!  Your encouragement really helps.  I hope that the top wing will go on okay, what with the odd A-H strut design of inverted V cabanes and main wing struts angled inward about 40 degrees! :o  I'm counting on the jig to get me through. ;) 

The water tank is fabricated and awaiting brass paint.  I'm still trying to figure out precisely how I will sling it below the cabanes under the top wing center joint.  Should be exciting!  Still have to fabricate the exhaust pipes, the observer's cage and a few detail odds and ends, but I'm starting to run out of things to make!  A good sign, I guess.  Now it's time to put it all together and hope everything fits right!  ;D   We're getting close.  8)

Regards,

Bob

Offline miamiangler

  • Full Member
  • ***
  • Posts: 194
Re: Lloyd C.V 1/32 Scratch Build Project
« Reply #229 on: June 16, 2013, 09:29:45 AM »
looking great ,like what you have done so far .

                                                                  Willi

Offline rhallinger

  • Hero Member
  • *****
  • Posts: 1976
Re: Lloyd C.V 1/32 Scratch Build Project
« Reply #230 on: June 19, 2013, 01:09:17 PM »
Here's a little more progress this week.  I have mounted the cabane struts in preparation for mounting the top wing.  However, before doing that I will need to complete the radiator piping above the engine, the mounting bracket for the radiator, and the exhaust pipes.  Here are the affixed cabane struts:


Further progress will be slowed by work obligations for the next week or so.  See you at the end of June!

Regards,

Bob

Offline uncletony

  • Hero Member
  • *****
  • Posts: 4392
    • Aircraft In Pixels
Re: Lloyd C.V 1/32 Scratch Build Project
« Reply #231 on: June 19, 2013, 01:24:43 PM »
Oooooooooh that looks really nice

Offline pepperman42

  • Hero Member
  • *****
  • Posts: 4507
  • Sergeant, my brown pants.......
Re: Lloyd C.V 1/32 Scratch Build Project
« Reply #232 on: June 20, 2013, 09:24:24 AM »
Lovely engineering on this - as usual!!

Steve

Offline Chris Johnson

  • Hero Member
  • *****
  • Posts: 1959
Re: Lloyd C.V 1/32 Scratch Build Project
« Reply #233 on: June 20, 2013, 10:31:44 PM »
You really do exceptional work Bob.

Cheers,

Chris
You can have it good; You can have it fast; you can have it cheap. Pick any two, but all three are impossible.

Offline GAJouette

  • Hero Member
  • *****
  • Posts: 3579
  • " Beware of the Spanish Inquisition"
Re: Lloyd C.V 1/32 Scratch Build Project
« Reply #234 on: June 21, 2013, 12:20:44 AM »
  Bob,
As always exceptionally beautiful works my old friend.
Highest Regards,
Gregory Jouette
" What Me Worry"

Offline rhallinger

  • Hero Member
  • *****
  • Posts: 1976
Re: Lloyd C.V 1/32 Scratch Build Project
« Reply #235 on: June 28, 2013, 01:17:06 PM »
Okay, I've come up for air, so here's a little more progress.  The exhaust pipes have been crafted from Plastruct Butyrate tubing.  I chose Butyrate because it is softer than styrene and easier to bend without deforming or cracking (I also happened to have the right size in my scrap plastic box)  :).  I cut the tube to appropriate length and bent it over a paintbrush handle to match the drawings, then inserted a short length of brass rod of appropriate thickness in the attached end to serve as an attachment peg to the engine cylinders.  Here is how they look painted and tacked in place with white glue:


I have seen photos of both straight and bent pipes on Series 82 aircraft, and long and short pipes.  I suspect that field modification was not uncommon.  I like they way these look, so I'm sticking with them. 

Next up: the radiator piping.  We're getting close now to the assembly jig and top wing attachment! ;D

Cheers,

Bob

Offline Des

  • Administrator
  • Hero Member
  • ******
  • Posts: 9325
    • ww1aircraftmodels.com
Re: Lloyd C.V 1/32 Scratch Build Project
« Reply #236 on: June 28, 2013, 03:35:57 PM »
Lovely work on the pipes Bob, they certainly look the part, looking forward to seeing the top wing mounted.

Des.
Late Founder of ww1aircraftmodels.com and forum.ww1aircraftmodels.com

Offline Zabu

  • Hero Member
  • *****
  • Posts: 681
Re: Lloyd C.V 1/32 Scratch Build Project
« Reply #237 on: June 29, 2013, 03:27:33 AM »
Your work it's amazing.

The Loyd it's a beauty!

Cheers.

Offline Gisbod

  • Hero Member
  • *****
  • Posts: 2438
Re: Lloyd C.V 1/32 Scratch Build Project
« Reply #238 on: July 03, 2013, 03:31:39 AM »
These scratch builds are incredible - I wouldn't know where to start..

Guy
“Oh! I have slipped the surly bonds of Earth -
Put out my hand, and touched the face of God.”

P.O. John Gillespie Magee 1941

Offline rhallinger

  • Hero Member
  • *****
  • Posts: 1976
Re: Lloyd C.V 1/32 Scratch Build Project
« Reply #239 on: July 03, 2013, 09:31:52 AM »
Thanks everyone for your kind words.  They are appreciated, and the encouragement does really help with motivation.  I do feel the need to provide some encouragement back to all of you out there who are so supportive, by hastening to remind you that I am just an average modeler who is taking some chances and trying new techniques and working right through my fears to try and complete my first scratch buillt WWI aircraft.  Any modeler on this forum can do this, if they are willing to take the time and to persevere. 

Well, the front end is beginning to look a bit busy, just as it should:


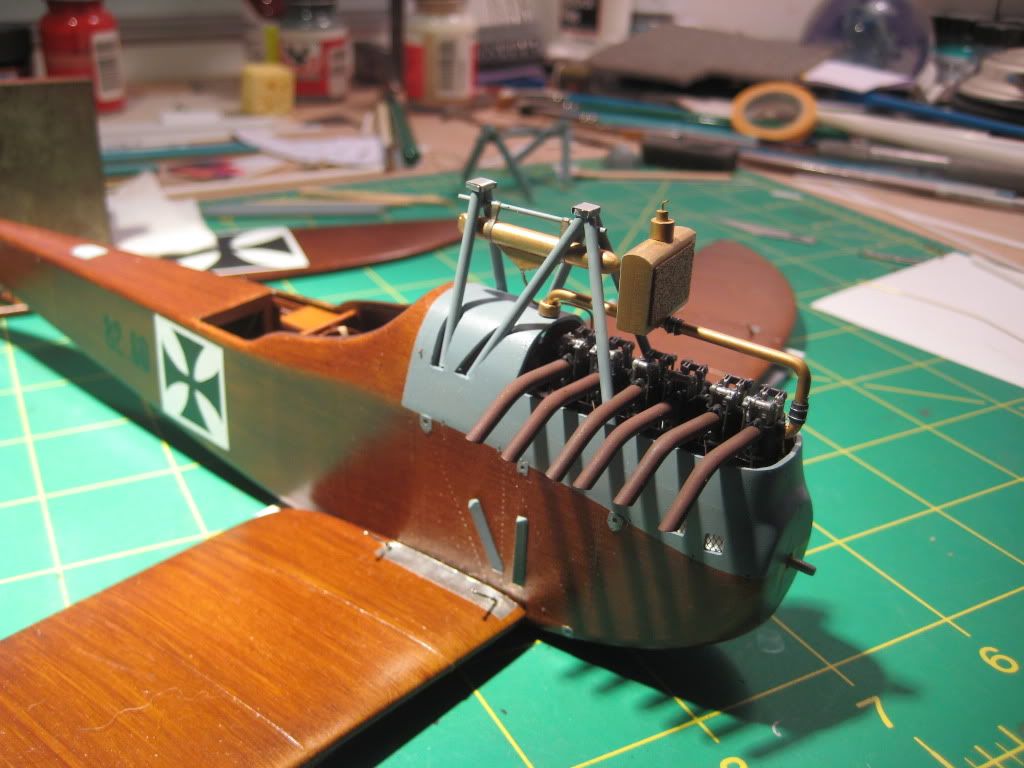
The radiator pipes and water tank are installed, but I just set the radiator in place for show.  It will require brass wire supports emanating from the forward cabane struts, and will not be permanently affixed until the top wing is in place.

A closer view:


The radiator pipes are made from another Plastruct product, butyrate plastic tubing with wire inside, which makes it very easy to bend into nice curves.  You can also trim back the plastic and leave a wire projection as a locating pin, which I did at both ends.  This was a leftover product from my model railroading days.  The insulation wraps are Tamiya tape slices painted weathered black, with silver-painted monofilament as the clasps.  The water tank is a length of Evergreen styrene tube with the ends shaped appropriately with filler and sanded to shape.  Painted tape strips (secured with CA) represent the metal straps which secured the tank.  Both pipes and tank are brush painted with Mr. Metal Brass, which gives a darker used look, IMO.  I may experiment to see if a darker wash would work to make them appear more weathered and tarnished.

I need to make the windscreen and install the radiator brackets, then the engine area will be complete.  Since the outboard lower interplane rigging runs to the top of the cabane assembly, I may do that before I install the top wing.  We'll see.  I think I will add the empennage elements soon also.  Then she'll really be looking like the avian beauty that was the Lloyd! ;D 

Regards,

Bob