Author Topic: Lloyd C.V 1/32 Scratch Build Project  (Read 44902 times)

Offline uncletony

  • Hero Member
  • *****
  • Posts: 4392
    • Aircraft In Pixels
Re: Lloyd C.V 1/32 Scratch Build Project
« Reply #135 on: February 24, 2013, 11:04:09 AM »
Oh... And nice update! Landing gear struts look great.

Offline rhallinger

  • Hero Member
  • *****
  • Posts: 1976
Re: Lloyd C.V 1/32 Scratch Build Project
« Reply #136 on: March 02, 2013, 10:36:40 AM »
Time for another mini-update.  Here are the wings, painted and Futured, ready for oils:


The lighting makes the color appear more reddish, when, in fact, it is Tamiya Desert Yellow, and looks such in natural light.  As I write this, the oils were applied last night per the Eric Larson tutorial in Hints & Tips here, and the wings immediatey ensconced in a dust-free container to dry foe a few days.  I think they look pretty goods, but no pix until they dry! ;)  Then, I seal the tops and flip them over to do the bottoms. :)

I've started my strut experimentation, but will be away this weekend, so maybe I'll have an answer next week.  Until then, take care everyone!

Regards,

Bob

Offline coyotemagic

  • Hero Member
  • *****
  • Posts: 7710
  • "Here's to not buggering it up." -Winston Chuchill
    • My Models
Re: Lloyd C.V 1/32 Scratch Build Project
« Reply #137 on: March 02, 2013, 10:50:34 AM »
Incredible looking wings, Bob!  She's coming along beautifully.
Cheers,
Bud
"All men dream: but not equally. Those who dream in the dark recesses of the night awake in the day to find all was vanity. But the dreamers of day are dangerous men, for they may act their dreams with open eyes, and make it possible." -T. E. Lawrence

Offline Chris Johnson

  • Hero Member
  • *****
  • Posts: 1959
Re: Lloyd C.V 1/32 Scratch Build Project
« Reply #138 on: March 02, 2013, 11:59:01 PM »
Looking really nice Bob! You do some masterful scratchbuilding.

One quick question. Do you airbrush Future or apply it with a brush? If airbrushed as I suspect it is, how many coats? I've yet to try airbrushing it for an overall gloss coat so any tips will be gratefully received. Lastly, are those Floquil paint bottles I see in your images?

Okay, that was more than one quick question.

Cheers,

Chris
You can have it good; You can have it fast; you can have it cheap. Pick any two, but all three are impossible.

Offline ALBATROS1234

  • Hero Member
  • *****
  • Posts: 2657
Re: Lloyd C.V 1/32 Scratch Build Project
« Reply #139 on: March 03, 2013, 04:27:20 PM »
not sure what bob has done but i apply future with a wide soft clean brush that i have set aside just to apply future. it self levels so well without a brushstroke. the only thing is to apply in thin coats and let dry for several hours or overnight before the second coat. if not the orig coat will sorta melt and gum up a bit. i tryed to airbrush future and it wasnt worth it to me. first it seemed to pool up and run even experimenting w pressures. second it seemed to dry in the airbrush quickly and began sputtering at which time i had to do a complete teardown and cleaning. just not necessary when you can so easily brush it on and rinse that brush off in faucet water right quick.you can thin future with water which makes a nice semigloss finish. or add future to acrylic paint to make translucent washes.

Offline rhallinger

  • Hero Member
  • *****
  • Posts: 1976
Re: Lloyd C.V 1/32 Scratch Build Project
« Reply #140 on: March 03, 2013, 10:03:07 PM »
Thanks Chris and Alby.  Interesting thoughts.  I airbrush Future, several thin coats until I am satisfied with the gloss sheen.  It does dry VERY quickly, and the airbrush requires regular and frequent flushing to remain clean.  With these wings, by the time I got around to the last one, the first was dry enough to apply another coat.  You can get away with that with airbrushing, as long as you are not applying too thickly.  Again, for these wings I was merely sealing and giving a smooth enough finish for the oils to flow smoothly when brushing the woodgrain.  IMO, I did not add enough gloss to apply decals well (except maybe lozenge).

I simply never thought about brushing Future, but thanks for sharing your technique Alby! :D  It would be a bit less work, so I will experiment with a brush as you have suggested, and see which way I like best.  I love learning new things here on the Forum! ;D 

Regards,

Bob

Offline Chris Johnson

  • Hero Member
  • *****
  • Posts: 1959
Re: Lloyd C.V 1/32 Scratch Build Project
« Reply #141 on: March 03, 2013, 11:32:20 PM »
not sure what bob has done but i apply future with a wide soft clean brush that i have set aside just to apply future. it self levels so well without a brushstroke. the only thing is to apply in thin coats and let dry for several hours or overnight before the second coat. if not the orig coat will sorta melt and gum up a bit.

Yep, that's how I employ it too. Your tip to let it dry several hours or even overnight between coats is one to pay heed to. When I first started using it, I thought it was drying almost instantaneously . . . but experience proved that it doesn't.

Cheers,

Chris
You can have it good; You can have it fast; you can have it cheap. Pick any two, but all three are impossible.

Offline mgunns

  • Hero Member
  • *****
  • Posts: 2255
Re: Lloyd C.V 1/32 Scratch Build Project
« Reply #142 on: March 05, 2013, 03:27:31 AM »
I have been applying Future with a Q-tip for years.  All of the above still applies.  You have to let it dry overnight or a long time so it doesn't gum up.  I too tried airbrushing with no luck.  On natural metal finishes it gives it a weathered look.  I did the  Monogram B-29 that way, and one of the guys in the club was amazed at the realistic weathering acheived.  When I told him what I did and the result wasn't planned but serrindipitous, he was dumbfounded.  I have also used a brush to good effect.

Good Luck

Mark
Mark

We few, we happy few.....

Offline rhallinger

  • Hero Member
  • *****
  • Posts: 1976
Re: Lloyd C.V 1/32 Scratch Build Project
« Reply #143 on: March 05, 2013, 02:29:13 PM »
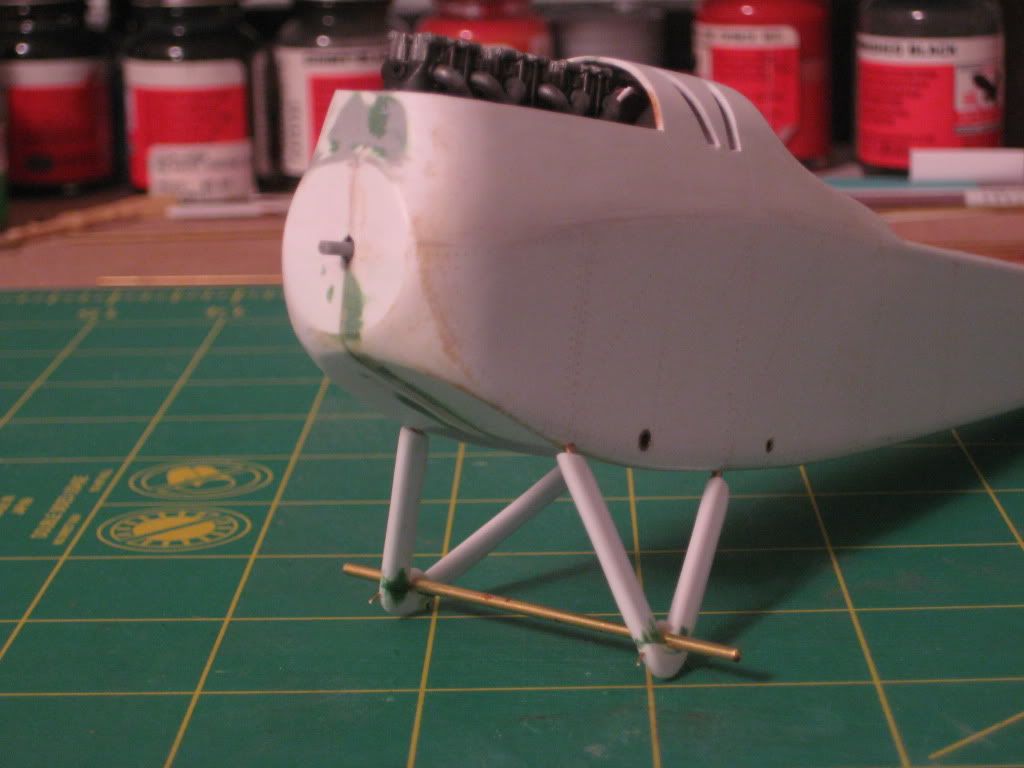
Slow but steady progress.  Here is a test fit of the landing gear.  I am pleased, but final positioning will require an assembly jig to be fabricated soon.


Here are the wing tops with dried oils.  I have not yet sealed them with Future and clear orange. 


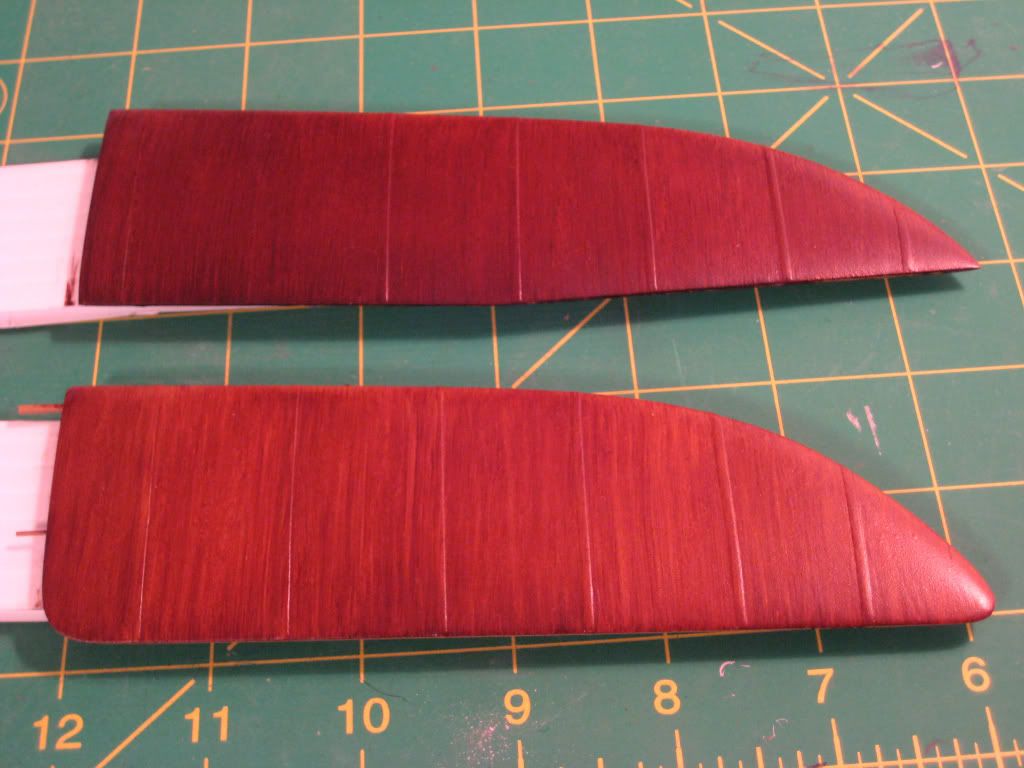
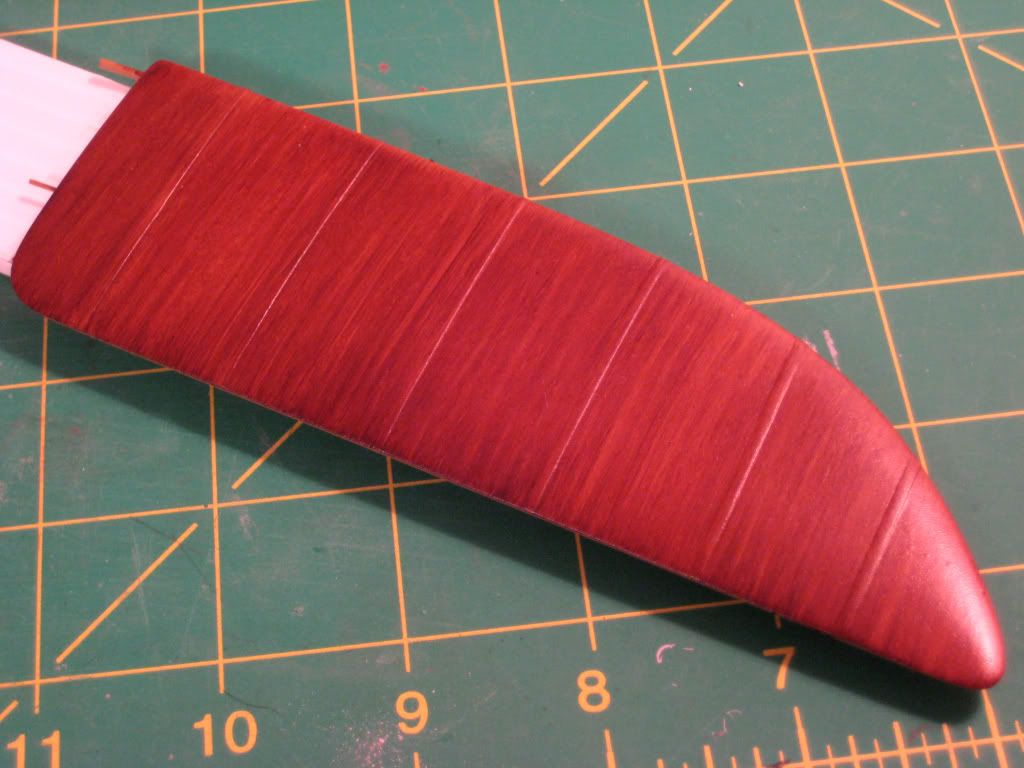
They appear a bit dark compared to other natural wood, but this is mahogany, which is generally darker than the pine or birch often seen on other aircraft.  They are not really as reddish as the pics appear due to the incandescent lighting.  I think it will be fine.  Now, after sealing, I flip them and do the other side.  While that's drying, I will build jigs, work on struts, etc.  Time to paint the fuselage too!

The next steps will challenge me.  I need to solder brass tube/rod for the cabane wing mounting bracket, this guy here:


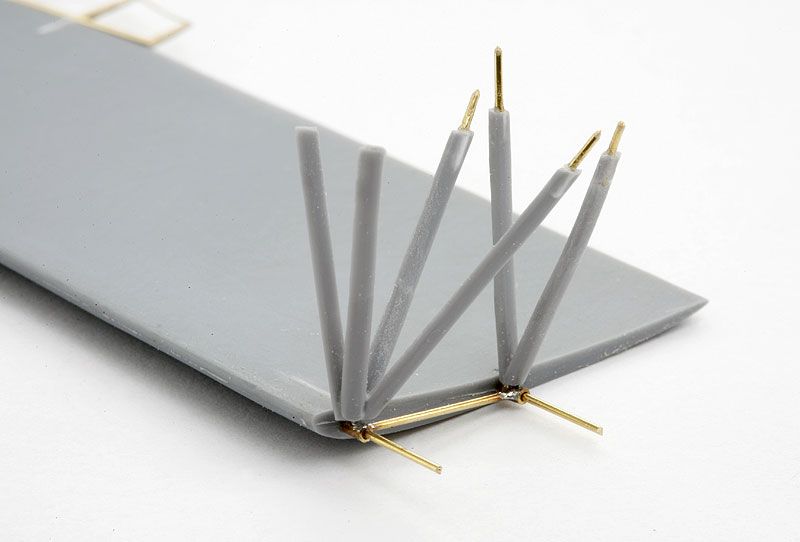
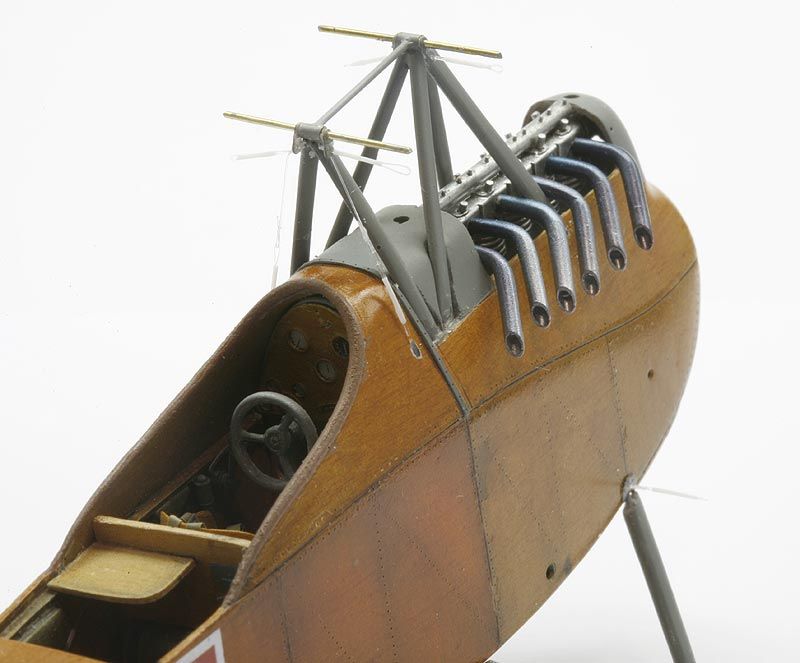
These superb examples are from Wojtek Fajga's stunning 1/48 Special Hobbies Lloyd.  I've got my work cut out for me! ;) 

My time period has been shortened by a week.  Mother-in-law is arriving on April 21st, and she occupies the spare bedroom where my modeling desk is located. ::)  I'll have to try to be finished by then! ;)

Chris, the bottles are PollyScale acrylic railroad colors, made by Floquil.  I find their color selection useful, and they airbrush and handbrush well.

Regards,

Bob
 

Offline GAJouette

  • Hero Member
  • *****
  • Posts: 3579
  • " Beware of the Spanish Inquisition"
Re: Lloyd C.V 1/32 Scratch Build Project
« Reply #144 on: March 11, 2013, 07:22:56 AM »
  Bob,
Outstanding update my friend.Her landing gear looks awesome! Keep the outstanding work.
Highest Regards,
Gregory Jouette
" What Me Worry"

Offline Epeeman

  • Hero Member
  • *****
  • Posts: 1419
Re: Lloyd C.V 1/32 Scratch Build Project
« Reply #145 on: March 12, 2013, 07:33:34 AM »
Bob,

Sorry, only just catching up on your project - I take hat off to you and others who knock a model up from scratch!

Great work so far and progressing nicely.  Good luck on the remainder of your build, mate.

Regards

Dave
As we say in fencing, what's the point?

Offline Galloway

  • Full Member
  • ***
  • Posts: 202
Re: Lloyd C.V 1/32 Scratch Build Project
« Reply #146 on: March 14, 2013, 06:24:08 AM »
Looking really Great Bob.............. Landing gear looks great.......... I'm torn between using brass or plastic when get around to fabricating mine .....

   Ken 
"Slàinte mhòr agad!"

Offline rhallinger

  • Hero Member
  • *****
  • Posts: 1976
Re: Lloyd C.V 1/32 Scratch Build Project
« Reply #147 on: March 14, 2013, 02:06:33 PM »
I hear you Ken. ;)  I ended up experimenting with brass tube for the landing struts, but  couldn't get it into a proper areodynamic shape, so I settled on rectangular styrene strip sanded to an elliptical cross section and connected with brass pins.  It seemed like the easist way to get the combination of ellipical cross-section and "V" shape, and appears to be  sufficiently sturdy.  Brass tubing would have worked fine for round cross-section struts.  The axle is brass tube and will have a styrene fairing formed around it eventually. 

Since I'm here, I might as well note that the elevators and rudder are now fabricated, the fuselage sides and top have been painted, sealed and oil-grained, and the oils are drying in the dust-free box for a few more days.  The wings are now sealed with clear and I am ready to cut the masks for painting the national markings on the wings.  The cabane struts are fabricated from Plastruct plastic coated wire, but the top wing mounting bracket still awaits my attention. 

The results of my wing strut experimentation established that bamboo skewers will be the easiest material to make these from, having the right combination of stiffness, narrow diameter and ease of sanding to the appropriate ellipitcal shape and drillng to accept brass locating pins.  I still have to fabricate the rest of these.

More on all of this later.  I hope to have more pictures soon.

Regards,

Bob 


Offline Des

  • Administrator
  • Hero Member
  • ******
  • Posts: 9325
    • ww1aircraftmodels.com
Re: Lloyd C.V 1/32 Scratch Build Project
« Reply #148 on: March 14, 2013, 02:33:16 PM »
Excellent progress Bob, I really like the way the wings turned out. The fuselage interior fitted beautifully within the fuselage halves, it's always a nice feeling when that happens. Looking forward to your next update.

Des.
Late Founder of ww1aircraftmodels.com and forum.ww1aircraftmodels.com

Offline Galloway

  • Full Member
  • ***
  • Posts: 202
Re: Lloyd C.V 1/32 Scratch Build Project
« Reply #149 on: March 15, 2013, 08:35:33 AM »
Bob,

  Here is a video just for you! Not Lloyds but still related!  Enjoy..........

 Ken


 http://www.europafilmtreasures.eu/PY/457/see-the-film-the_tyrolean_eagles_of_war_in_winter
« Last Edit: March 15, 2013, 08:41:04 AM by Galloway »
"Slàinte mhòr agad!"