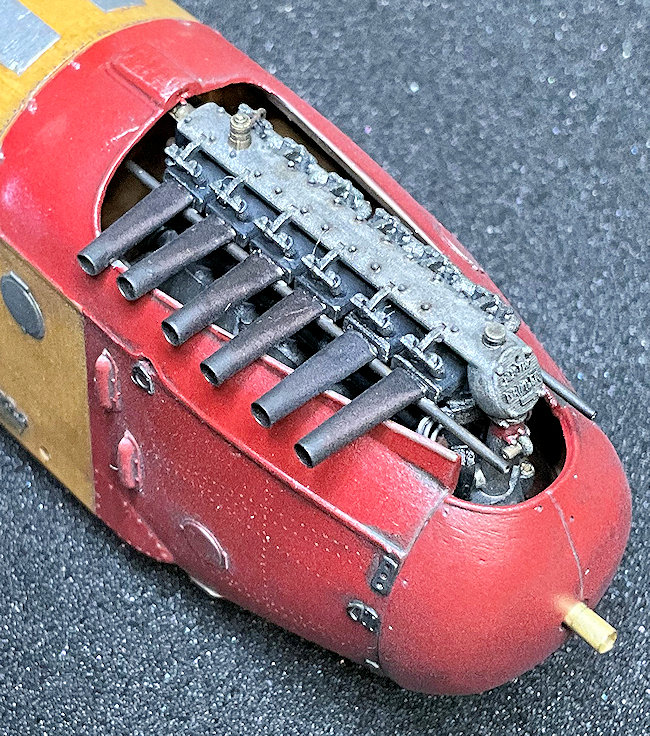
Recent Posts

Pages: 1 ... 8 9 [10]
91
Wow that is an outstanding restoration.

Stephen.
92
Under Construction / Re: Multi-Seat 2026 GB - Sopwith 1 1/2 Strutter 1/72
« Last post by lone modeller on June 07, 2026, 06:07:21 AM »
An interesting description of your travails and success in overcoming them. The fuselage markings look the part, especially the serial which from its size must have tried your patience.

The colour scheme that you have described sounds very interesting: just shows how much variation there could be at the time.

Stephen.
93
Hi all,
The upper surfaces of the flight surfaces have been airbrushed.
I've masked off then airbrush the the fin and fuselage markings.
The lower wing and tailplanes are fitted.

Next up is to apply the roundels to the fuselage and wings plus a couple of minor markings.
The kit supplies masks for the roundels, but I'll try the easier option of using decals from my spares collection.
Otherwise I'll use the masks,

Mike

94
What's New / 1/72 Peddinghaus/Eduard SPAD S.XIII
« Last post by enathan on June 07, 2026, 03:03:23 AM »
I don't know if this is new but it's new to me  :)
Peddinghaus Decals offer 6 kits of the SPAD S.XIII in 1/72, with plastic by Eduard and decals by Peddinghaus.
Each kit contains 2 AC, Decal sheet/s & pilot figures in 1/72 and in 1/32.

The kits are:
- Spad S.XIII Early Le Cigognes Guynemer & Deulin
- SPAD S.XIII Early/Late Les Cigognes Sevin & Coudouret
- SPAD S.XIII Early Rene Fonk (2 versions)
- SPAD S.XIII Italian Francesco Baracca & Fulco Ruffo di Calabria
- Spad S.XIII Late 27th Aero Sq. Frank Luke & Joe Wehner
- Spad S.XIII Late 94th Aero Sq. Edward Rickenbacker (two versions)

https://www.peddinghaus-decals.de/1-72-plastic-kits/
95
Under Construction / Re: Multi-Seat 2026 GB - Sopwith 1 1/2 Strutter 1/72
« Last post by RAGIII on June 06, 2026, 11:40:38 PM »
Glad to hear you were able to recover the build! Also good to know your techniques worked  8) Looking forward to the results.
RAGIII
96
Under Construction / Re: Multi-Seat 2026 GB - Sopwith 1 1/2 Strutter 1/72
« Last post by DaddyO on June 06, 2026, 08:38:54 PM »
This is all so impressive not even considering that it is in 1/72.  Just love that wood grain.

Warren Q

Cheers Warren  :)

Slight delay in proceedings because the oil weathering started to eat into the varnish coat despite drying for a couple of days. I've had this occur before and it's usually down to scrubbing too hard or overworking the oil paint on the surface - bloody annoying.
Of course this meant there were little bits of varnish and stuff on my lovely smoothish surface so I wasn't happy; out with the turps to take off all the oil paint and varnish which then damaged the underlying PC10 (of course)  :'(

Anyway I decided to just pop the model down and step away for a few days. Usually I'd work on a different model at this point, but I've been trying to stick with working on just one model at a  time so had nothing else to drop onto. Opening another box would inevitably mean that this one was put on the shelf of doom.

Fast forward to yesterday and I decided the turps/oil on the surface had had plenty of time to evaporate and I tentatively brushed a couple of thin coats of the original PC10 over the surface and let it dry fully. Not wanting to go through the whole varnish/oil routine again which always adds dust and bits to the surface I decided on a nother approach - when painting figures I usually work wet in wet to get the main areas of shadows and highlights and then use thin glazes to blend and add nuances of colour; would the same approach work on an aircraft? Only one way to find out . . .

I'm pleased to say that the same techniques work just as well on a wing as they do on a frock coat and enthusiasm in all things aircraft related has been restored  ;D
I do think the method has some mileage (for me at least) since it allows a for more artistic approach to painting aircraft that appeals to my creative side rather more than the prescriptive methods usually employed. (I appreciate that using an airbrush can give similar effects and probably more easily, but I only own a very basic second hand airbrush which is useful for blocking in and I feel more comfortable using hairy sticks whenever possible).

Right enough rambling I'm off to the local airfield to watch some big 'uns in a D Day celebration (although given the weather I suspect most of the time will be spent in the cafe next to the airstrip)

Paul
97
The World of Scale Models / Re: 1/48 scale ICM Hampden Mk.1
« Last post by Brad Cancian on June 06, 2026, 01:52:56 PM »
Some stellar work here Gary as always. I too am becoming more and more inclined to do marking with masks. Yours have come out beautifully, as has the rest of your paint work.

Great stuff!

Cheers,

Brad C
98
The World of Scale Models / Re: 1/48 scale ICM Hampden Mk.1
« Last post by RAGIII on June 06, 2026, 09:18:45 AM »
A shame you couldn't make the show with this one! I am sure you will sort all out with no problem!
RAGIII
99
Having built two of these I found them extremely enjoyable and for My standards the fit was great  ::) Looking forward to your progress!
RAGIII
100
Under Construction / Re: 1:32nd scale Armstrong-Whitworth F.K.3 'Little Ack'
« Last post by RAGIII on June 06, 2026, 09:14:37 AM »
Nice!
RAGIII
Pages: 1 ... 8 9 [10]