Author Topic: wnw albatros DV Manfred von Richthofen  (Read 2520 times)

Offline nannolo

  • Newbie
  • *
  • Posts: 9
wnw albatros DV Manfred von Richthofen
« on: October 23, 2019, 06:57:46 AM »
I have already started the kit but I would like to share this wip with you
I came to close the fuselage but I think it would be nice to share the previous work phases instead of starting from an advanced job.
There are 5 planes but I like this with appropriate modifications.


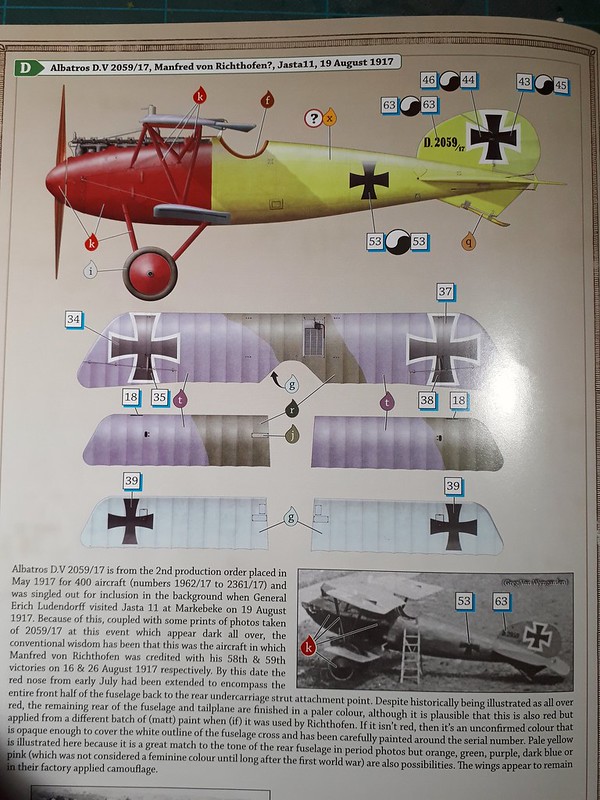
As specified in the instructions and also in the book "Windsock Fabric Special No.1 - von Richthofen's Flying Circus_Colors and Markings of Jagdgeschwader Nr.1", the most accepted hypothesis is that the back of the fuselage was also painted in red.
Also in the picture of the wingnut site there does not appear to be differences between the color of the front and back. The nose and the wheels were certainly red for the jasta membership 11. In fact the squadron with Manfred von Richthofen in command was identified by the red color in the front, while each pilot had his own identifying colors in the back.

Instead of using yellow I will therefore only use red. I like this scheme better than the one in red of the "1177/17 red body" because the crosses have remained visible and not covered by the paint.
The wings instead will have the camouflage pattern of mauve and green factory, used in the second part of the war. The lower blue part.

First I tried to correct some imperfections in the kit. In fact on the fuselage there are inspection doors which, while in the upper part are well defined, are instead only sketched in the lower part (arrow in red). For this I have removed them and will be replaced by photo-etchings once the two semi-fuselages are joined.
In addition there are two vents that will be opened by cutting the parts indicated in blue by putting in their place two small tubes of suitable size.


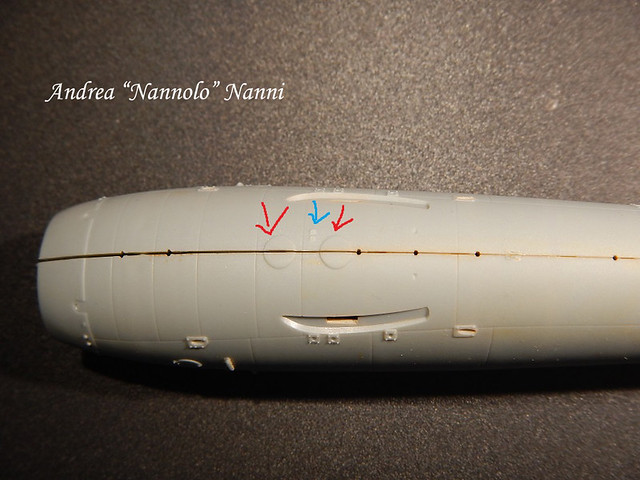
Same thing for the rear doors.
I have also eliminated the points from which the cables come out towards the tail. On the model they are rectangular while in reality they were with semicircular points. Also in the upper part there are two incorrect square grooves. Having therefore to drill to let out the wire, with a nice photo-etching I also have the advantage of having a clean hole.


After having thinned the ends that should be made of metal and instead are too thick, I then switched to coloring the inside of the semi-fuselage. A part in gray green (the color of the paint that will then be used for the metal parts in the rest of the albatros) and a part trying to reproduce an effect similar to wood. I preferred oils to decals also because once closed you will see very little ...


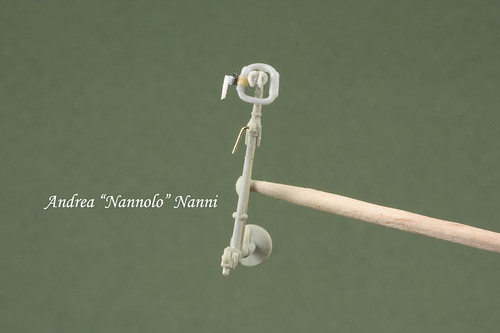
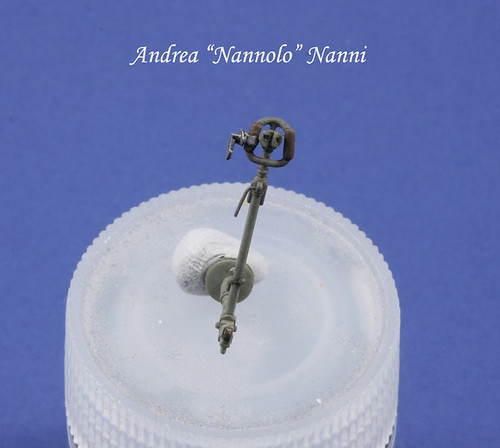
I started very detailed interiors. But I didn't mind doing any additions.
For example the control bar which lacked some details including the two "ears" (machine-gun triggers) that I reconstructed with the magic sculpt.


Another mistake of the wingnut: behind the seat they put a flat piece indicating it as wood. Instead in the plane it is in fabric, tied to a wooden frame. For this reason, having eliminated the plastic part that fixed the seat to it, I tried to simulate the fabric. To do this I cut out a piece of paper with my plotter that I crumpled a little and made less smooth with fine abrasive paper. I then painted it in sail gunze, which comes close to the color of the raw material used.


It was therefore the turn of the seat. For the skin I decided to try Uschi decals. At my expense I learned that they are very transparent. The underlying color can be used to give light and shadow effects. To apply them I used tamiya tape to trace the shapes and use it to cut the decal sheet

Error to avoid: do not fold the excess parts, hoping to cover them with another piece of decal !! Being semi-transparent you will see and ruin the effect. In fact, once the inside was dry, I had to scrape off the excess attached to the outside. As a base color I used a dark sand
A coat of clear to seal and then you can play with opaque and oil washes to find the desired degree of wheathering.
To enrich it all I added the pillow modeled with magic sculpt.


Then I dedicated myself to the fuel tank that I detailed by adding plugs and tubes to which copper wires will be connected to recreate the real one


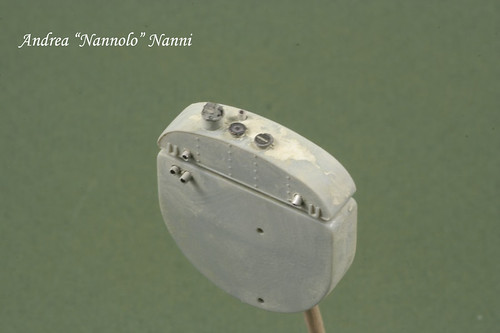
I couldn't resist getting it dirty a little


For now I will stop ... See you soon the other work phases
« Last Edit: October 25, 2019, 12:58:39 AM by nannolo »

Offline Alexis

  • Hero Member
  • *****
  • Posts: 7947
  • Love the self
Re: albatros DV Manfred von Richthofen wingnut wings
« Reply #1 on: October 23, 2019, 10:18:50 AM »
Nice work so far  8)


Terri
Hurra ! , Ich Leben Noch
Body and life is a vessel we use to travel the planet . Femininity is the gift , The miracle comes from what we do with it .

Offline Juan

  • Hero Member
  • *****
  • Posts: 2457
  • All gave some, some gave all.
Re: albatros DV Manfred von Richthofen wingnut wings
« Reply #2 on: October 23, 2019, 10:41:47 AM »
Great looking details Andrea, looking forward to your progress.

Offline AlbertD

  • Full Member
  • ***
  • Posts: 116
Re: albatros DV Manfred von Richthofen wingnut wings
« Reply #3 on: October 23, 2019, 12:30:37 PM »
Really nice work so far. I just happen to be starting the same kit today. You have already given me some good ideas to try.

Offline FAf

  • Hero Member
  • *****
  • Posts: 1099
Re: albatros DV Manfred von Richthofen wingnut wings
« Reply #4 on: October 23, 2019, 03:12:23 PM »
Good work! I'll pick up a few hints for my next build.
/Fredrik

Offline RAGIII

  • Hero Member
  • *****
  • Posts: 18943
Re: albatros DV Manfred von Richthofen wingnut wings
« Reply #5 on: October 23, 2019, 10:43:53 PM »
Outstanding start and beautiful results!
RAGIII
"A man has to know his limitations": Harry Callahan

"Don't slop it on" Lynda Geisler

Offline Robin

  • Sr. Member
  • ****
  • Posts: 386
Re: albatros DV Manfred von Richthofen wingnut wings
« Reply #6 on: October 23, 2019, 10:49:09 PM »
Not to disturb, I'll sit quietly in a corner and make notes.  :)

Robin
Found my mojo and clipped it's wings, so it won't fly away.

Offline nannolo

  • Newbie
  • *
  • Posts: 9
Re: wnw albatros DV Manfred von Richthofen - pit finished
« Reply #7 on: October 25, 2019, 01:13:26 AM »
Another part of the work already done ...
it can be said that the pit is finished ... the wires that go up to the upper wing remain to be connected, I have to insert a piece between the two semi-fuselages and a lever, not present in the kit.
First of all an important advice, for those who are about to do the same plane. Do not paint the contact areas of the internal frame with the semi-fuselage ... The fit is so precise that the paint can cause problems.
Same thing in the lower part of the tank ... The lower wings will be inserted through the holes in the fuselage. For this I sanded and removed the color residues.


I then glued the various instruments after passing a drop of futures on the glass


I also added the numerous cables that were connected to the bar both above and below using the elastic ez line wire.
I had fabric belts but they seemed too small and so I opted for the photoetches of the box

On the right I inserted the levers on the instrument panels made of brass wire.
Behind the panel I reproduced the copper tubes that you will barely see once closed.
To the tank I added some tubes where I had inserted the aluminum tubes, to make it more realistic


the next step will be the engine

Offline Alexis

  • Hero Member
  • *****
  • Posts: 7947
  • Love the self
Re: wnw albatros DV Manfred von Richthofen
« Reply #8 on: October 25, 2019, 11:27:10 AM »
Nice work on the details  :)


Terri
Hurra ! , Ich Leben Noch
Body and life is a vessel we use to travel the planet . Femininity is the gift , The miracle comes from what we do with it .

Offline Juan

  • Hero Member
  • *****
  • Posts: 2457
  • All gave some, some gave all.
Re: wnw albatros DV Manfred von Richthofen
« Reply #9 on: October 25, 2019, 12:03:10 PM »
Fantastic office with plenty of details.

Offline RAGIII

  • Hero Member
  • *****
  • Posts: 18943
Re: wnw albatros DV Manfred von Richthofen
« Reply #10 on: October 26, 2019, 12:19:51 AM »
Outstanding cockpit details! Your advice about clearing the paint from the joining surfaces is well founded!
RAGIII
"A man has to know his limitations": Harry Callahan

"Don't slop it on" Lynda Geisler