Author Topic: Lohner C1  (Read 2672 times)

Offline KiwiZac

  • Global Moderator
  • Hero Member
  • *****
  • Posts: 2634
    • My Linktree
Re: Lohner C1
« Reply #15 on: February 25, 2024, 08:59:18 AM »
Excellent start Dennis. I know next to nothing about the Lohners but this looks like a neat design.

I need to buy another bottle or two of mojo!
If you could order me a case it'd be much appreciated!
Zac in NZ

Offline djuggie

  • Full Member
  • ***
  • Posts: 165
Re: Lohner C1
« Reply #16 on: February 27, 2024, 05:21:14 AM »
February 26, 2024

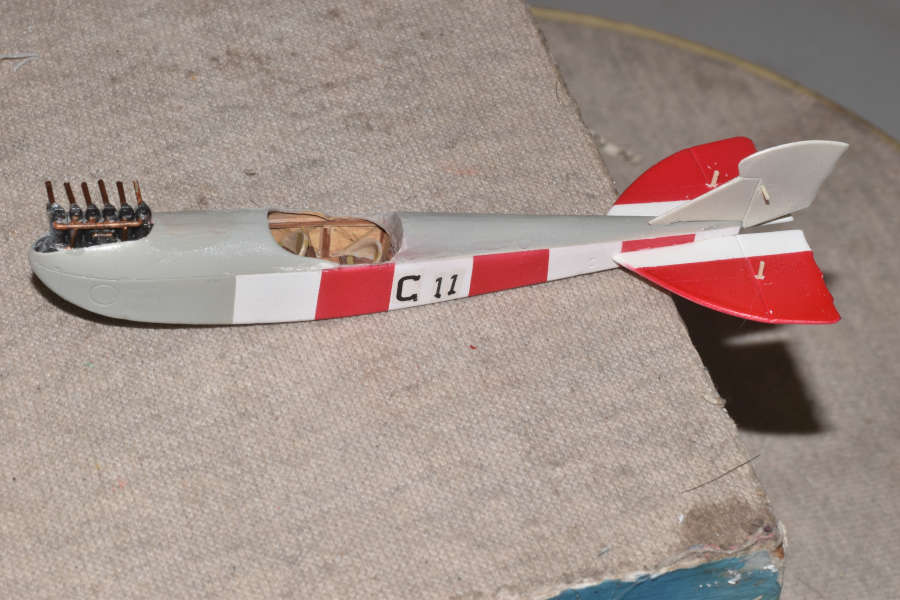
The fuselage was next with putty.  I built up the rear deck as my reference shows a sloped surface to the tail.  I use the Bondo as it never shirks, sands very easy and will take any color of paint over it.

After this step was complete, the fuselage was painted grey, then white and red section were added.  The decals were found in the spare decal locker.  (Everyone has one of those, right?)  The beautiful part of this model, is that is all of the decalling I have to do.  The control horns were attached and all tail surfaces were glued on.  Not shown in the photos is the tail skip.

You would think after all of years I have modelling I would not attach the exhaust until after painting.  Obviously that does apply me and the rear exhaust pipe left three times.  Found it twice and made a new one when it left for the third time.  Sigh.

Dennis


Offline KiwiZac

  • Global Moderator
  • Hero Member
  • *****
  • Posts: 2634
    • My Linktree
Re: Lohner C1
« Reply #17 on: February 27, 2024, 06:42:38 AM »
As Ron Burgundy said: "Well, that escalated quickly." Great progress Dennis!

The decals were found in the spare decal locker.  (Everyone has one of those, right?)
Mine is a very secure Heller 1/72 Canadair CL-215 kit box which I believe is older than I am  ;D
Zac in NZ

Offline Tim Mixon

  • Hero Member
  • *****
  • Posts: 838
  • Main focus is 1/72 WWI
Re: Lohner C1
« Reply #18 on: February 27, 2024, 10:41:49 AM »
Wow! Beautiful work Dennis. You are making quick work on this one.  I really like the livery choice.  I’m going to have to reference this build for my own. 

What area of California are you in?  I will be working in Fontana for nine weeks starting mid July. 

All the best,
Tim

Offline djuggie

  • Full Member
  • ***
  • Posts: 165
Re: Lohner C1
« Reply #19 on: February 27, 2024, 01:32:37 PM »
Tim,

Right square in the middle of the state in Fresno.  That would put you four hours from me.

I like to build unusual kits, often one of a kind.  Like the Siemens Schurkert DDR1 and RAF AE3 (Bat).  Both are scratch built but follow the pattern of vacuforms.

Dennis

Offline NigelR

  • Hero Member
  • *****
  • Posts: 737
Re: Lohner C1
« Reply #20 on: February 27, 2024, 07:18:08 PM »
More good progress on this striking kit. I like the fact you build these unusual types, they are always great to see.

Offline djuggie

  • Full Member
  • ***
  • Posts: 165
Re: Lohner C1
« Reply #21 on: March 01, 2024, 04:10:29 AM »
February 29, 2024

Two shots of the undercarriage heavily modified from the kit.  It probably should be a little more forward but there comes a time when corrections only lead to more serious problems.  I can see that my decals are not reacting well but then, they are very old.

I will start the wings today.  They will be painted and at least the lower wings installed.  I foresee difficulties mounting the top wing due to its awkward configuration.  More photos this weekend. 

Dennis


Offline KiwiZac

  • Global Moderator
  • Hero Member
  • *****
  • Posts: 2634
    • My Linktree
Re: Lohner C1
« Reply #22 on: March 02, 2024, 04:48:10 AM »
The undercarriage looks great to my eye Dennis, lovely work!
Zac in NZ

Offline djuggie

  • Full Member
  • ***
  • Posts: 165
Re: Lohner C1
« Reply #23 on: March 04, 2024, 01:54:35 PM »
March 3, 2024

This is what I consider the most difficult part of the kit.  Cutting the wings out was easy.  Aligning the red and white strips so that both wings are the same, not so easy.  After a great deal of measuring and re-measuring and then re-measuring  my measuring, I am satisfied with the results.  After everything was dry, the lower wing was attached.  The top wing has three spars connecting the halves and it was delicate to say the least.  The fuel tank does give it a little strength.  The locating holes were drilled and it now ready for the jig.  Should have some more progress tomorrow or Tuesday.

Dennis 


Offline NigelR

  • Hero Member
  • *****
  • Posts: 737
Re: Lohner C1
« Reply #24 on: March 04, 2024, 07:28:48 PM »
That looks like a tricky job but hopefully it will look great when the top wing is on. More good progress here.

Online DaddyO

  • Hero Member
  • *****
  • Posts: 528
Re: Lohner C1
« Reply #25 on: March 04, 2024, 09:55:56 PM »
Certainly colourful Dennis

Interesting to see how the national markings on the drawings are shown (Lined up with the leading/trailing edges on top wing and parallel to the rib line/airflow on the bottom; you'd have thought it would have been one or the other) ???
There cannot be a crisis today, my schedule is full

Offline Davos522

  • Hero Member
  • *****
  • Posts: 836
Re: Lohner C1
« Reply #26 on: March 06, 2024, 12:51:32 AM »
Love those stripes, this is going to be really pretty when it's done.

Dutch

Offline Tim Mixon

  • Hero Member
  • *****
  • Posts: 838
  • Main focus is 1/72 WWI
Re: Lohner C1
« Reply #27 on: March 06, 2024, 01:48:35 AM »
Great looking paintwork Dennis. Very much anticipating the completion. I find building split upper wing biplanes to be very challenging.

Offline djuggie

  • Full Member
  • ***
  • Posts: 165
Re: Lohner C1
« Reply #28 on: March 06, 2024, 03:31:45 AM »
March 5, 2024

Into the Aeroclub jig and out appears an installed top wing.  It went easier than I thought it would.  The fragile top wing presented no problems and the alignment went very easy.  The colors on the top and bottom wing even match.  That was the most difficult part of this kit.

The second set of shots shows the radiator installed, also the cabanes.  Most of what I am doing right is guess work due to the fact the kit is of a later version of the aircraft I am building.  But they are close to looking right and I can live with that.

The final photo is the top wing supporting system, again estimating its position from the pictures I do have.  The photo also shows the prop and radiator reservoir.   All in all, I am pleased with the results.  I should start rigging today with a completion date of this week.

Dennis


Online Thumbs up

  • Hero Member
  • *****
  • Posts: 570
Re: Lohner C1
« Reply #29 on: March 06, 2024, 04:49:20 AM »
Really enjoying this build!  :)