Author Topic: 1:32nd scale Halberstadt D.II  (Read 5462 times)

Offline NigelR

  • Hero Member
  • *****
  • Posts: 719
Re: 1:32nd scale Halberstadt D.II
« Reply #60 on: March 13, 2024, 06:24:06 PM »
That's looking good Mike, and well done for overcoming the strut challenges. Thanks for sharing your build, it means I will be prepared for when I do the Oeffag Albatros.........

Offline Mike Norris

  • Hero Member
  • *****
  • Posts: 2218
  • RAF Old and Bold
    • Mikes WW1 Aircraft Models
Re: 1:32nd scale Halberstadt D.II
« Reply #61 on: March 13, 2024, 11:48:38 PM »
That's looking good Mike, and well done for overcoming the strut challenges. Thanks for sharing your build, it means I will be prepared for when I do the Oeffag Albatros.........

Hi Nigel,
I found that's it's possible to drill further into the struts using a 0.8mm diameter drill.
It means you can add longer locating rods, lessening the stress at the strut ends,

Mike


Retired - 27 years RAF service then 20 years Military Aerospace Technical Author/editor.

Offline Mike Norris

  • Hero Member
  • *****
  • Posts: 2218
  • RAF Old and Bold
    • Mikes WW1 Aircraft Models
Re: 1:32nd scale Halberstadt D.II
« Reply #62 on: March 14, 2024, 04:13:06 AM »
Hi all
A word of caution for anyone thinking of building this model

The upper wing has to be mounted onto a total of 12 struts (8 interplane struts and four fuselage cabane struts)
As already stated, the struts are all 3D printed and therefore weak
To try fitting the upper wing onto 12 struts and at the same time keep everything aligned is difficult
Therefore I chose to fit the upper wing onto the 8 interplane struts only, then fit the cabane struts after the upper wing was fitted

Caution:
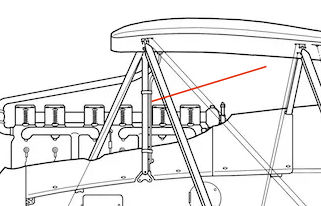
When drilling the locating holes in the upper and lower wings for the interplane struts, it's important to make sure the tilt forward angle of the struts is correct
If not, the upper wing will be in the wrong position for the fuselage cabane struts to locate correctly in their upper wing and fuselage recesses
After I had fitted the upper wing I found that the tilt forward angle of the interplane struts was not enough and therefore the upper wing was positioned too far rearwards
This meant that the kit supplied cabane struts could not be fitted correctly in addition to the 2 coolant pipes from the engine to the radiator in the upper wing
To correct the angle of the struts was not an option as this would have meant removing the upper wing and definitely breaking the struts in the process
Therefore, I made and fitted replacement cabane struts, created from formed Brass tube

Anyone making this model should make sure the holes for locating the interplane struts are drilled at the correct angle to allow the upper wing to be positioned (when fitted) correctly to align the fuselage cabane struts in their upper wing and fuselage recesses


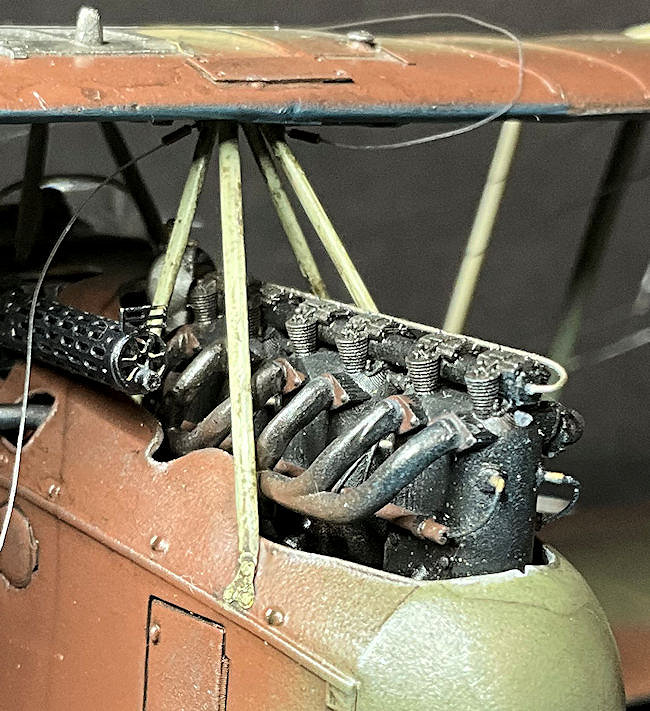
A fuel pipe, not represented in the kit, needs to be added to the rear of the left cabane strut.


PS: The brown overspray on the engine exhaust pipe has been sorted.

Mike
« Last Edit: March 14, 2024, 09:22:49 PM by Mike Norris »


Retired - 27 years RAF service then 20 years Military Aerospace Technical Author/editor.

Offline acewwi

  • Full Member
  • ***
  • Posts: 180
Re: 1:32nd scale Halberstadt D.II
« Reply #63 on: March 14, 2024, 04:28:51 AM »
I admire your courage Mike.
Spyros

Offline NigelR

  • Hero Member
  • *****
  • Posts: 719
Re: 1:32nd scale Halberstadt D.II
« Reply #64 on: March 15, 2024, 09:11:07 PM »
I admire your courage Mike.
Me too. No way I would contemplate this one, I continue to be impressed by Mike's engineering and building skills. And perseverance!

Online macsporran

  • Hero Member
  • *****
  • Posts: 1696
Re: 1:32nd scale Halberstadt D.II
« Reply #65 on: March 16, 2024, 12:31:30 AM »
Completely empathize with your problems Mike.

I stalled in my SE5 build as I realized the Roden interplane struts were completely useless for my usual method of mounting these first, adding top wing, then popping in the interplane struts.

I decided I would have to support top wing on the interplanes first, then once cured, make cabanes to fit the gap and insert thus strengthening up the structure prior to rigging.

In 50 years of modelling I've never used a jig so I started to look around, but most seem to be out of production. Then I found the LMG units - rather expensive here, but relatively cheap from a company called Plastic Models Store in Kyiv, Ukraine.

I'll post info about the jigs elsewhere - but these might be a perfect solution for these Lukgraph builds?
Sandy 

Offline Mike Norris

  • Hero Member
  • *****
  • Posts: 2218
  • RAF Old and Bold
    • Mikes WW1 Aircraft Models
Re: 1:32nd scale Halberstadt D.II
« Reply #66 on: March 17, 2024, 02:34:50 AM »
Completely empathize with your problems Mike.

I stalled in my SE5 build as I realized the Roden interplane struts were completely useless for my usual method of mounting these first, adding top wing, then popping in the interplane struts.

I decided I would have to support top wing on the interplanes first, then once cured, make cabanes to fit the gap and insert thus strengthening up the structure prior to rigging.

In 50 years of modelling I've never used a jig so I started to look around, but most seem to be out of production. Then I found the LMG units - rather expensive here, but relatively cheap from a company called Plastic Models Store in Kyiv, Ukraine.

I'll post info about the jigs elsewhere - but these might be a perfect solution for these Lukgraph builds?
Sandy

Hi Sandy,
I've never used any sort of jig for assembling my models.
I do it all by eye and if needed, elastic bands  ;D
However, I do use my 'Kronos Designs' Third Hand for holding the models when rigging.
It leaves both hands free.
Sadly I don't think it's available anymore as his FB page hasn't been updated since 2015,

Mike


Retired - 27 years RAF service then 20 years Military Aerospace Technical Author/editor.

Offline Mike Norris

  • Hero Member
  • *****
  • Posts: 2218
  • RAF Old and Bold
    • Mikes WW1 Aircraft Models
Re: 1:32nd scale Halberstadt D.II
« Reply #67 on: March 17, 2024, 07:04:53 AM »
Hi all
The rigging is complete
Structural rigging with 0.12mm diameter mono-filament, 0.5mm diameter tube and 'Gaspatch' 1:48th scale metal turnbuckles and Anchor Points
Flight controls rigging with 0.08mm diameter mono-filament, 0.4mm diameter tube and 'Gaspatch' 1:48th scale metal Type C turnbuckles and Anchor Points

Apart from the propeller the model is finished

Now its the figures and display case

Mike


Retired - 27 years RAF service then 20 years Military Aerospace Technical Author/editor.

Offline PrzemoL

  • Hero Member
  • *****
  • Posts: 4910
  • There was Eru... and he made first the Ainur...
    • Przemysław Litewka
Re: 1:32nd scale Halberstadt D.II
« Reply #68 on: March 17, 2024, 04:41:25 PM »
Continues to amaze me. Just beautiful.
Ash nazg durbatuluk, ash nazg gimbatul,
Ash nazg thrakatuluk, agh burzum-ishi krimpatul.

Offline NigelR

  • Hero Member
  • *****
  • Posts: 719
Re: 1:32nd scale Halberstadt D.II
« Reply #69 on: March 17, 2024, 08:39:10 PM »
Superb work Mike, this is an impressive looking model and a lot of work! I would love to see this in the flesh some day.

Offline FAf

  • Hero Member
  • *****
  • Posts: 1088
Re: 1:32nd scale Halberstadt D.II
« Reply #70 on: March 17, 2024, 10:36:42 PM »
Beautiful craftmanship through out! I don't really see myself building this particular kit, but your postings here and your build logs are a great help to anyone following in your footsteps.
/F

Offline Mike Norris

  • Hero Member
  • *****
  • Posts: 2218
  • RAF Old and Bold
    • Mikes WW1 Aircraft Models
Re: 1:32nd scale Halberstadt D.II
« Reply #71 on: March 21, 2024, 06:09:50 AM »
Hi all,
This the pilot figure from 'Aviattic.
I replaced the head from my 'spares', as the original seemed too small.
Painted with 'Tamiya', 'AK Interactive' and Citadel paints.
Weathered with 'Flory Models' clay wash (Dark Dirt) and 'Tamiya' Weathering Master (Set D -Oil Stain) and (Set A - Mud).

Mike


« Last Edit: March 21, 2024, 07:52:26 PM by Mike Norris »


Retired - 27 years RAF service then 20 years Military Aerospace Technical Author/editor.

Offline Flik63J

  • Jr. Member
  • **
  • Posts: 52
Re: 1:32nd scale Halberstadt D.II
« Reply #72 on: March 21, 2024, 06:24:53 AM »
Your figure painting is also on a very high level Mike,

How do you find the time to practise………I can’t believe that you achieve such results with one attempt!!

Congratulations,

David

Offline Mike Norris

  • Hero Member
  • *****
  • Posts: 2218
  • RAF Old and Bold
    • Mikes WW1 Aircraft Models
Re: 1:32nd scale Halberstadt D.II
« Reply #73 on: March 22, 2024, 12:37:10 AM »
Your figure painting is also on a very high level Mike,

How do you find the time to practice………I can’t believe that you achieve such results with one attempt!!

Congratulations,

David

Hi David,
I'm not a great figure painter, but I like to add figures for scale effect.
I've painted 91 figures for the 51 WW1 aircraft models I've build so far.
Back in the eighties I used to make 54mm Napoleonic figures from 'Historex'.
Those were painted with enamels of course.
All of the straps, harnesses and belts etc were made from thin strips of toothpaste tubes, which then were basically lead!!
I just brush on the paints and wet blend them until I get the effect I like.
No skill involved, just time,

Mike


Retired - 27 years RAF service then 20 years Military Aerospace Technical Author/editor.

Offline Flik63J

  • Jr. Member
  • **
  • Posts: 52
Re: 1:32nd scale Halberstadt D.II
« Reply #74 on: March 22, 2024, 12:51:06 AM »
Just wonderful……..a labour of love!

David