Author Topic: Special Hobby 1/48 SPAD VII  (Read 17755 times)

Offline andonio64

  • Hero Member
  • *****
  • Posts: 1687
  • There's no hurry
Re: Special Hobby 1/48 SPAD VII
« Reply #45 on: September 09, 2012, 07:05:17 AM »
Dear friends, as promised here are some pictures from the latest works:

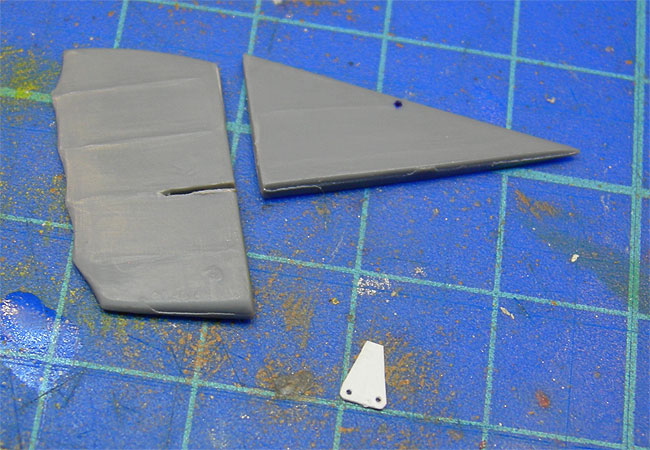
Separated fin and rudder and eliminated the control horns.
Prepared a piece of plasticard to replace the rudder's control horns.


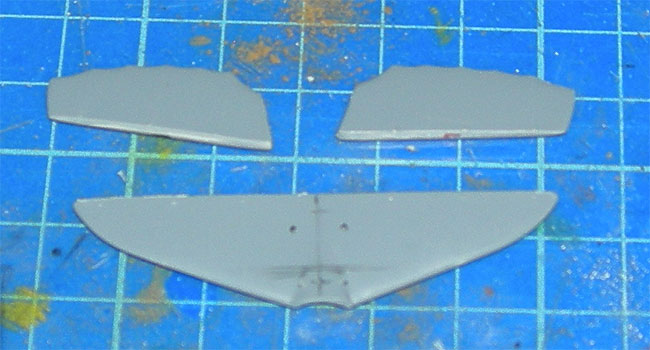
Separated horizontal stabilizer and elevators, marked points to drill


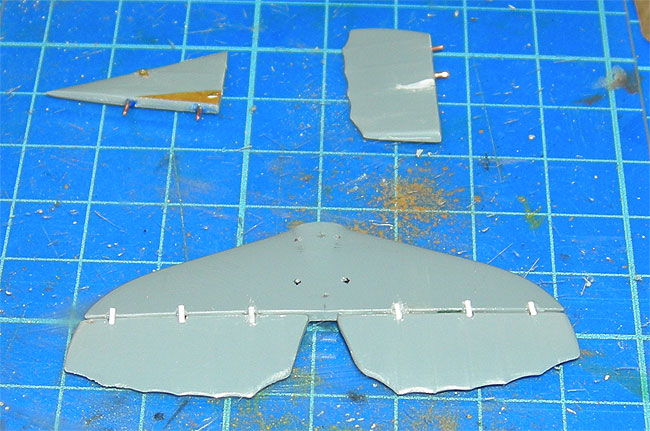
Here you can see the horizontal planes re-joined with remade hinges and the vertical parts were completed with pins and PE panels.


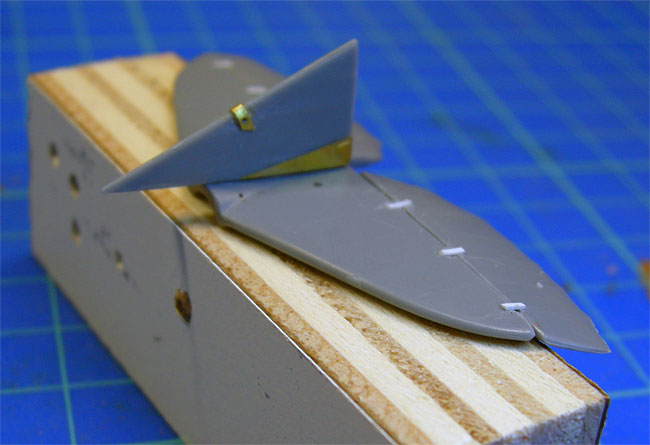
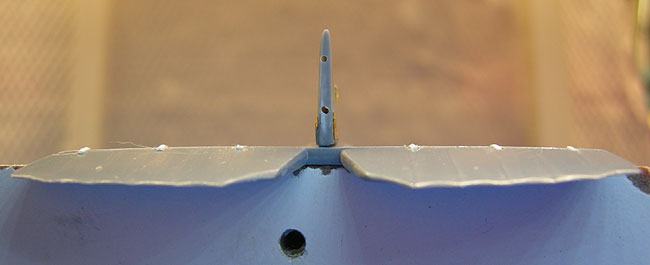
Everything put together, the rudder will be glued after it will be coloured and will get its decals


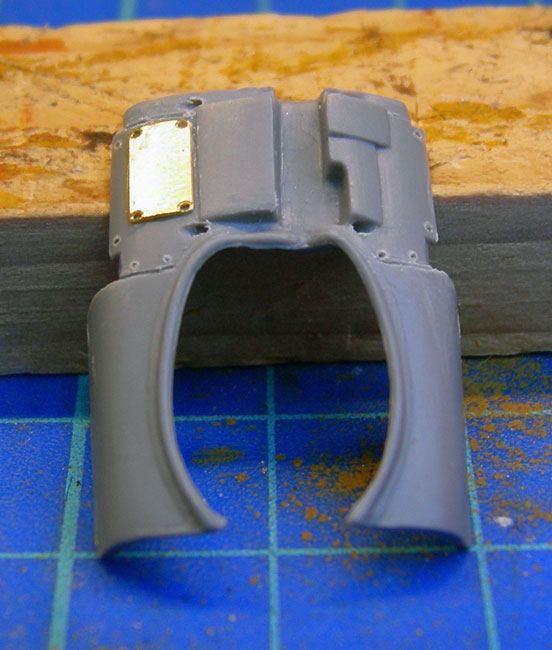
On the cockpit entrance: additional PE panel, drilled some holes for the rigging


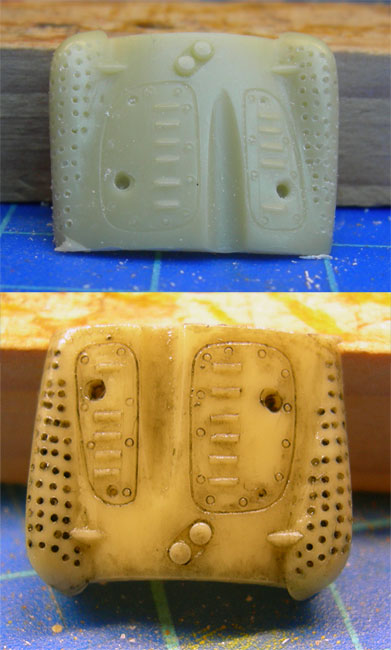
Here is the top of the engine cowling; I re-drilled all the holes on the two external covers of the cylinders.
They were just roughly marked, they looked more like bumps than holes. I turned them into holes but didn't drill the resin to the other end, so after I used India ink to fill those pits in order to make them seem deep after painting.
Some sort of preshading...
Same use of the India ink to preshade the other marks  on this piece, then I sealed it spraying matt transparent coating, because colours in successive coatings would have melted the ink...


Here is the tail skid, the rubber belt is simulated with 0,5 mm masking tape


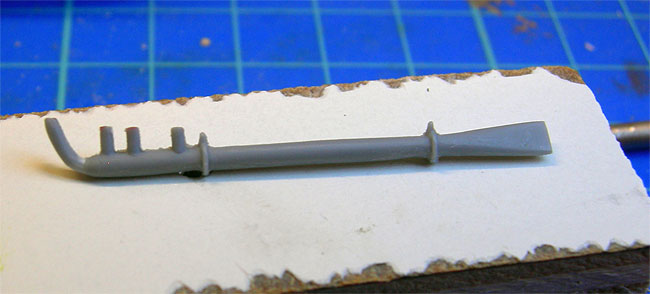
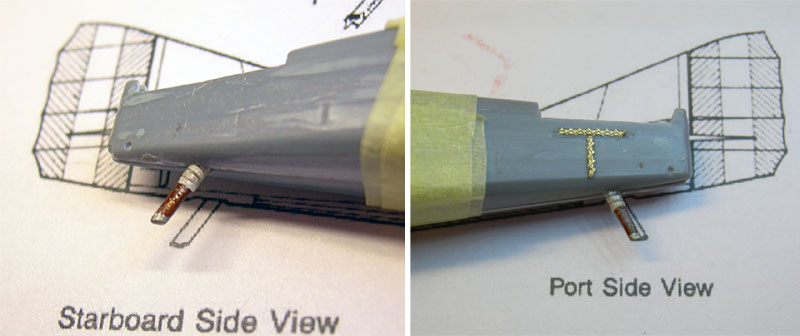
Here is one of the two exhaust tubes. The fixing point which is nearer to the engine in my documentation does not appear, so I decided to eliminate from both the tubes.


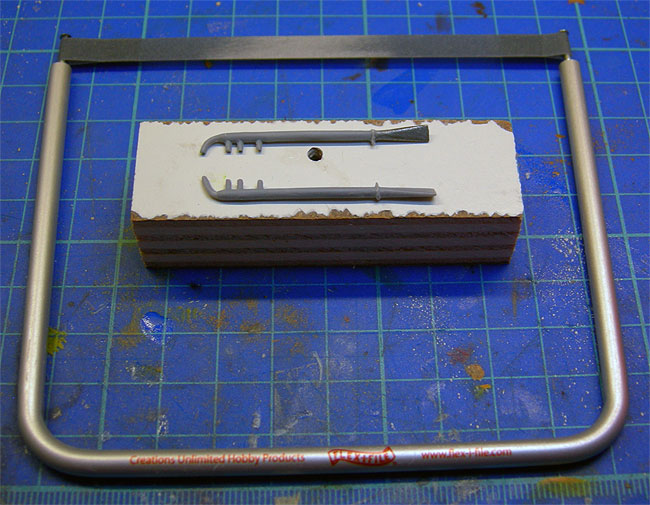
I used the Flex-i-file which I think is a really smart tool!


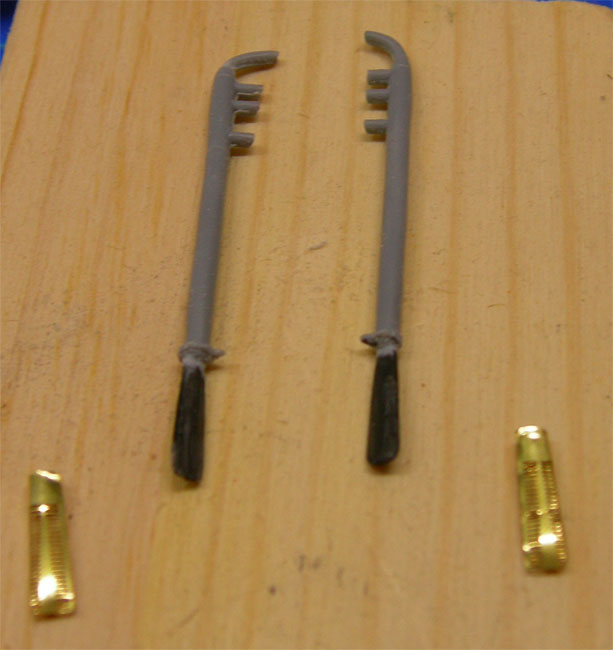
Here are the PE terminals that I want to use with the exhaust tubes, I decided to keep the terminals of the plastic parts to glue the brass on them but they had to be reduced and I painted them black not to be too visible.


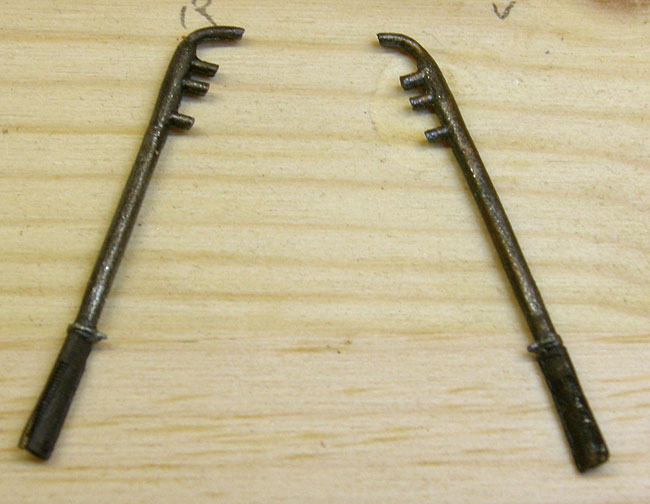
Here is the final result. I wasn't able to close the PE trminals very well, I am still a bit uncomfortable in shaping the PE parts very well. I hope to improve with time!
The painting of the tubes was to my advice very good, but I wasn't able to take a good picture although I shot maybe 12 photos, so it cannot be appreciated here.

I used as a base XF-84 DARK IRON, I tried this paint for the first time today and it's great, it really resembles a "cooked" metallic part, then I "wheathered" it with a very-dry brush of XF-56 to give some metallic reflection and X-34 to give some warmer tones here and there.
On the terminals imagining they were more dirty for the smoke I left XF-84 more visible. The picture shows a much more contrasted difference between the terminals and the rest of the exhaust, to the naked eye it's less contrasted...

Will go on tomorrow... thanks for your patience in reading this my friends!

Ciao

Antonio
« Last Edit: September 09, 2012, 07:13:28 AM by andonio64 »

Offline GAJouette

  • Hero Member
  • *****
  • Posts: 3579
  • " Beware of the Spanish Inquisition"
Re: Special Hobby 1/48 SPAD VII
« Reply #46 on: September 09, 2012, 09:14:08 AM »
  Antonio,
Outstanding progress and update my friend. Well worth the wait too.
Highest Regards,
Gregory Jouette
" What Me Worry"

Offline Whiteknuckles

  • Hero Member
  • *****
  • Posts: 1334
Re: Special Hobby 1/48 SPAD VII
« Reply #47 on: September 09, 2012, 09:49:04 AM »
More great detailing progress Antonio.
I like what you did with the exhaust tubes, looks very effective ;)

Andrew
Eternal Apprentice

Offline andonio64

  • Hero Member
  • *****
  • Posts: 1687
  • There's no hurry
Re: Special Hobby 1/48 SPAD VII
« Reply #48 on: September 22, 2012, 04:18:08 PM »
Hallo friends, here is an update:

I completed the two pieces on top of the engine cowling


Then I made the "cnned meat" style fuel unload mechanism, I carved the little opening on top of which I inserted the eyelet (self made) and pierced the corresponding hole beneath the cockpit. The red line is drawn in photoshop to show how the cable will run


Then I went on with my usual India ink preshading, I cover the ribs with 0,5 mm masking tape and drybrushed with india ink using a fantastic cylindric flat end brush for nail art (... ! ...) found in the Leroy Merlin store

tape removed

bottom surfaces

Tape on the fuselage

The black pencil drawn line behind the cockpit represents the border between the dark forward areas and the light back surfaces of the fuselage.
I am convinced that the difference in colour was done on purpose and did not depend on the underlying material, not all the "dark" zone cover the metal areas, I checked the kit's horizontal "ribs" on the fuselage against the drawings of the book by Thomas and they are correct, then I have seen a lot of pictures showing the dark-light border was set behind the head of the pilot...

tape removed
I seal te India ink with Gunze transparent matt varnish
Here is the rudder (to be touched up) which went under the same treatment


Yesterday night I started composing the cockpit:

Clumsily handling the floor piece, the control stick got broken, you can see it sadly laying  top left of the picture... :-(
In the end it was better because I had to heavily work on the lower surface of that piece because I found it closes the holes I made to let the pins of the wings go through

To get to this point I worked the whole evening to take material off the piece _very_ slowly avoiding to make it too weak and breaking it...

Ciao ragazzi!!!!  :D  :D  :D  :D  :D
« Last Edit: September 22, 2012, 04:22:54 PM by andonio64 »

Offline uncletony

  • Hero Member
  • *****
  • Posts: 4350
    • Aircraft In Pixels
Re: Special Hobby 1/48 SPAD VII
« Reply #49 on: September 22, 2012, 10:11:11 PM »
Great update, Antonio! She's coming along.

Offline GAJouette

  • Hero Member
  • *****
  • Posts: 3579
  • " Beware of the Spanish Inquisition"
Re: Special Hobby 1/48 SPAD VII
« Reply #50 on: September 24, 2012, 01:09:53 AM »
  Antonio,
Yes indeed she's coming along quite nicely my friend. Looking forward to seeing what's next.
Highest Regards,
Gregory Jouette
" What Me Worry"

Offline andonio64

  • Hero Member
  • *****
  • Posts: 1687
  • There's no hurry
Re: Special Hobby 1/48 SPAD VII
« Reply #51 on: October 07, 2012, 08:07:13 AM »
Thank you Gregory and Tony... and thanks everybody, after a long time here are some pictures to illustrate the state of the works...

I have worked on the Machine Gun, used some brass pieces to improve the plastic piece


here it is painted and temporarily placed where it will be glued


In the following pictures you see the tail "group": painted, rigged and joined...

I made a mistake: as you see in the third frame the rudder is touching the horizontal plane while it should be a bit away from it.
But the rudder has to be stuck to the fin so it's the position of the fin which was wrong...


So I had to detach the vertical group and send it back a few millimeters (spostamento = displacement).
I succeeded in doing so without having to cut the rigging which thanks god is done with elastic wire.


Here is the tail group provisionally joined to the fuselage.


In this picture you see the fuselage halves joined, I had to use a lot of putty and sanding work to correct the join line therefore I rubbed out the preshading on the top and on the belly of the fuselage.
Here you see the preshading re-done and everything restored.


The black area is intended to host the "chin" brass piece and was painted that way to show through the vents as if the engine room was hollow.

Then it was time to take again on the "chin" piece, after some thinking I remembered on the PE brass frets there were two versions of the chin piece

...so I took it back on the bench.

On the left the piece not to be used for the "early" version of this plane, on the right is the correct piece on which (as you know) I had already worked.
I left that piece while it still was too big to fit the room available beneath the fuselage, before working on the two pieces I painted them in their final shade of beige not to have them painted ater they were glued to the black area, not to risk beige colour would overpaint the black basis.


...on the right you see the correct piece as I left it: curved and trimmed.

After some measurements I decided to cut the pieces along the orange lines and to discard the yellow crossed parts.

I noticed the "incorrect" piece had the louvers oriented the other way round and that was not due to the piece orientation... I really don't understand this, in any case I decided to go that way as well...

This is the final result, all in all I judge it acceptable.

THe latest thing done is to fix on the cockpit cover piece the rigging going to the top of the cabane struts


Thanks for your attention mates

Offline uncletony

  • Hero Member
  • *****
  • Posts: 4350
    • Aircraft In Pixels
Re: Special Hobby 1/48 SPAD VII
« Reply #52 on: October 07, 2012, 11:19:45 AM »
Another great update Antonio!

Offline NP

  • Full Member
  • ***
  • Posts: 155
  • Location: Head in the clouds
Re: Special Hobby 1/48 SPAD VII
« Reply #53 on: October 07, 2012, 07:43:29 PM »
Thats some nice work with the tiny pieces - I've just thrown in the towel after spending about an hour trying to get a muzzle guard like that on a 1/48 Vickers on straight - can I heck!

Offline andonio64

  • Hero Member
  • *****
  • Posts: 1687
  • There's no hurry
Re: Special Hobby 1/48 SPAD VII
« Reply #54 on: October 07, 2012, 07:55:06 PM »
Ah ha! MUZZLE GUARD... I was getting crazy trying to find a term for that piece!!!
Thanks!!!
 8) 8) 8)

Offline Whiteknuckles

  • Hero Member
  • *****
  • Posts: 1334
Re: Special Hobby 1/48 SPAD VII
« Reply #55 on: October 07, 2012, 09:07:41 PM »
Great update Antonio, excellent work as per usual ;)

Andrew
Eternal Apprentice

Offline andonio64

  • Hero Member
  • *****
  • Posts: 1687
  • There's no hurry
Re: Special Hobby 1/48 SPAD VII
« Reply #56 on: October 15, 2012, 10:42:40 PM »
Hallo mates, thanks Andrew!

Some step ahead:
I completely closed the fuselage, also glued the cowling and cockpit top, the radiator + prop will go at the end:


Then I started studying the undercarriage, this is one of the wheels as supplied by the kit:


I decided to pierce the hub to make it look more real and also sharpened the edges of the hole in the wheels "cover" and  poured in to it a drop of black colour to make it look a hole.
Then I mounted also the framework, drilled holes to make rigging go through and sprayed the primer on everything.


Here are the wheels after I painted them...


The framework rigged...


...and painted

Now it's time to put the cabane strust in place and start preparing the wings...

Ciao

Antonio

Offline andonio64

  • Hero Member
  • *****
  • Posts: 1687
  • There's no hurry
Re: Special Hobby 1/48 SPAD VII
« Reply #57 on: October 22, 2012, 06:17:55 AM »
News from the SPAD:


I put in place the cabane struts and fixed the rigging, the MG was not glued in this picture


Then I made and glued the windshield, kicking and knocking it...
I used the PE frame and cut myself some small acetate squares from one leaf I detached from some packaging I don't remember...
I used the green cap Tamiya cement but sticking one panel made the other detach... It was so difficult especially for the corner panels which are curved.
In the end I had to use CA on a couple of them and this made some opacity appear on some corner, but in the end I am glad it went at its place!!!

Then I glued the MG and to "relax" I created the bullets entering into the MG right side and the empty tape exiting on the MG left.


Obviously it will not be easy to see those details after they'll be covered by the top wing...

Now I am studying the bottom wings pieces needed to rig...

Ciao!!!!

Offline mgunns

  • Hero Member
  • *****
  • Posts: 2255
Re: Special Hobby 1/48 SPAD VII
« Reply #58 on: November 09, 2012, 03:19:26 AM »
Hello Andonio64:

I have been following your build.  Your efforts are paying off.  I like your approach to preshading.  Never would have thought of using India Ink. Simple but effective. 

I wish there were some Italian markings for the SPAD's in 1/32nd scale.  Sadly only the Hobbycraft kit.

Best

Mark
Mark

We few, we happy few.....

Offline ALBATROS1234

  • Hero Member
  • *****
  • Posts: 2657
Re: Special Hobby 1/48 SPAD VII
« Reply #59 on: November 09, 2012, 03:07:11 PM »
i have followed this build for some time, you do a nice job with your build.2 things, 1. you can try to use clear gloss to cure opacity on the windshield. i have used future(klear) but other acrylic clear gloss should work to camoflage the cloudy part. 2. i have never seen someone build ,paint and rig assembys like this. i wonder how you dont break the rigging and scuff the paint as the build progresses? i always build the main structure before i paint then basically attach the top wing then rig. i am curious because it seems like it must be easier to build this way. i never thought to try this. i may in the future. cheers on your nice spad vii.