Author Topic: Sopwith Tabloid (Classic Planes) and Baby (Eduard), another 1:72 double build  (Read 18388 times)

Offline IanB

  • Hero Member
  • *****
  • Posts: 2444
I had some time yesterday for modelling but didn't feel in the mood for drilling all the RE8's rigging holes, and I'm still waiting for the paints for the twin Fokker build, so what to do?

 I decided to prepare for my next project, or more accurately, decide what it would be. Since I'm really enjoying building the 2 Fokkers together I thought I'd do another double build. 3 of my last 4 builds have been Fokkers, (E.III, D.I & D.II) so I decided to dig out 2 of the very first kits to enter my stash: Classic Planes' Sopwith Tabloid, and Eduard's old Sopwith Baby.

Here's what I have to start with:
 First the Tabloid..


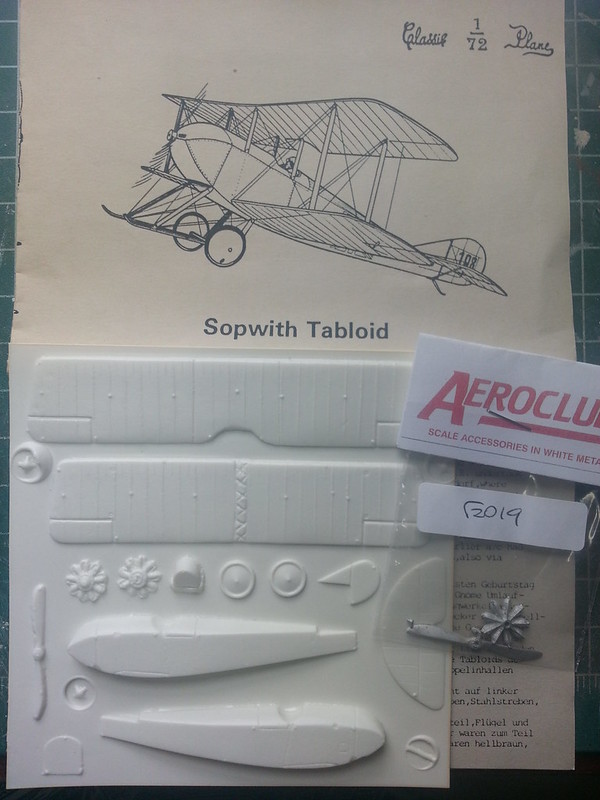
 Not too bad, but pretty basic. There are no stencils or guides of any sort for either the struts or the undercarriage so I'll have to measure those myself using the DF plans as referance. I will use an Aeroclub engine and prop, and it will be modeled to represent number 168 which, piloted by Lt RLG Marix, attacked the Zeppelin sheds at Duesseldorf on October 9th 1914, destroying Zeppelin Z.IX. This will be my first vacform kit build......

and the Baby...


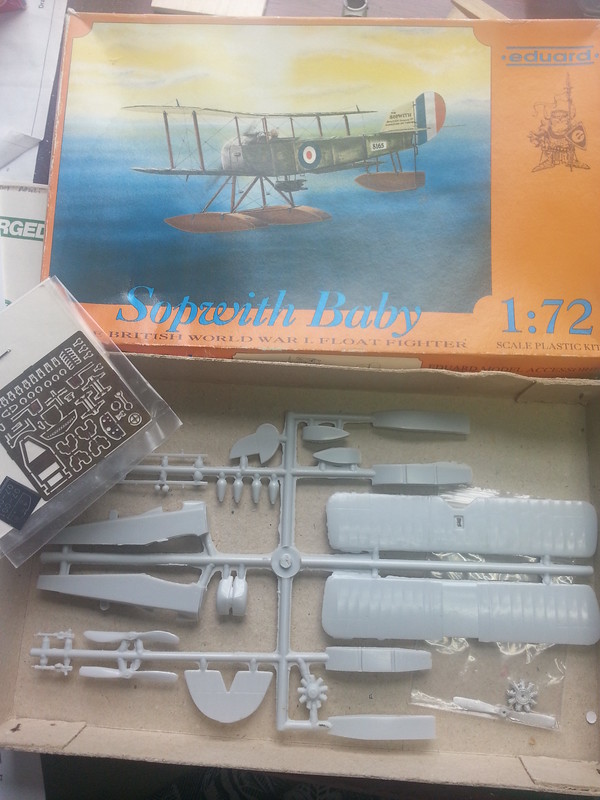
 - this one is more like a limited run kit, with a huge amount of flash on most of the parts. I assume it was one of their first! Having said that, there are 3 small PE sets: one for engine details, one for the interior, and one for struts. The latter won't be used but the other 2 look very useful!
 The blue on all the roundals is a little too bright so I'll use aftermarket ones, but there are 2 sets of Sopwith factory stencils so I may be able to use the other set on the Tabloid!

 I then made a start on cleaning everything up, starting with the Baby:
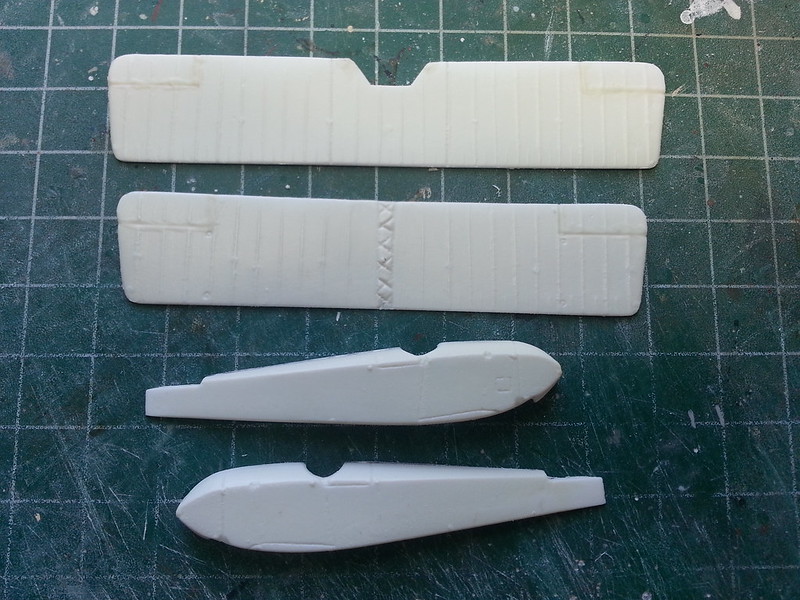
 I removed the humps fore and aft of the cockpit which were on the Schneider, but not on the Baby, then started on the wings. They were first thinned quite considerably. About 1mm was removed from the leading edges, I  straightened the wing tips as the moulded tips had a slight curve to them, and corrected and slightly enlarged the centre section cutouts.


Finally, I cleaned the flash off the float parts and glued the 2 halves of each of the 3 floats together. The horizontal stabilisers and elevators are totally wrong and will be replaced

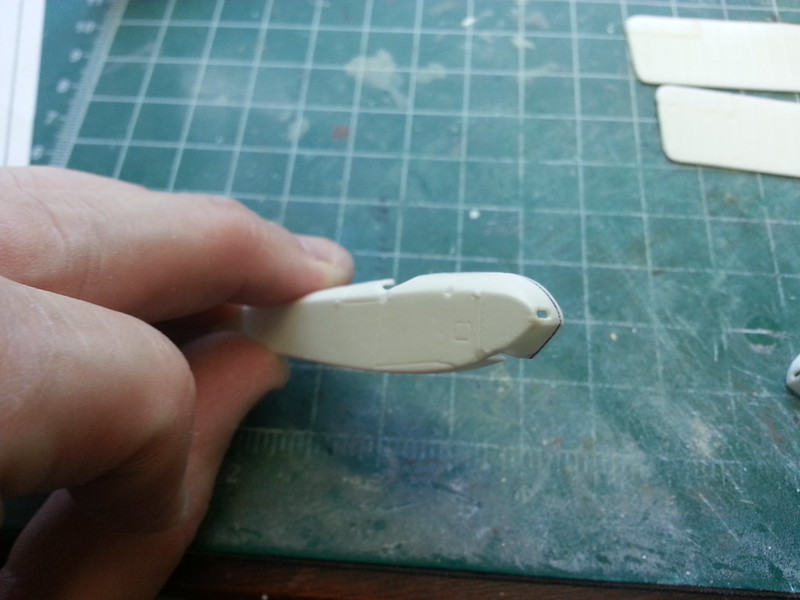
 Today I made a start on the Tabloid. After removing the parts from the sheet they were all cleaned up and checked against the plans. The horizontal stabiliser and elevators were reduced in width by a couple of mm to start with - the easy bit!
 Cockpit and engine cutouts were carefully opened up and filed to shape, and the 2 cooling intakes on the nose drilled out.
 The wings were also reduced in chord by about 1mm, corrections were made to the centre cutout, and Mr Dissolved Putty was applied to the aileron edges as 168 was a wing-warper. The fin and rudder are too small so I'll make new ones, and the top of the cowling is a little too shallow, so maybe a little milliput will help there once it's all together. I still have to remove the little dots so characteristic of Classic Planes' vacforms....


 These will probably sit at this stage for a while until the others are finished....RE8 rigging holes tomorrow!

Thanks for looking in!

Ian
« Last Edit: July 04, 2017, 03:08:25 AM by IanB »

WarrenD

  • Guest
This is going to be another great one Ian, really looking forward to is.

(FWIW, I think the Eduard Sopwith Baby and Schneider were the first Eduard kits I ever bought oh so long ago. I thought I was being pretty esoteric and exotic when I did so.)

Warren

Offline coyotemagic

  • Hero Member
  • *****
  • Posts: 7710
  • "Here's to not buggering it up." -Winston Chuchill
    • My Models
This is going to be another great one Ian, really looking forward to this.
I agree.  Another brilliant project.
Cheers,
Bud
"All men dream: but not equally. Those who dream in the dark recesses of the night awake in the day to find all was vanity. But the dreamers of day are dangerous men, for they may act their dreams with open eyes, and make it possible." -T. E. Lawrence

Offline TobyCoulson

  • Hero Member
  • *****
  • Posts: 610
Always enjoy your builds and the fact that you're doing a vacform is doubly interesting.
Ale should be drunk out of a glass. Lager should be drunk out of desperation

Offline Manni

  • Hero Member
  • *****
  • Posts: 1768
    • Der Militärmodellbauer
Oh, I will follow this build. Very intresting, because my family is living in Düsseldorf since many generations.
Manni
"Ich hab' da mal was vorbereitet.": Jean Pütz
"Warum noch mehr Bausätze?!?": meine Frau

Offline RAGIII

  • Hero Member
  • *****
  • Posts: 18901
Ian,
You have become a Fix everything that doesn't look right building machine! I, like the others, am looking forward to this one! Great start!
RAGIII
"A man has to know his limitations": Harry Callahan

"Don't slop it on" Lynda Geisler

Offline lone modeller

  • Hero Member
  • *****
  • Posts: 5337
I do not know why you do not have a standard header: putting right the…………

Another very interesting pair - I have both on my list to scratch build one day, but when I do get around to them it will be one at a time! Looking forward to seeing these two gems being brought to completion. Also looking forward to the next RE 8 instalment, but will be away for a few days so I will just have to wait a bit longer….

Stephen.

Offline IanB

  • Hero Member
  • *****
  • Posts: 2444
Thanks for the encouragement gents!
 Rick, Stephen - I had not looked upon this as a "correction" build, but it looks as though it may turn out that way!

 I'm waiting for some decals for the double Fokker build so I took the Baby out again today...the first thing I had to do was thin the fuselage sides to get the cockpit opening a little more to scale. Then I compared the fuselage to the drawings and realised that the top of the nose needed to be lowered a little - taken care of very easily by a little sanding, but more importantly, the rear fuselage was way too deep.

I decided the easiest way around this was to cut the bottom off completely, chamfered slightly, so that I could simply add a piece of plastic card to give me a new underside.So it was marked up....


This shot shows one side done, and the other side marked with a black marker to show just how much was removed..


and finally it matches the drawings...


 The last correction that is needed may have to wait until the fuselage is together. The upper fuselage and cockpit opening are both wrong. Because the kit was moulded as a Schneider, with the raised forward fuselage, I will need to add filler to restore the correct curve over the top. The cockpit opening is also too square at the front, and too elongated at the rear, and needs to be more of a regular oval shape. I think the easiest way to do that will be to overlay a piece of plastic card once it's all together, but I may rethink that later.

Ian

« Last Edit: July 04, 2017, 03:15:37 AM by IanB »

Offline IanB

  • Hero Member
  • *****
  • Posts: 2444
I have repainted the Fokker D.I fuselage so couldn't do much with that today.....back to the Baby!

I took another look at the floats and realised that they, too, are way over sized. So that was today's task. The shape was not far off but they were much too deep, and also needed quite a bit of filler on the seems along the sides. Here's one sanded down and compared to the uncorrected kit item....


The same treatment was given to the second main float and the tail float, which fortunately only needed a little filling and minor reshaping.....


Followed by half an hour removing everything from my bench and cleaning all the sanding dust!

 That should be all the major corrections taken care of, so next up should be some actual progress...

Ian
« Last Edit: July 04, 2017, 03:18:24 AM by IanB »

Offline steveb

  • Full Member
  • ***
  • Posts: 237
Man, that's quite a bit of work! I don't know if I'd ever have the courage to attempt a vac-form build.
Where do you find those drawings?

Thanks,
Steve

WarrenD

  • Guest
Re: Sopwith Tabloid (Classic Planes) and Baby (Eduard), another 1:72 double build
« Reply #10 on: September 13, 2016, 07:46:14 PM »
Where do you find those drawings?

Windsock Datafiles, you can find them used on evil-bay, Byrd Aviation Books here in the U.S., or direct from the publisher:
http://www.windsockdatafilespecials.co.uk/datafiles-10-c.asp

FWIW, HTH,

Warren

Offline IanB

  • Hero Member
  • *****
  • Posts: 2444
Re: Sopwith Tabloid (Classic Planes) and Baby (Eduard), another 1:72 double build
« Reply #11 on: September 13, 2016, 10:55:19 PM »
Thanks Warren!
Yes, I use Datafile drawings for all my builds. They are not 100% accurate though, and I always check the dimensions of the drawings against the quoted measurements for each aircraft and adjust as necessary on my printer. Some, such as the Fokker D.I, actually vary on the same page and have the wingspan different in plan and front views! So a little extra care and checking is needed to be sure.

Ian

Offline RAGIII

  • Hero Member
  • *****
  • Posts: 18901
Re: Sopwith Tabloid (Classic Planes) and Baby (Eduard), another 1:72 double build
« Reply #12 on: September 14, 2016, 12:14:18 AM »
Ian,
Just absolutely outstanding work on the fuselage correction as well as the floats. This is continuing to be a great build thread!
RAGIII
"A man has to know his limitations": Harry Callahan

"Don't slop it on" Lynda Geisler

Offline lone modeller

  • Hero Member
  • *****
  • Posts: 5337
Re: Sopwith Tabloid (Classic Planes) and Baby (Eduard), another 1:72 double build
« Reply #13 on: September 14, 2016, 01:41:46 AM »
So I was right - these will be correction builds after all! Still excellent progress and great to see these being built.

I agree with you about the WS DataFile drawings - there are errors in them including differences in plan and elevation views which any modeller should take care with. I know to my cost……. The FE 8 has a side elevation drawing in what seems to be 1/76 scale on a supposed 1/72 sheet. 

Stephen.

Offline IanB

  • Hero Member
  • *****
  • Posts: 2444
Re: Sopwith Tabloid (Classic Planes) and Baby (Eduard), another 1:72 double build
« Reply #14 on: September 19, 2016, 10:31:31 AM »
Yes Stephen, you were!

 Since I'm still waiting for some custom decals from Poland for the Fokker build I've been doing small bits and pieces on this one in the meantime. I've added some rudimentary framework to both, and the firewall to the Tabloid. I'm not too worried about total accuracy here as most of it won't be visible.


I then looked at marking up the holes for the control cables and while doing so, realised that the cut out for the horizontal stabiliser on the Baby wasn't long enough - it finished too far aft. So that was marked up and filed out....


Then I marked the positions of the holes for the cables, and filed out the rear of the Baby fuselage to allow for the control cables for the water rudder...


That rear end cutout will be refined a little more once the fuselage is together.

Thanks for looking in!

Ian
« Last Edit: July 04, 2017, 03:22:28 AM by IanB »