Author Topic: Sopwith Pup - RNAS : WNW's 1/32  (Read 7968 times)

Offline Pete Nottingham

  • Hero Member
  • *****
  • Posts: 906
  • I chose the wrong week to stop sniffing glue
Re: Sopwith Pup - RNAS : WNW's 1/32
« Reply #15 on: January 24, 2014, 03:26:59 AM »
Great start Andi, nice looking interior, I agree about the PE, I never seem to have much luck using it, as you say a lot of it is far too small and fiddly.

Cheers

Pete.

Offline coyotemagic

  • Hero Member
  • *****
  • Posts: 7710
  • "Here's to not buggering it up." -Winston Chuchill
    • My Models
Re: Sopwith Pup - RNAS : WNW's 1/32
« Reply #16 on: January 24, 2014, 03:57:35 AM »
Outstanding start on the innards, Andi.  Your wood grain looks fantastic.
Cheers,
Bud
"All men dream: but not equally. Those who dream in the dark recesses of the night awake in the day to find all was vanity. But the dreamers of day are dangerous men, for they may act their dreams with open eyes, and make it possible." -T. E. Lawrence

Offline mgunns

  • Hero Member
  • *****
  • Posts: 2255
Re: Sopwith Pup - RNAS : WNW's 1/32
« Reply #17 on: January 24, 2014, 04:26:06 AM »
Hello Andi:

It all looks pretty good from where I sit at my computer terminal, I'd say you're off to a pretty darn good start.  I like the figure as well.  Where did you acquire him?

Looking forward to more as you progress.

Best

Mark
Mark

We few, we happy few.....

Offline Ernie

  • Hero Member
  • *****
  • Posts: 3961
  • "Once more into the breach"
Re: Sopwith Pup - RNAS : WNW's 1/32
« Reply #18 on: January 24, 2014, 08:17:23 AM »
I am hanging on your every word as my next project will be a Pup.  I will
be very interested in your final thoughts re the PE.  I'm up in the air on that
one.  Your progress so far is looking terrific.  I really like the wood work and
your interior rigging. Well done, my friend.

Cheers,
Ernie :)
The new old guy, take two...

Offline Des

  • Administrator
  • Hero Member
  • ******
  • Posts: 9325
    • ww1aircraftmodels.com
Re: Sopwith Pup - RNAS : WNW's 1/32
« Reply #19 on: January 24, 2014, 02:03:42 PM »
Well done Andi, what you have achieved so far looks really good, BTW, I hate PE and avoid it as much as possible.

Des.
Late Founder of ww1aircraftmodels.com and forum.ww1aircraftmodels.com

Offline PrzemoL

  • Hero Member
  • *****
  • Posts: 4920
  • There was Eru... and he made first the Ainur...
    • Przemysław Litewka
Re: Sopwith Pup - RNAS : WNW's 1/32
« Reply #20 on: January 24, 2014, 06:00:11 PM »
Very nice Pup interior in the making, Andi. Keep it up! You are on the good way to build a great model.
Ash nazg durbatuluk, ash nazg gimbatul,
Ash nazg thrakatuluk, agh burzum-ishi krimpatul.

Offline Andi Little

  • Full Member
  • ***
  • Posts: 182
Re: Sopwith Pup - RNAS : WNW's 1/32
« Reply #21 on: January 26, 2014, 11:57:01 PM »
Very many thanks all - I appreciate the encouragement ... a lot!


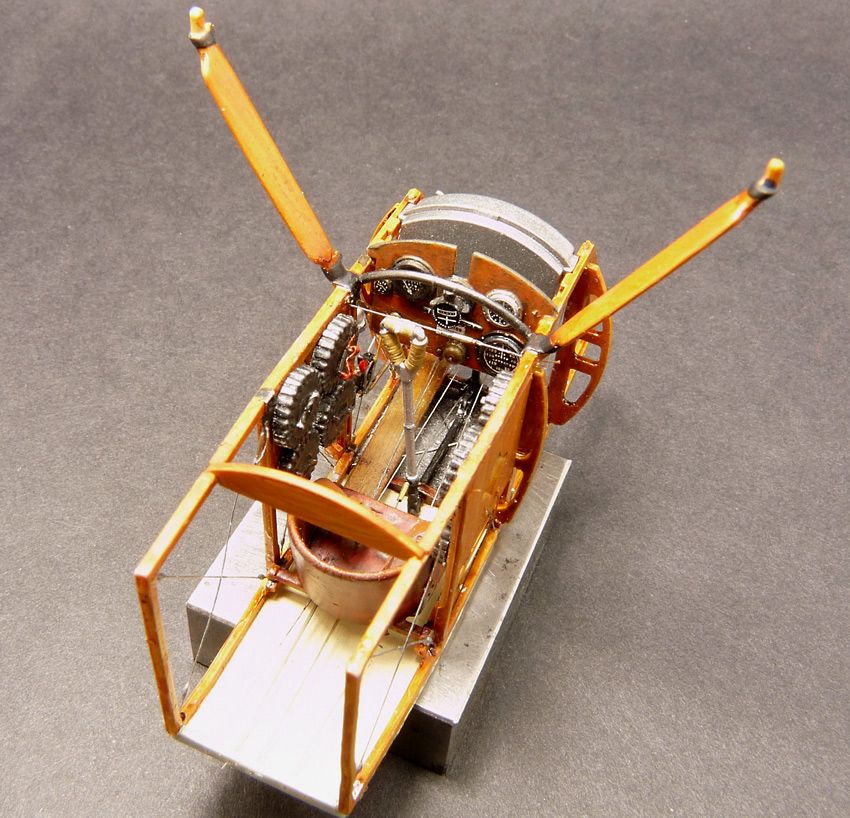
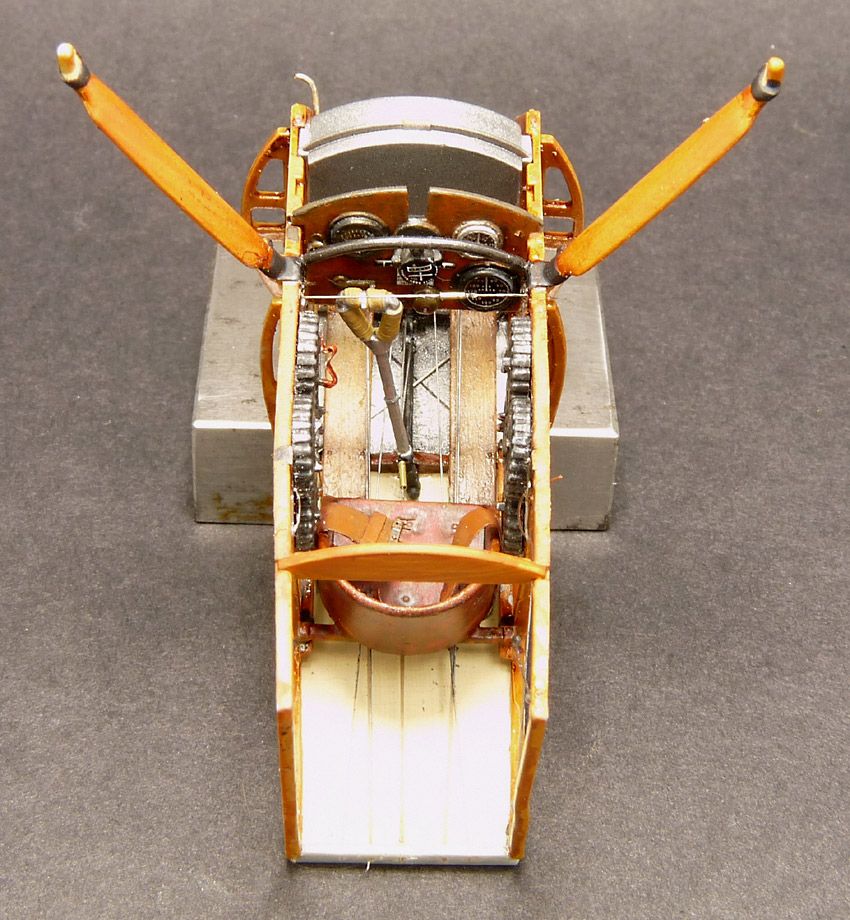
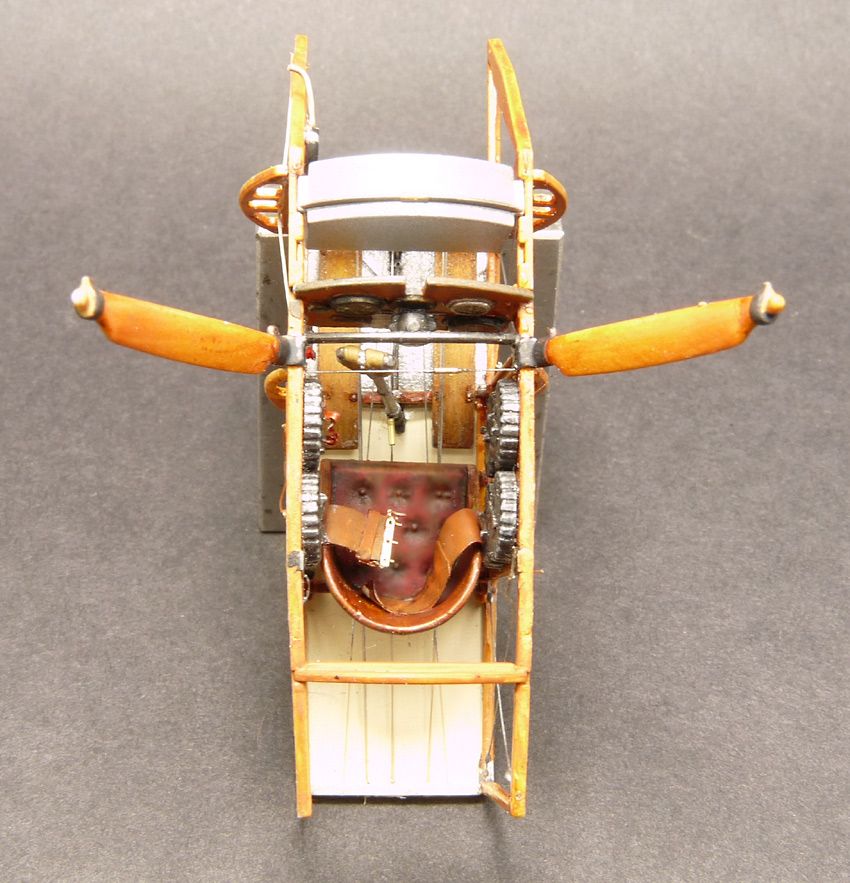
So, an addendum rather than an update, but I have the little horror together now. And it's like it's made from spun sugar ... I'm terrified of it. I hold it so gently for fear of crushing it that nine times out of ten I drop it anyway causing all manner of injuries!
................It's not what I see on here? But I do believe I'm making headway building these yur' airyplanes ... although I think most of the applause should go to the kit - it makes me look good! ??

Pic's then ...........................


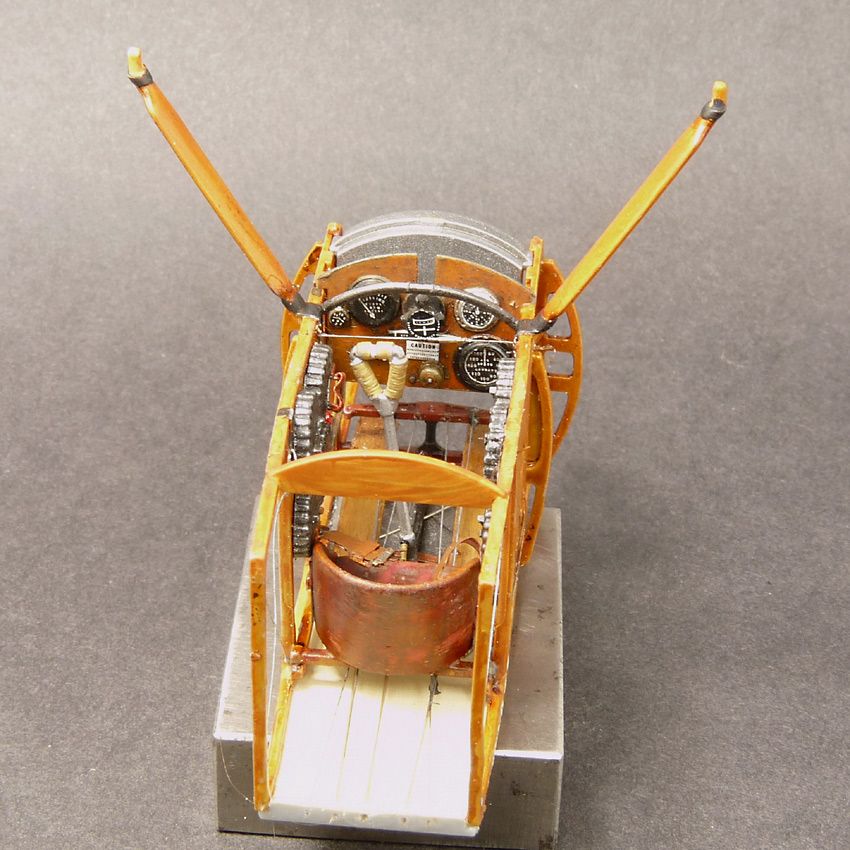
For those that may be unfamiliar with my posts (we're talking an idiot abroad here) that little steel block is an old apprentices "test piece" and it measures 1"x1¼" ... if only for a size reference? ... (25x32mm in round metric figures) 10mm or 3/8's thick.


Now then ................... the question of the Photo etch?

One must understand that this is just how I found it, and that these opinions are simply mine own: and in no way should reflect on any product or manufacturer.

But, I'm not impressed. They're fussy, they're fiddly - I'm at a loss to see how they choose what bits to detail, and largely they seem to make little impact on the overall "look" of a component part. YES!! I know there are bits that work beautifully, and that some are going to look really impressive but these to my mind make up such a small part of the "fret" that I simply chose not to use most of it - and in some cases was actually "unable" to use it. I would suggest that if your sight is compromised, or your fingers have lost their dexterous quality ... then I'm afraid like me you might be welcoming a world of frustration onto your bench.
Again this might just be me? - But the WNW's kits although fantastic do represent quite an investment, the A/M-etch is not cheap by any means, and I might just be struggling to justify the additional expense - I could certainly spend those pennies elsewhere about my hobby and see more for my money.
These are pretty hard edged reasons {and perhaps making me sound a bit Scrooge like) but if you want a simple perhaps more emotive reason .................. I didn't enjoy the experience at all, just a bit frustrating and not a little disappointing.

Of course your mileage may vary - but I shall study any upgrade frets in the future and be quite hard in my decision making - I want a go at the thread bare lozenge decals, as I do the wood grain ones ... and one can't just chuck money at a kit for ever as I have this little philosophical devil that sits on my shoulder chanting into my ear that ever contentious dichotomy .................

"Are you a modeller? Or an assembler?" ..............

Laters everyone...............
KBO ............. Andi.

Offline lcarroll

  • Administrator
  • Hero Member
  • ******
  • Posts: 8565
Re: Sopwith Pup - RNAS : WNW's 1/32
« Reply #22 on: January 27, 2014, 12:14:33 AM »
Andi,
    I generally agree with your comments on Photo Etch. It's expensive ,"fiddly", and very difficult to work with. The smaller parts for me develop into an "eye test" and manual dexterity challenge I usually come in last at. It's greatest fault IMHO is the two dimensional nature of it; I find it less frustrating and more satisfying to scratch build the part then to try to add three dimensional "depth" to it. There are exceptions of course however I find I use it less with every consecutive Build to the point of nearly not at all at this point.
Cheers,
Lance

Offline Ian from Doncaster

  • Hero Member
  • *****
  • Posts: 1164
Re: Sopwith Pup - RNAS : WNW's 1/32
« Reply #23 on: January 27, 2014, 12:45:51 AM »
Hi Andi, great 'pit you have here :)

As for PE, it has its place IMHO but some of the extras for WNW kits add little.  Take for example, the pulley assemblies seen through the inspection panels in the Sopwith Pup and Tripe wings.  No doubt the PE will make a very delicate pulley that may be just a little easier to paint in component form tan the kit moldings, but the kit moldings are good enough, with careful painting, to model this part of the aircraft anyway - especially when you need to remove the molded parts.  That is the bit I don't like about PE, I would damage the model more during the molding removal than the gain from using the PE.

Offline Ernie

  • Hero Member
  • *****
  • Posts: 3961
  • "Once more into the breach"
Re: Sopwith Pup - RNAS : WNW's 1/32
« Reply #24 on: January 27, 2014, 02:11:21 AM »
Andi, you done wonderfully with the cockpit.  Beautiful work.  I really like the
honey coloured woodwork.  Great job on the instrument panel.
  Out of curiosity, how solid are the Cabane struts?  I've never done a Pup or
Tripe and have always wondered.  Silly question, but I've always been nervous
about singular struts. :-[
  As for the PE...I appreciate you input.  Lots of food for thought.  Truthfully, I am
still on the fence on that one.  I've used them in most of my builds but like you mentioned,
I've never used all from the fret.  The two dimensional aspect is a pain, for sure, but can often
be improved on.  Whether they are "worth it", depends...some of them are pretty expensive.
 I guess it's a beauty is in eye of the beholder situation. 
  It's an enjoyable build Andi and I'm looking forward to the next updates.

Cheers,
Ernie :)
The new old guy, take two...

Offline mgunns

  • Hero Member
  • *****
  • Posts: 2255
Re: Sopwith Pup - RNAS : WNW's 1/32
« Reply #25 on: January 27, 2014, 03:02:01 AM »
Hello Andi:

I think your 'pit is coming along nicely and looks outstanding the way you have it.  I too like the honey toned wood grain you have achieved.  (I am still working on that one).  I agree with you about the PE.  I find the fret that WNW supplies more than satisfies my needs.  I have popped for some aftermarket stuff, only to find I use very little of it as it is just too fiddly.  Even the cooling jackets for the Spandau's in the WNW kits I find fiddly and sometimes I just use the alternate Spandau rather than frustrate myself with the PE.  Sometimes it works, other times it doesn't.  Overall I think it comes down to modeling basics, fill the seams, good paint, clean assembly, some weathering, (something I am struggling with) and it looks good.  Assembler or builder?  It is a hobby and it is supposed to be fun, and I am keeping it fun in my part of the frigid, arctic, snowy, "Great" upper Midwest.  This forum and the hobby keeps me sane during this time of the year; "The Dead of Winter".  Notice there is never a "Dead of Summer"?  Oh well, I digress.
The struts are a pretty sturdy assembly, just require a little care, but fairly robust.  It is a great kit.
Looking forward to more Andi.

Best

Mark
Mark

We few, we happy few.....

Offline IFF1418

  • Hero Member
  • *****
  • Posts: 1541
Re: Sopwith Pup - RNAS : WNW's 1/32
« Reply #26 on: January 27, 2014, 03:48:01 AM »
Hello Andi,

Very nice work on the interior, nice woodcolor and wonderful instrument panel. Bracing very well done. So this is a great start!

Kind regards
Patrick

Offline Andi Little

  • Full Member
  • ***
  • Posts: 182
Re: Sopwith Pup - RNAS : WNW's 1/32
« Reply #27 on: February 01, 2014, 11:27:35 PM »
Gentlemen................

Not so much an update, more of a request for an opinion based on the boards collective wisdom?


As can be seen I have the cockpit now buttoned up inside the fuselage: Just a smidge of vanity filler along top and bottom seams - I'm sure it will end up being micron thin once sanded down but experience dictates that nano-measurements become painfully visible once you've committed yourself to a coat of paint.
Thanks to sharing of information on the board I seem to got away with minimum fettling of cockpit floor in order to stop it fouling the wing saddle. And just a touch of "schmoozing" to get a nice clean "sit" for the cockpit coaming etc.
I've just given those oval panels on the nose a little bit of work to make them "stand out" just a touch more, I don't trust my ability to not bury them in paint otherwise.
And!! there's the crux of this matter: and my request for advise. Would it be better to button all these panels up and then mask and paint - or paint separately and then assemble. My natural "MO" (in this instance) would have me fit all these panels and then paint in order to minimise the ingress of paint to the finished interior.
Perhaps this a silly question, ........but I've learnt if nothing else, that most everything I know seems to count for little!!

Would appreciate your thoughts cheps!
KBO ............. Andi.

Offline IFF1418

  • Hero Member
  • *****
  • Posts: 1541
Re: Sopwith Pup - RNAS : WNW's 1/32
« Reply #28 on: February 01, 2014, 11:50:16 PM »
Hi Andi,

Most of the cockpit cowlings of the Sopwith Tripe were painted seperately (see the build logs) so I guess that it would be better for the Pup too. Your closing looks very good and neat,  I'm sure this will be a great build!

Kind regards
Patrick

Offline LindsayT

  • Hero Member
  • *****
  • Posts: 844
  • "Somehow it didn't seem like war at all..."
Re: Sopwith Pup - RNAS : WNW's 1/32
« Reply #29 on: February 02, 2014, 12:01:45 AM »
Andi, fwiw I had good luck painting the panels separately. All the usual caveats regarding no paint on joining surface apply. One thing that tripped me up, though that you might want to watch out for. I tried to get pretty and assemble panels out of order. End result? Heartache and pain. I learned a good lesson to always follow Wingnut's order of operations.

Regardless of what you do, I'm looking forward to seeing how it turns out.

Lindsay