Author Topic: 1/72 Zeppelin-Lindau (Dornier) Rs II  (Read 28552 times)

Offline Alexis

  • Hero Member
  • *****
  • Posts: 7947
  • Love the self
Re: 1/72 Zeppelin-Lindau (Dornier) Rs II
« Reply #45 on: October 14, 2017, 09:53:26 AM »
Very interesting subject and cool . Super work so far Stephen  :)


Terri
Hurra ! , Ich Leben Noch
Body and life is a vessel we use to travel the planet . Femininity is the gift , The miracle comes from what we do with it .

Offline NinetythirdLiberator

  • Hero Member
  • *****
  • Posts: 1590
Re: 1/72 Zeppelin-Lindau (Dornier) Rs II
« Reply #46 on: October 19, 2017, 01:48:36 PM »
Geez, Stephen!  How on earth did I miss this one!  One of my favorites and I have always contemplated making one from scratch.  Incredible so far!  Well...pretty dang unbelievable if you want the truth.  :o :o :o :o

Will be watching intently.

Dan

Offline lone modeller

  • Hero Member
  • *****
  • Posts: 5322
Re: 1/72 Zeppelin-Lindau (Dornier) Rs II
« Reply #47 on: October 21, 2017, 07:00:34 AM »
Evening All,

Thanks Ian, Terri and Dan for dropping by. Yes Ian this is by far the largest scratch build that I have attempted, and it truly was a very large machine. Remember too that crew members were in the hull - originally to service the engines in flight!

Good to have you on board Dan - glad you like it too. I am sure that you could scratch build one of these too - I would like to see you do it if only to compare construction techniques and results!

I have not reported anything recently as I have been away to visit my brother, but we have been busy together as he has helped me with some of the work where two sets of hands were necessary and with a process which I have not mastered - soldering.

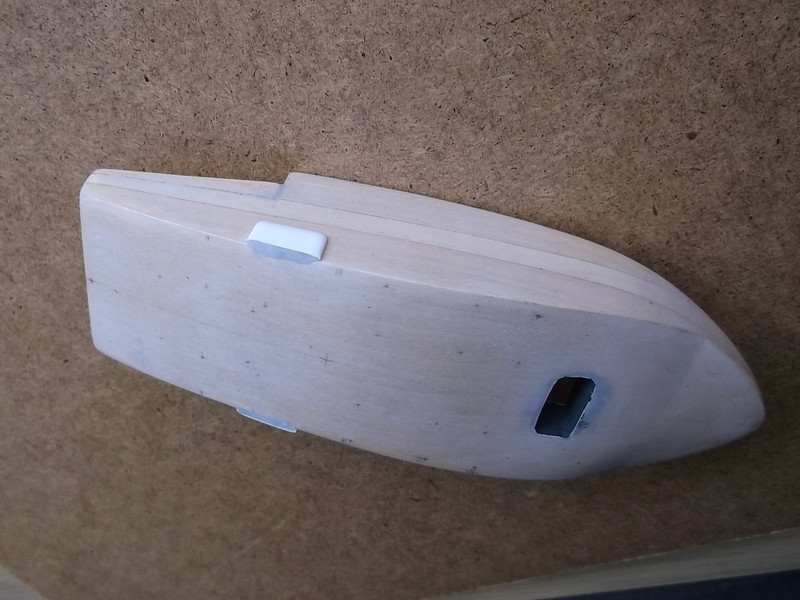
Before I left to see him though I added two small pieces of 60 thou card to the middle of the hull sides. These represent where the rear cabane struts were fixed to the top of the hull: the hull tapers slightly in plan but the cabanes were parallel with the thrust line and set close to the hull edge at the front.. Consequently the rearmost attachment point was slightly outboard of the edge of the hull and some form of bracket was fixed and then concealed behind a cover. It is not entirely clear from the photos what this looked like so I have shaped the card to what I think is a fair representation:


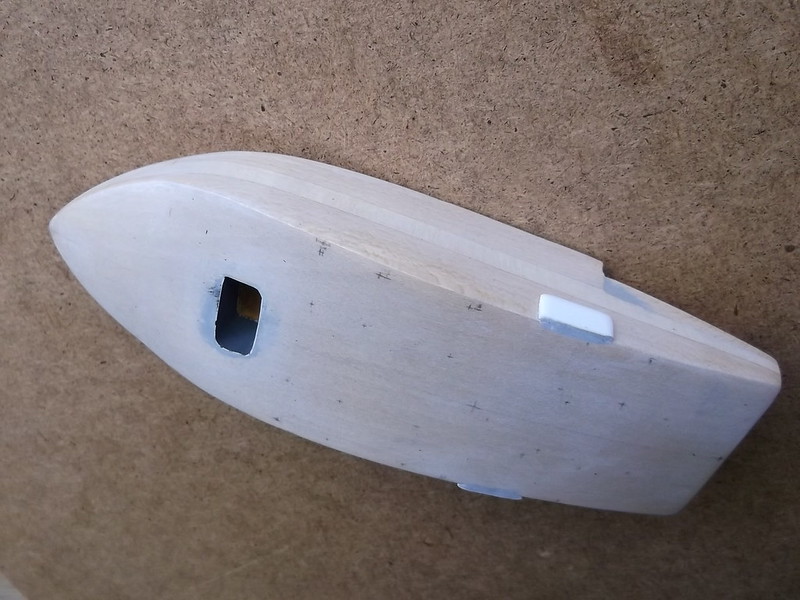
All of those crosses on the top of the hull mark where I will have to drill locating holes for the cabane and engine support struts. The one in the centre is where the boom will be inserted into the top of the hull. First though the boom had to be made. For reasons of strength I decided to make this from brass rod, using 1/16 inch (1.6mm) for the arm which will be fixed into the hull and the 4 long arms, and 3/64 inch (1.19mm) for the cross pieces. I had intended to superglue these together but after a discussion with my brother he suggested that this would not be strong enough particularly given that the top side booms are attached to a single boom which enters the top of the hull via a triangular piece. This strange design came about as a consequence of the redesign of the engine installation: originally this machine was powered by three engines in the hull connected to the propellors via drive shafts. This arrangement was not very satisfactory for a number of reasons, among them being that one of the drive shafts broke causing the aircraft to make a forced landing. Then when the pilot tried to take off the central unit broke away and severely damaged the tail booms in the process. This caused a major redesign of the aircraft. The hull was reshaped, 4 engines were fitted instead of three, and these were placed in tandem in nacelles between the hull and the wing. This in turn meant that the upper boom attachment had to be reduced to a single central arm to clear the rear propellors.

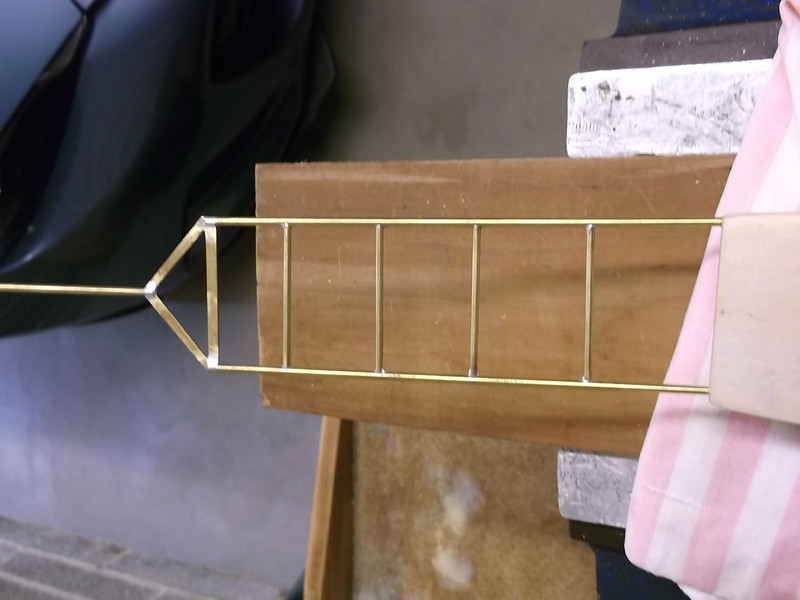
My brother is very skilled with a soldering iron so he offered to make the upper part of the boom with the triangular joining piece and central arm for me. The triangular section was cut from a piece of brass sheet and after the boom parts had been cut form rod and the ends filed and cleaned, they were mounted on a jig of balsa wood to check size and alignment prior to soldering:


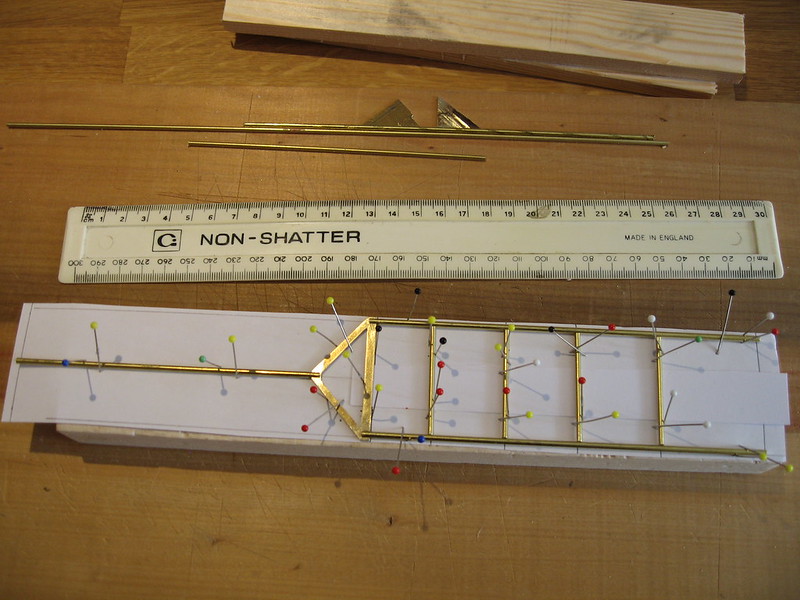
Both ends of the boom are too long. This was done deliberately so that they can be cut to the correct lengths later: in particular the forward end needs to be buried as deeply into the hull as possible to give maximum strength. The boom was soldered and the new piece had the very small amounts of excess solder removed with a file.

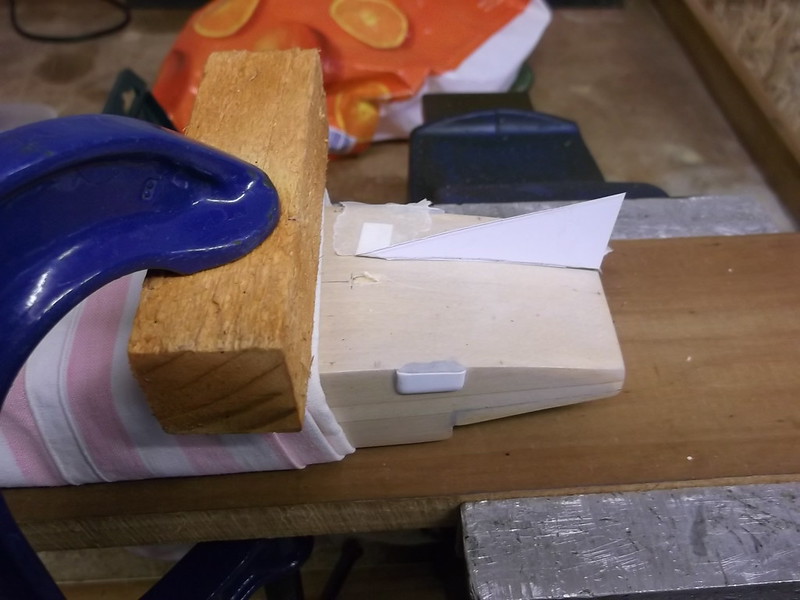
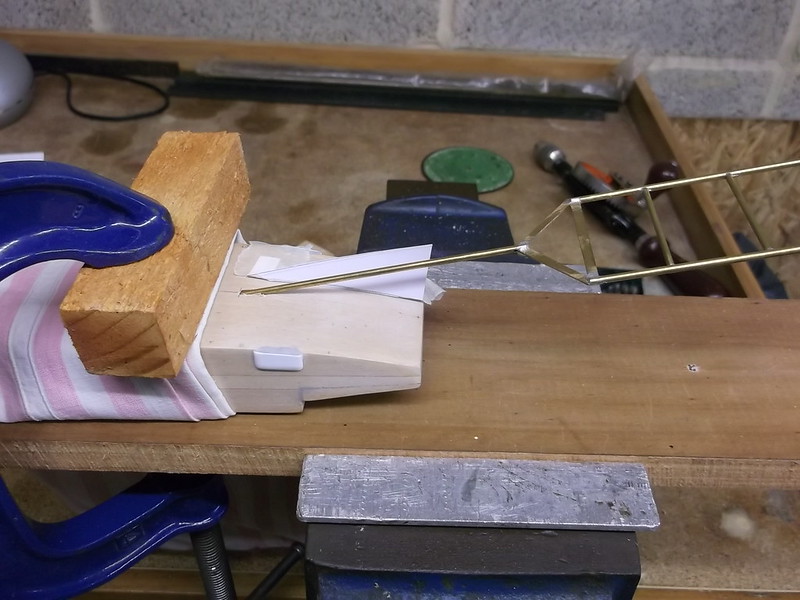
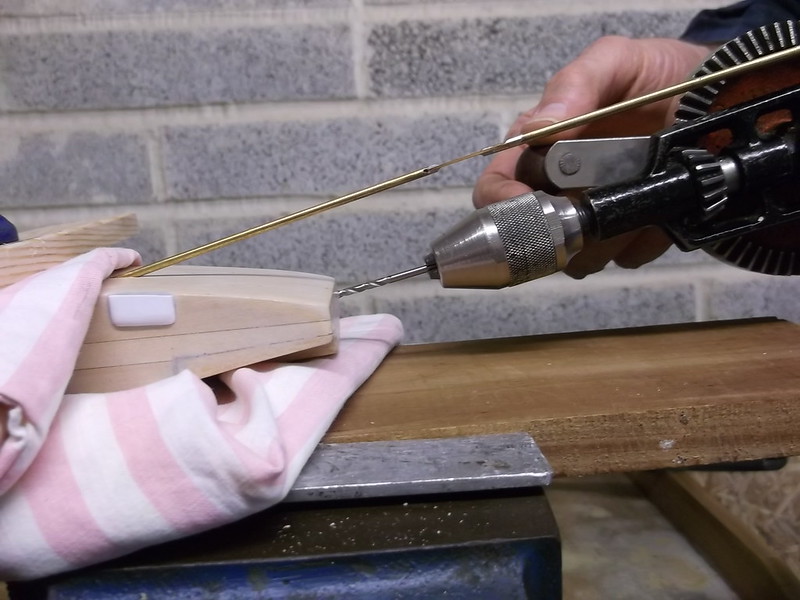
Then we set about drilling the holes for the booms in the hull. The hull was wrapped in cloth to protect it as it was held in a vice and G clamp to make sure that there was no movement when we started to drill the holes. The first one to be drilled was the most difficult: this was the central hole in the middle of the hull. This has to penetrate at a low angle which meant that a small vertical pilot hole was drilled to a depth of approximately 1/4 inch (0.5cm), and then a paper template which had been made from the plan was crudely taped to the hull just to one side of the it:


We checked the alignment by pushing the single arm of the boom into place:


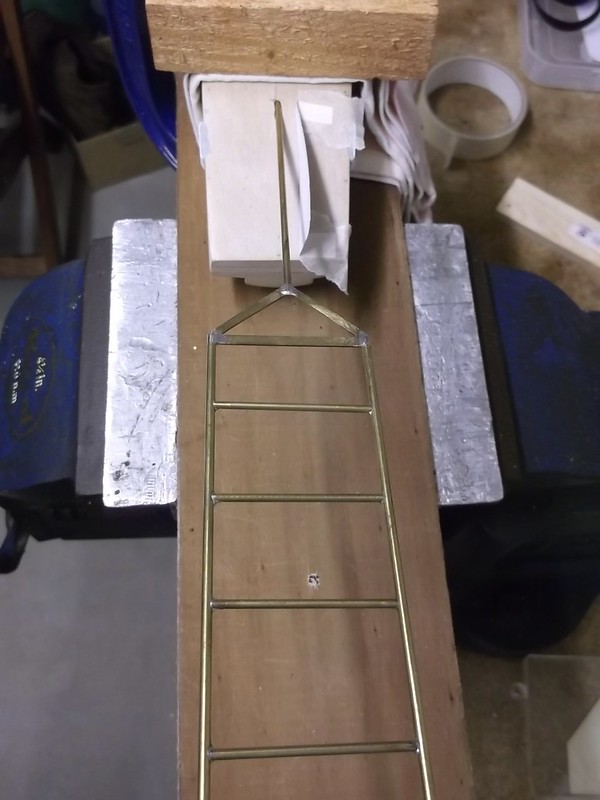
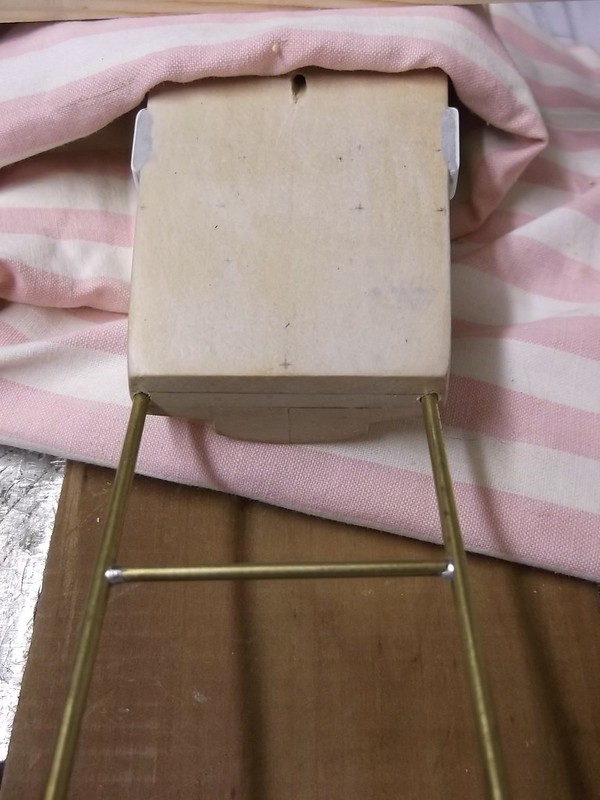
No extra drilling needed there! This now formed a convenient alignment jig for the two holes which had to be drilled in the lower rear of the hull where the lower boom arms will be fixed:


When both holes had been drilled we were able to use the boom to make sure the gap and angle was right:


Now I have to cut the remaining the parts of the boom assembly from brass rod and fit it to the hull with epoxy and superglue. However I will drill all of the remaining holes in the hull and wing first, as the hull will be easier to handle without a large lump of brass sticking out of the rear!

Thanks for looking.

Stephen.

Offline RLWP

  • Hero Member
  • *****
  • Posts: 1494
  • Bodger
Re: 1/72 Zeppelin-Lindau (Dornier) Rs II
« Reply #48 on: October 21, 2017, 07:38:42 AM »
Very clever!

When does it start looking like an aeroplane?

Richard
Hendon for flying - the fastest way to the ground!

Offline RAGIII

  • Hero Member
  • *****
  • Posts: 18845
Re: 1/72 Zeppelin-Lindau (Dornier) Rs II
« Reply #49 on: October 21, 2017, 08:08:56 PM »
Extremely well done work on the boom assembly and mounting! Really coming along now!
RAGIII
"A man has to know his limitations": Harry Callahan

"Don't slop it on" Lynda Geisler

Offline Des

  • Administrator
  • Hero Member
  • ******
  • Posts: 9325
    • ww1aircraftmodels.com
Re: 1/72 Zeppelin-Lindau (Dornier) Rs II
« Reply #50 on: October 21, 2017, 08:48:06 PM »
Very nicely done boom assembly, the soldering is extremely neat.

Des.
Late Founder of ww1aircraftmodels.com and forum.ww1aircraftmodels.com

Bughunter

  • Guest
Re: 1/72 Zeppelin-Lindau (Dornier) Rs II
« Reply #51 on: October 22, 2017, 07:09:00 AM »
Again, that is a fantastic project! What I always say: scratching with brass and soldering is pure fun, and you and your brother made a good job!
I don't know this aircraft and I'm curious how it will look like.

Cheers,
Frank

Offline lone modeller

  • Hero Member
  • *****
  • Posts: 5322
Re: 1/72 Zeppelin-Lindau (Dornier) Rs II
« Reply #52 on: November 02, 2017, 08:39:57 AM »
Evening All, Thanks Richard, Rick, Des and Frank for the very kind remarks - they are much appreciated.

Richard: I am hoping that the model will begin to look like an aeroplane in this post, but it will be some time before the wing is fitted because it is a parasol held by cabanes and large V srtuts to the hull sides. The engines were mounted between the hull and the wing.

The first step was to attach the top boom arms to the hull. I laid the boom on to a set of plans and cut off the excess rod at both ends, leaving enough at the front end to be pushed about 2.5 cm into the hull. This will ensure that it does not move or fall out later.. The boom was supported by three upright posts at the very rear of the hull - these were made from brass rod and expoxied into holes drilled into the hull. These holes were drilled at the same time as others which will be used later for among other things, engine support struts, stub wings, and cabane struts. In all 41 holes of different sizes, and all had to be in the correct places - not 3mm or 5mm too much to one side or the other. I too can get cross-eyed when measuring so I made a tracing from the plans to show where all the holes on the top of the hull needed to go and transferred this to the model. I could then check each location and correct if necessary without finding later that I had mis-drilled one or two! The holes in the sides of the hull for the stub wings were easier as I will explain later.

Back to the boom: with the vertical posts in place I epoxied the front post and pushed this into the hole in the centre of the hull until the triangular section at the front of the boom sat directly over the posts. A quick dab of CA on the tops of the posts and put the boom on to the posts: the CA made sure that the boom did not move while the epoxy cured overnight. In the morning I added the centre strip in the triangle at the front end of the boom - this was from 15 tou plastic card held also held in place with CA.


The last photo shows the holes where the lower boom arms will be inserted into the hull However before that stage I cut the fins from 30 thou card and rouned the leading and trailing edges: these were fabric wrapped around the boom struts so did not need to be either aerofiol section of very thin. These two pieces of card were CA'd to the underside of the upper boom arms:


Now the lower boom arms could be epoxied into the rear of the hull and CA'd to the card fins. This method of using epoxy and CA means that the arms are securely fixed to the wood and plastic: I have some wriggle time to get the boom in the correct place with the epoxy, and when it is where I want it the CA holds it in place while the epoxy cures.


When the above was set and rigid I could add the remainder of the boom struts - vertical and horizontal. I started with the horizontal strut at the rear: I measured the gap with a pair of dividers, cut the rod and filed the ends with a round file to fit into the circular boom arm and CA'd it into place:


Having checked that all was square and true I was able to cut the remaining pieces of brass rod as per the above and glue into place. I finished by cutting the vertical centre posts from 20 thou plastic rod and CA'd them into place too:


At last I have a structure which is beginning to look like a flying boat! There are alternative ways to do this but experience has taught me that making the parts as I go along is better in the end because I can measure everything to fit together exactly rather than finding that something is not quite square, the wrong length, too short, etc when the completed sub-assembly is tested against the other part of the model. I also used CA for the brass attachments because it was easier and safer than solder and a hot iron: imagine trying to hold the rod with one hand and solder and iron in another......and then get it all square and true!!!

The front arm of the boom was braced on each side by small struts which I represented with 15 thou rod. Of course holes had been drilled in the top of the hull to receive these.... Finally I added the stub wings at the rear of the hull. I had drilled two holes in the edges of each wing and inserted a piece of stiff wire which was held in place with CA. The wire ends were held against the hull to mark where the holes should be drilled. (This was actually done before I fixed the boom into place  - I am describing it here to make it easier to follow). Add a drop of CA to the ends of the wires and insert into the holes in the hull. A little filler as necessary was run along the joint and the whole rubbed down and primed.


Thanks for looking.

Stephen.

« Last Edit: November 02, 2017, 08:46:05 AM by lone modeller »

Offline RLWP

  • Hero Member
  • *****
  • Posts: 1494
  • Bodger
Re: 1/72 Zeppelin-Lindau (Dornier) Rs II
« Reply #53 on: November 02, 2017, 08:51:24 AM »
It looks like the unfortunate offspring from the mating of a Bleriot IX and a speedboat

Loving this one Stephen

Richard
Hendon for flying - the fastest way to the ground!

Offline IanB

  • Hero Member
  • *****
  • Posts: 2441
Re: 1/72 Zeppelin-Lindau (Dornier) Rs II
« Reply #54 on: November 02, 2017, 10:35:00 AM »
I can't help laughing at Richard's comment, but at the same time, this is looking very good indeed. Lovely brasswork!

Ian

Offline RLWP

  • Hero Member
  • *****
  • Posts: 1494
  • Bodger
Re: 1/72 Zeppelin-Lindau (Dornier) Rs II
« Reply #55 on: November 02, 2017, 06:29:48 PM »
It is lovely, and scratchbuilding is an excellent way of raising awareness of these more obscure aeroplanes. After all, WNW is very, very unlikely to produce a kit

No disrespect intended, Stephen, quite the opposite

Richard
Hendon for flying - the fastest way to the ground!

Offline Des

  • Administrator
  • Hero Member
  • ******
  • Posts: 9325
    • ww1aircraftmodels.com
Re: 1/72 Zeppelin-Lindau (Dornier) Rs II
« Reply #56 on: November 02, 2017, 08:12:56 PM »
Coming along beautifully Stephen, the boom assembly looks very impressive and strong, looking forward to seeing the next updates.

Des.
Late Founder of ww1aircraftmodels.com and forum.ww1aircraftmodels.com

Offline lcarroll

  • Administrator
  • Hero Member
  • ******
  • Posts: 8554
Re: 1/72 Zeppelin-Lindau (Dornier) Rs II
« Reply #57 on: November 02, 2017, 10:21:37 PM »
It is lovely, and scratchbuilding is an excellent way of raising awareness of these more obscure aeroplanes. After all, WNW is very, very unlikely to produce a kit

No disrespect intended, Stephen, quite the opposite

Richard

    My compliments as well Stephen, great work all round and "hat's off" to your brother for his artistic soldering as well! Fascinating Build Log and a pleasure to follow along! 8)
Cheers,
Lance

Offline RAGIII

  • Hero Member
  • *****
  • Posts: 18845
Re: 1/72 Zeppelin-Lindau (Dornier) Rs II
« Reply #58 on: November 03, 2017, 12:58:15 AM »
Continuing to be a great build to follow! Looking closer to an aircraft now! Absolutely Lovely work as always!!
RAGIII
"A man has to know his limitations": Harry Callahan

"Don't slop it on" Lynda Geisler

Offline lone modeller

  • Hero Member
  • *****
  • Posts: 5322
Re: 1/72 Zeppelin-Lindau (Dornier) Rs II
« Reply #59 on: November 03, 2017, 05:31:21 AM »
Thank you all for the very kind comments gentlemen.

Richard I can assure you that no offence has been taken by your very amusing comment! I am sure that if WNW did produce a kit of this aircraft there would be many modellers who would wonder what on earth it was! I have to admit that I only found out about this by chance but it gripped my imagination and I just knew that I had to accept the challenge of trying to build one - for the reasons you have given!