Author Topic: Voisin III LAS 1/72  (Read 9582 times)

Offline Des

  • Administrator
  • Hero Member
  • ******
  • Posts: 9325
    • ww1aircraftmodels.com
Re: Voisin III LAS 1/72
« Reply #15 on: April 29, 2017, 08:38:00 AM »
It gets better and better with each update, well done Stephen.

Des.
Late Founder of ww1aircraftmodels.com and forum.ww1aircraftmodels.com

Offline IanB

  • Hero Member
  • *****
  • Posts: 2439
Re: Voisin III LAS 1/72
« Reply #16 on: April 30, 2017, 12:14:48 AM »
Coming on very nicely. I like the look of the rads, I'm still trying to decide how to go about making some for the Muromets, so may look into that method.

Ian

Offline lone modeller

  • Hero Member
  • *****
  • Posts: 5317
Re: Voisin III LAS 1/72
« Reply #17 on: May 06, 2017, 07:57:37 AM »
Evening All,

Thanks Des and Ian for leaving your kind remarks.

I have added the ribs to the wings from 10 x 20 thou Evergreen strip attached with liquid glue. These were then sanded down to take off the edges. I have also added the ailerons to the lower wings.

Many of you are aware that when it comes to pushers, both conversions and scratch builds, I have considerable form. However some may not know of the method that I use to construct the booms, so I will describe the method in detail here and in a later post. What follows is part one of a process - part 2 will follow after I have completed painting the wings, fuselage, tail units, etc. The problem with pushers is that the boom assembly must fit the wing trailing edges exactly. In some cases the horizontal boom arms may not be parallel, nor are they in line with the top of the wings. If the booms are assembled first from a side elevation drawing of the model, the spacing of the wings has to be absolutely precise or problems will arise when trying to attach the front ends of the complete booms to the trailing edges of the wings. I avoid this problem by attaching the horizontal arms of the booms to the wings before I put the top wing into place.


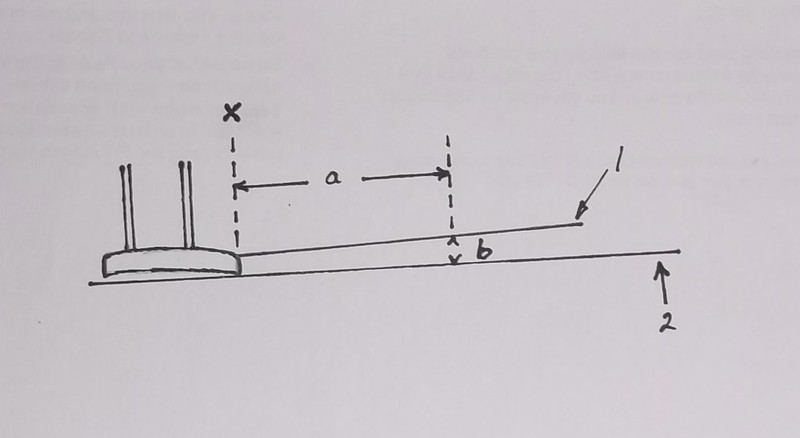
The drawing shows the wings and how to measure the angles of the booms. Line ' 2 ' is the horizontal which touches the front and rear of the underside of the wing, (not as in the drawing where it has missed the front edge - I know, I cannot draw properly!) Distance ' a' is measured to a convenient distance from the trailing edge of the wing - make it as far back as possible while at the same time being easy to measure, e.g. 5.5cm rather than 5.7cm. Height b is measured from the scale drawing: it is the difference between line ' 2 ' and the line of the boom ' 1 '  at the measured distance from the trailing edge of the wing: in this case 5.5cm. Height ' b ' tells you how high the support for the boom will need to be at 5.5cm from the trailing edge of the wing when the wing is lying flat on the desk/modelling bench. Now you can put your two supports, e g a piece of plastic card of the thickness ' b',  at distance ' a ' (in this case 5.5cm), one for each boom, behind the trailing edge of the model wing.  When you attach the booms to the top of the wing rest them on the supports while they dry out, and you will have the correct angle between the boom and the wing. NB the distance ' b ' may not be the same for both wings: you must measure each wing separately. I use Araldite to attach the booms to the wing because it sets very hard but gives me some wriggle time if needed. I make my booms from florists wire because it is about the right diameter and it is easy to roll straight but is also rigid and does not sag later. I file out a groove in the top of the wing trailing edges with a round file into which I can place the boom: this gives a better join between the wire of the boom and the plastic of the wing. 


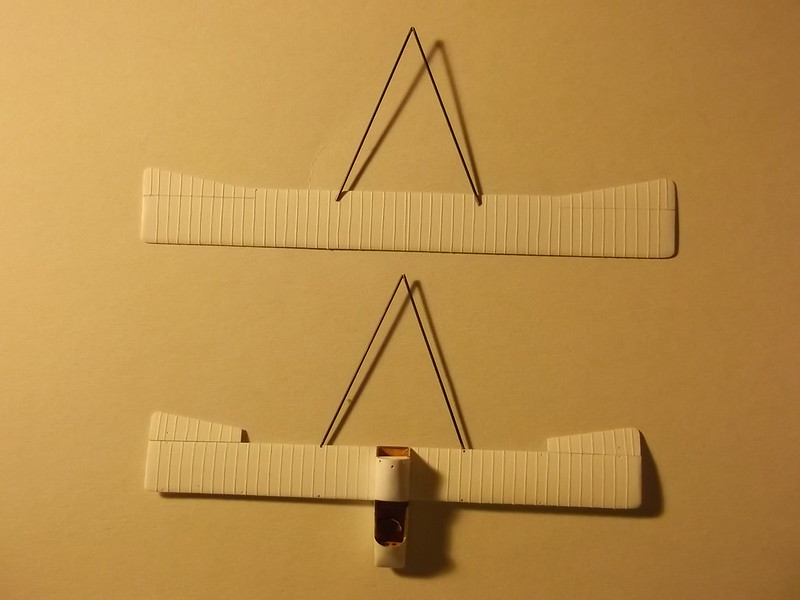
Above are the two sets of booms, one on each wing, for the Voisin which is currently under construction. Note that I joined the ends of the booms with superglue as this sets quickly and gives the structure a little additional support while the epoxy cures. The shadows show that the booms do not lie flat but are above the desk top: this is because I used the method described above, and this will ensure that when I put the top wing on to the lower one and join the rear of the booms to the rudder, they will be at the correct vertical distance apart. In a later post I will describe how I assemble the top wing and the remainder of the boom strut assembly. But first I must  paint the above assemblies and add the markings. 

Thanks for looking.

Stephen.
« Last Edit: May 06, 2017, 08:04:27 AM by lone modeller »

Offline IanB

  • Hero Member
  • *****
  • Posts: 2439
Re: Voisin III LAS 1/72
« Reply #18 on: May 06, 2017, 11:19:08 PM »
Very useful explanation, thanks Stephen! I have more than a few pushers in the stash as I also have a soft spot for them, but I've yet to tackle one.....

Ian

Offline Juan

  • Hero Member
  • *****
  • Posts: 2456
  • All gave some, some gave all.
Re: Voisin III LAS 1/72
« Reply #19 on: May 07, 2017, 12:39:46 AM »
Great progress and tutorial (at least for me).  The wings look great, heck all of it looks great.

Offline RAGIII

  • Hero Member
  • *****
  • Posts: 18842
Re: Voisin III LAS 1/72
« Reply #20 on: May 07, 2017, 10:55:03 PM »
Outstanding work Stephen as always! Thanks for the tutorial. It will be useful if I ever get the nerve to try a scratch build!
RAGIII
"A man has to know his limitations": Harry Callahan

"Don't slop it on" Lynda Geisler

Offline lone modeller

  • Hero Member
  • *****
  • Posts: 5317
Re: Voisin III LAS 1/72
« Reply #21 on: May 23, 2017, 06:05:14 AM »
Evening All,

Thanks Ian, Juan and Rick for the kind comments. Ian it is really time for you to try a pusher - they are not nearly as difficult as some seem to think - and as I used to do before I took the plunge. You could really show the rest of us how to do it!!

I have painted the model and the markings: the latter were hand painted. To put on the roundels I scored the circles with a pair of dividers and then painted the red and blue circles allowing the paint to fill the grooves. The serial number on the nacelle was printed on my home computer.


I have been drilling holes in the nacelle to take the various pipes and parts which are attached to it: this seems to have more holes than a Tilsiter cheese!

The engine was fixed via a pin from the rear of the engine which was put into a hole in the horizontal bar which crosses the rear of the nacelle. Then the braces from the rear end of the drive shaft to the bottom rear of the nacelle could be fixed. The small exhaust pipes which lead from the ring on the rear into the rear of the nacelle were made from bent 30 thou card and inserted into some of the holes mentioned above.

The radiators have been put into place and the pipes to and from the engine. The pipes were made from 20 thou rod and were fixed to the holes drilled in the fuselage and sides of the radiator blocks.


The next stage will be to add the top wing.

Thanks for looking.

Stephen.
« Last Edit: May 28, 2017, 08:27:20 AM by lone modeller »

Offline Des

  • Administrator
  • Hero Member
  • ******
  • Posts: 9325
    • ww1aircraftmodels.com
Re: Voisin III LAS 1/72
« Reply #22 on: May 23, 2017, 07:24:06 AM »
What a difference the paint and markings make, the colour you used is excellent and very eye-catching, this model is looking superb, can't wait to see the top wing in place then the fun part, the rigging.

Des.
Late Founder of ww1aircraftmodels.com and forum.ww1aircraftmodels.com

Offline Old Man

  • Hero Member
  • *****
  • Posts: 600
Re: Voisin III LAS 1/72
« Reply #23 on: May 24, 2017, 12:03:57 PM »
Looking really sweet, Sir.

Very nice indeed.

Offline lone modeller

  • Hero Member
  • *****
  • Posts: 5317
Re: Voisin III LAS 1/72
« Reply #24 on: May 28, 2017, 08:35:44 AM »
Evening All,

Thanks Des and OM for the encouraging remarks. This model is unusual because of the white finish - rather like RAF jets in the 1950's!

I have put on the top wing and rudder and all of the wing and boom struts. I will now describe part two of how I fix a wing and booms on a pusher in such a way that I ensure that the boom struts and rudder fit correctly first time.

I started this particular assembly by cutting two small indents in the leading edge of the rudder where the boom struts would join. (In reality the ends of the booms were attached to the rudder post by hinges but that is not easy to model in this scale so I compromised). The rudder was glued to the V of the lower boom with superglue and held in position while the glue dried. I had already measured accurately from the plans the inner wing struts: these were glued to the lower wing. While they were still pliable I lowered the top wing on to the struts having first put small blobs of cement into the holes on the underside of the top wing so that the struts could be eased into position and the wing lined up with the one underneath. The V of the upper boom was then edged into the slot on the leading edge of the rudder and superglued in place, making sure that the leading edge of the rudder was vertical. Now I supported the upper wing with some square Revell acrylic paint pots to make sure that nothing moved while the wing strut cement set hard.


The structure may look weak but in fact when it is properly dry it is quite easy to handle provided one is careful not to strike it hard or drop it. Adding the rest of the wing struts was very simple - they were eased into place one at a time after cement had been placed in the relevant holes in the wings. The outer struts are angled outwards on this model which is why I fixed the innermost struts first - the wings were rigid when I came to add the outer ones and they could therefore be put in place fairly easily: on other pushers I normally add the outer struts first when putting on the top wing because it makes a larger and more stable triangular structure. The boom struts could be cut to the exact length having been measured from the model with a pair of dividers: these were fixed with superglue. The cabane struts under the leading edges of the radiators and the single strut from the end of the engine drive shaft to the top wing completed the exercise.


This method has many advantages among which was that I was not trying to do too many operations simultaneously and could therefore focus on getting the alignments right. Once the inner wing struts had set I had a strong but slightly flexible structure to work with. The booms structures were essentially made to measure while the wings can be properly aligned and the rudder made vertical in relation to the thrust line of the aircraft. The outer wing struts being angled outwards did not cause a problem because the others were already in place holding the wings rigid. Now I can rig the underside of the top wing before I tackle the undercarriage.

Thanks for looking.

Stephen.

Offline ALBATROS1234

  • Hero Member
  • *****
  • Posts: 2657
Re: Voisin III LAS 1/72
« Reply #25 on: May 29, 2017, 10:41:51 AM »
Gorgeous man just gorgeous

Offline lcarroll

  • Administrator
  • Hero Member
  • ******
  • Posts: 8551
Re: Voisin III LAS 1/72
« Reply #26 on: May 29, 2017, 12:14:05 PM »
    Brilliant work Stephen, and a very pretty result. This is yet another outstanding model from your work bench, looking forward to seeing her rigged and completed.
Cheers,
Lance

Offline IanB

  • Hero Member
  • *****
  • Posts: 2439
Re: Voisin III LAS 1/72
« Reply #27 on: May 29, 2017, 11:46:56 PM »
Very nice Stephen, and your method for getting everything lined certainly seems to work well.

Ian

Offline lone modeller

  • Hero Member
  • *****
  • Posts: 5317
Re: Voisin III LAS 1/72
« Reply #28 on: June 05, 2017, 08:45:54 AM »
Evening All,

Thanks Scott, Lance and Ian for dropping by and leaving those encouraging remarks. Now I am tackling the tricky bits I appreciate your suport.

I have rigged the underside of the top wing as this will be much less accessible later, and I do not want to knock bits off the undercarriage assembly and have to put them all back again at a later stage. I have also put the undercarriage legs on: this aircraft had a pair of nose wheels which was unusual for the time. I made the rear most struts from 20 x 30 thou card which had been filed to aerofoil section, and the oleo legs for the front were made in the same way. The remaining struts were made from rolled wire as this was both stronger and represented better the steel tube of the original aircraft. The axle was made from plastic rod. The wire struts were glued into place using superglue. Holes had been drilled through the ends of the rear struts to take the axle which is held with liquid cement. The black pipes on the underside rear in the photos are the bottoms of the exhaust pipes. I have also put on the control rod from the cockpit - this ran under the fuselage between the undercarriage legs.


Those with sharp eyes will also have noticed that I have started to rig the rear bay between the fuselage nacelle and inner struts: this is because these are some of the most difficult wires to put into place and once again I am trying to put in parts with the minimum chance of knocking off something else. I have also put in the control lines under the fuselage nacelle as these too are going to be less accessible later, plus I am spreading out the rigging process between other operations so that I can at least retain some sanity when I try to complete this model.


Thanks for looking.

Stephen.
 

Offline Old Man

  • Hero Member
  • *****
  • Posts: 600
Re: Voisin III LAS 1/72
« Reply #29 on: June 06, 2017, 08:27:52 AM »
This is really looking good, Sir!

Kudos on the early stage rigging --- well done.