Author Topic: Another double build: Sopwith Pup (HR Models) and Triplane (Revell), 1:72  (Read 23899 times)

Offline IanB

  • Hero Member
  • *****
  • Posts: 2439
 I gave these two a gloss coat yesterday, so today I was able to take the next step - adding the fuselage decals.

 The Pup was easy enough, or so I thought. The blue of the kit decals is far too light, so I had to find something else. The aftermarket sheets I have don't have any fuselage decals big enough without the white outline, so I had to look elsewhere. The answer, strangely enough, came from the Airfix Pup! I built an old blister pack Pup a few years ago and the "Anzac" decal disintegrated. I contacted Airfix who sent me a new decal sheet, but it was for the rebox RNAS version so it was no help..until now! The blue is still a little too light, but acceptable, so I have used the roundels from it on this one.


 Unfortunately the white stripe around the fuselage is not provided as a decal so I will gloss coat these tomorrow, and when that's dry, I'll mask off the stripe and spray it.

 The Triplane was relatively simple in that the new issue decals are pretty good. The one flaw was the serial number, which was far too large.


 I have a sheet of Pegasus RFC/RNAS serial numbers, but unfortunately there is no "N", so I had to use one of the spare ones in the Pup kit. It's a little small, but far better than the kit decals.


That still didn't look right, so I moved the numbers closer together and trimmed the white backing panel.


 Not perfect, with the slightly smaller and bolder "N", but it's far better, and will suffice - it really isn't too noticeable to the naked eye.

  Thanks for looking in!

Ian

Offline Syd Solo

  • Sr. Member
  • ****
  • Posts: 258
You are doing a remarkable job with kits that really show their age. I have these two in my stash and have been afraid to tackle them because of the amount of correcting they require. You have provided me with both inspiration and a tutorial!

Anyone who takes on this scale is to be admired. Also, nice guns!

Cheers

Syd

Offline RAGIII

  • Hero Member
  • *****
  • Posts: 18833
Both are looking fantastic with the markings in place!
RAGIII
"A man has to know his limitations": Harry Callahan

"Don't slop it on" Lynda Geisler

Offline Juan

  • Hero Member
  • *****
  • Posts: 2456
  • All gave some, some gave all.
Hi Ian, your builds are turning out beautifully, your hard work is paying off.

Offline steveb

  • Full Member
  • ***
  • Posts: 237
Things are really looking good, Ian!

Steve

Offline pepperman42

  • Hero Member
  • *****
  • Posts: 4436
  • Sergeant, my brown pants.......
Nice progress!!

Steve

Offline IanB

  • Hero Member
  • *****
  • Posts: 2439
Thanks folks, much appreciated!

I have been a bit quiet lately 'cos I have actually had to work! Then there's the garden, now that all the wrong things are starting to grow.....I have got a few bits and bobs done though. The Vickers guns are on, and the white stripe around the Pup has been added, which would have been so much easier had I realised there was no decal for it before I painted the PC10. My main worry of course, was having the tape remove the decals, and I got all of it off no problem..except the very last piece which tore a roundel. In fact that piece was so tacky it even left a sticky mess on the paint! I managed to salvage the torn piece and hopefully with a little touching up it won't be noticeable.


Ian

Offline lone modeller

  • Hero Member
  • *****
  • Posts: 5316
How have I missed theses recent updates? These are looking better each time you post: you seem to have cracked the colour problem so hopefully not long now before they are completed.

Stephen.

Offline IanB

  • Hero Member
  • *****
  • Posts: 2439
Thanks Stephen, I'm hoping that I can get a good bit done this week

 To that end, today I started preparing the Triplane for getting its wings. I spent an hour or so measuring and setting up the Aeroclub jig to get the upper wing in the correct place. Somewhere along the line the nose is a little short, so I decreased the stagger a tiny bit to bring the upper wing back to where it should be relative to the nose and get the "look" right.


 That was the easy bit. I then had to think of someway to mount the centre wing accurately, as I have removed the lumps on the struts which Revell provide. I eventually came up with a plan involving a piece of thick plastic card, cut out to fit around the jig sides and fuselage. It was bent to match the dihedral of the wings, and two slots were cut in the rear edge. To support the wings I squared off the ends of a couple of pieces of thick plastic rod and attached some more thick card to the ends, making sure that the rods were perpendicular. These rods will then fit in the slots I cut in the base piece, and because they are a fairly tight fit, will be adjustable for height. The plan being to line everything up, then glue the rods into the slots to fix their position. The centre wings will then rest on the top pieces of card which will support them while the glue dries.


 That's the plan, anyway.....
 After I'd done that I decided to dry fit the centre struts. It's lucky I did, as they're too short! I have added some plastic rod and will tidy it all up tomorrow when it's dry, and repaint them.

Thanks for looking in!

Ian
« Last Edit: June 04, 2017, 05:59:05 AM by IanB »

Offline lcarroll

  • Administrator
  • Hero Member
  • ******
  • Posts: 8550
Very clever and effective fix, Ian. The AeroClub Jig comes through again, with a little help from a skilled Builder, well done and impressive!
Cheers,
Lance

Offline andonio64

  • Hero Member
  • *****
  • Posts: 1685
  • There's no hurry
Wow Ian, this is pure engineering my friend!
8-)

Offline lone modeller

  • Hero Member
  • *****
  • Posts: 5316
I do love seeing how others make jury rigs to solve problems, even when they have other better jigs to hand. Very ingenious and exactly the kind of thing that I might have done in your place. These models are going to be well worth studying when they are finished.

Stephen.

Offline IanB

  • Hero Member
  • *****
  • Posts: 2439
Thanks Lance, Antonio, and Stephen, for your comments.
 Unfortunately the jig didn't work out too well. This is proving to be by far the trickiest wing-mounting operation I've done to date. The single struts make fitting them easier, but then it lacks fore-aft structural strength. I've made a couple of failed attempts (I did take pics but my camera has eaten them!) but I think I'm on the home straight now. The biggest problem has been keeping the centre struts in place - of course this would have been resolved if I'd simply followed my usual procedure of pinning them, but for some reason I didn't!
 I tried fitting all the struts first, with the intention of sliding the centre wing over them when dry. Then I realised that it wouldn't be possible to add the centre wing with the jig in the way. (doh!)
 Then I tried with the jig in place but it wasn't working out and I would have had to tape the wings to the jig, defeating the object of having it adjustable.
 I tried adjusting the Aeroclub jig to use it for the centre wing, but that wouldn't work as the bottom of the wing rail hit the little clamps that hold the wings in place before I could get the gap narrow enough.
 Finally I added the centre wing with the struts through it loosely. That was very awkward as the struts kept slipping out as I was trying to fit them, but I eventually got them all on and left it overnight to dry.
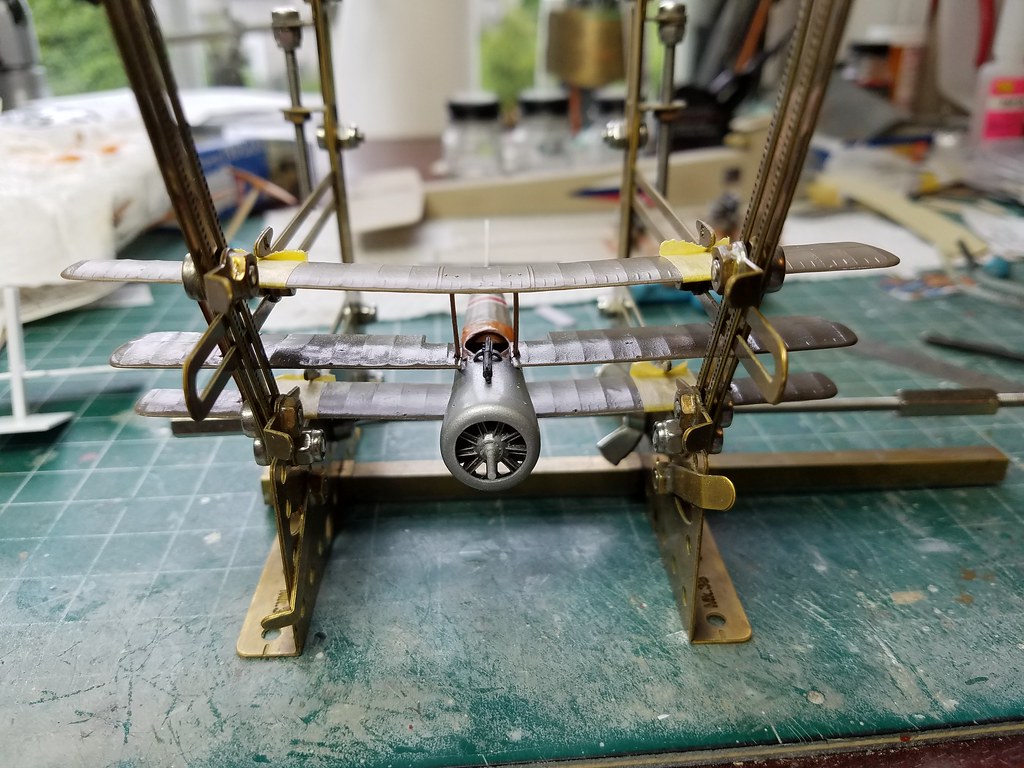
 This morning I added the upper wing and clamped it in place. that is now sitting to dry. The centre wing is still not fixed in place. I'll adjust it and fix it permanently once the top wing has set. Hopefully the struts will stay in place during that operation!

So here's where it is at the moment...


 This one is proving more of a challenge than I'd expected, I should have put a little more thought into pinning the struts and maybe even worked out a way of attaching the struts to the centre wing before fitting it all as a unit, but that would have been very tricky to get the strut angles, and therefore the wing stagger, correct. Of course, I could have just left the mounting lugs on the struts, or reduced them so they were less noticeable. Maybe even marked the struts with the position and angle of the mounting lugs before removing them....

 Anyway, hopefully it's on the home stretch now!

Thanks for looking in!

Ian
« Last Edit: June 07, 2017, 02:04:47 AM by IanB »

Offline lone modeller

  • Hero Member
  • *****
  • Posts: 5316
Why is it always so easy to be wise after the event?

Stephen.

Offline IanB

  • Hero Member
  • *****
  • Posts: 2439
Very true Stephen!
 
I think I've cracked it!
 The struts stayed put and I got the centre wing adjusted and glued in position using PlasticWeld and a small brush. After leaving it for an hour or so I used the same small brush to add some thin CA to the joints. Another hour or so and I have now added some PPP to the wings to fill the rest of the gaps. That will be carefully cleaned up when it's dried and then touched up as needed.


  8)

Before I remove it from the jig I'll add the centre wing drag wires and the landing wires, just to give it a little more rigidity.

Ian