Author Topic: You too can build a Fokker EV  (Read 5873 times)

Offline jagdbaron

  • Newbie
  • *
  • Posts: 12
You too can build a Fokker EV
« on: March 06, 2017, 12:22:46 AM »
As a long-time lurker, I’ve been tempted out of the shadows by RAGIII’s recent topic of the Avis Fokker EV. In particular, I note the number of people who would like to build a Fokker EV at 1/32 scale but do not own an Avis kit.

I have owned one for some years but am fearful of building it because it is now quite rare and I didn’t want to botch it. Recently, I looked at the similarities between the Fokker Dr1, DVI and EV/DVIII and concluded that I could convert a Roden DVI into an EV. (I did not have the heart to butcher a Dr1 so it had to be a DVI) There are some really well-priced offerings on sale at eBay from Poland and the Ukraine, so I bought a DVI for £24.99 from a very reliable bob271259.

The main items to be changed are the fuselage and the wing(s). Most of the rest is suitable for the EV. I must quickly say here that I am not a seeker after perfection; if it looks right, that’s good enough for me. So, forget the DVI wings and most of the struts and then concentrate on modifying the fuselage. I give below an illustration of Dr1 and EV fuselages to see the differences.


The Dr1’s is deeper towards the front and at the tail and is a scale distance of 3mm shorter than the EV. In fact the bottom of the EV’s fuselage is flat from the rear of the cockpit to the nose. I chose to slice the bottom of the DVI fuselage from the cockpit to the nose to achieve this using a razor saw.

A complete new fuselage bottom was cut from 1mm plastic card. I should say here that possessing an unmade Avis kit allowed me to get the curved shape of this item very accurately by using the Avis kit part as a template. In order to achieve a deeper tail I elected to fix new sides over the existing fuselage with 0.3mm plastic card. The card extended forward to a vertical frame position at the rear of the cockpit. This will allow the join to be disguised by pre-shading of the aircraft’s frame prior to covering with lozenge fabric. In the event, the 0.3mm card was easily sanded almost to zero at the front end and I cannot now see the join. As I mentioned above, the fuselage should be 3mm longer. This was simply done with 1mm plastic again and supplemented with filler. The DVI kit’s front firewall is the guide to getting this spot on. The fuselage top, apart from the front 3mm, remains the same as the DVI kit.


I do not have a photo of the butchered fuselage, but the above shows the end result with a new underside and the framing marked out by pre-shading. This is to allow the frame to show through the finished lozenge fabric. Below is a view of the underside, based on the template of the Avis EV, also the DVI kit's top, duly extended by 3mm.


My next post will cover the building of the wing.

I hope that this intrigues you!

Les
Les

Offline Juan

  • Hero Member
  • *****
  • Posts: 2457
  • All gave some, some gave all.
Re: You too can build a Fokker EV
« Reply #1 on: March 06, 2017, 12:43:39 AM »
Hi Les, I am intrigued and will follow your progress (wishing WnW will follow you too  ;) ).  All the best, Juan

Offline Borsos

  • Hero Member
  • *****
  • Posts: 3324
Re: You too can build a Fokker EV
« Reply #2 on: March 06, 2017, 01:20:31 AM »
Wow, that is cool, mate! I love this conversion. I am not too sure that I'll follow in the near future, as I am not so deep in love with the E V that I couldn't wait until someone releases a kit (or rereleases the Avis kit). But I do have a very similar project in the back of my head to saw a Morane Saulnier N into pieces that will be glued together as a Morane BB. So your project is a great motivator!
Best wishes
Borsos
"Deux armées aux prises, c'est une grande armée qui se suicide."
Barbusse.
"Ein Berg in Deutschland kann doch einen Berg in Frankreich nicht beleidigen. Oder ein Fluß oder ein Wald oder ein Weizenfeld."
Remarque.

Offline lone modeller

  • Hero Member
  • *****
  • Posts: 5322
Re: You too can build a Fokker EV
« Reply #3 on: March 06, 2017, 03:25:23 AM »
I am interested in any conversion or scratch build in any scale so I will certainly be following. You have made a really good start and make the whole thing look so simple! Hopefully it might encourage others to have a go too.

Stephen

Offline Des

  • Administrator
  • Hero Member
  • ******
  • Posts: 9325
    • ww1aircraftmodels.com
Re: You too can build a Fokker EV
« Reply #4 on: March 06, 2017, 05:38:40 AM »
Nice work so far Les, I love scratch building so your build is very interesting, looking forward to the next updates.

Des.
Late Founder of ww1aircraftmodels.com and forum.ww1aircraftmodels.com

Offline RAGIII

  • Hero Member
  • *****
  • Posts: 18847
Re: You too can build a Fokker EV
« Reply #5 on: March 06, 2017, 05:46:36 AM »
I will be following along of course! Your fuselage conversion looks terrific! You have made it look easy!
RAGIII

PS: One thing puzzling me is that with the obvious skills to do this conversion you would have any worry about messing up the Avis Kit  8)
RAGIII
« Last Edit: March 06, 2017, 09:41:19 AM by RAGIII »
"A man has to know his limitations": Harry Callahan

"Don't slop it on" Lynda Geisler

Offline jamieg

  • Full Member
  • ***
  • Posts: 190
Re: You too can build a Fokker EV
« Reply #6 on: March 06, 2017, 01:35:45 PM »
I was wondering what it would take to turn a Roden D.VI into an E.V, so I will be following closely. Great start.

Jamie

Offline jagdbaron

  • Newbie
  • *
  • Posts: 12
Re: You too can build a Fokker EV
« Reply #7 on: March 06, 2017, 08:11:28 PM »
I am interested in any conversion or scratch build in any scale so I will certainly be following. You have made a really good start and make the whole thing look so simple! Hopefully it might encourage others to have a go too.

Stephen

Hi Stephen, The most difficult bit is having the nerve to take a razor saw and butcher a perfectly good DVI fuselage. It took me some days to do the deed. I felt guilty at the mess I'd made and this spurred me on to make something of it. You know, 'I've started so I'll finish'

I will be following along of course! Your fuselage conversion looks terrific! You have made it look easy!
RAGIII

PS: One thing puzzling me is that with the obvious skills to do this conversion you would have any worry about messing up the Avis Kit  8)
RAGIII

Hi RAGIII, Congratulations on your evolving EV build. I suppose that by building this DVI conversion and not the Avis kit, I then can have my cake and eat it.
Also, I have in mind to give the result to my grandson so it will need to be a little more robust - this means strengthening it in places. I could then build a more fragile Avis EV for the display case.
I'm also hoping that, since I have now gone public on this build, that WnW will imminently announce a range of Fokker EV's and satisfy us all.

Nice work so far Les, I love scratch building so your build is very interesting, looking forward to the next updates.

Des.

Thanks Des, I have been in awe of your work for many years. By the way, a long belated thank you for the Morane-Saulnier N logo you generously sent me several years ago.

Les
Les

Offline ALBATROS1234

  • Hero Member
  • *****
  • Posts: 2657
Re: You too can build a Fokker EV
« Reply #8 on: March 08, 2017, 10:18:16 AM »
ive noticed the same thing but i have built an avis before and figured i coulf convert a d.vi if really necessary.

Offline xmald

  • Hero Member
  • *****
  • Posts: 1093
Re: You too can build a Fokker EV
« Reply #9 on: March 09, 2017, 04:22:19 AM »
This is going to be a great and interesting thread to follow Les!
Best regards
Filip

Offline jagdbaron

  • Newbie
  • *
  • Posts: 12
Re: You too can build a Fokker EV
« Reply #10 on: March 10, 2017, 09:08:12 AM »

The Fokker EV wing:-

The fact that the EV had only one wing and that wing was plywood covered, was the main reason that I thought I could construct a reasonable model using a Roden DVI.

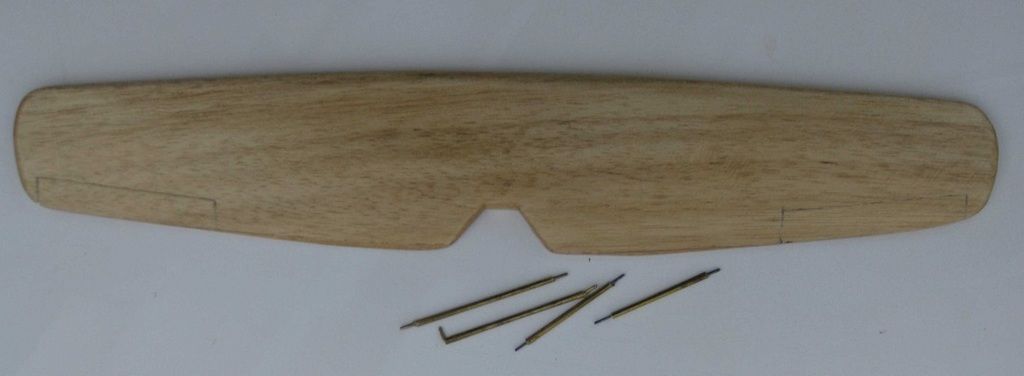
I calculated that the scale thickness of the wing was 7mm to the nearest mm. Being not half bad at woodworking, I sandwiched a 6mm and a 1mm section of obeche to make up the scale wing thickness. The obeche can easily be found in model shops and comes in 3ft long x 3inch wide sheets. Again taking advantage of the Avis kit, I marked out the wing shape, cut it to size and sanded it to scale profile – easy when you have a bandsaw and a belt sander. I also inset four minute tube sections to take the subsequent struts. Below are pictures of the wing, both top and bottom. I also show the struts I have made using brass tube and wire inserts.


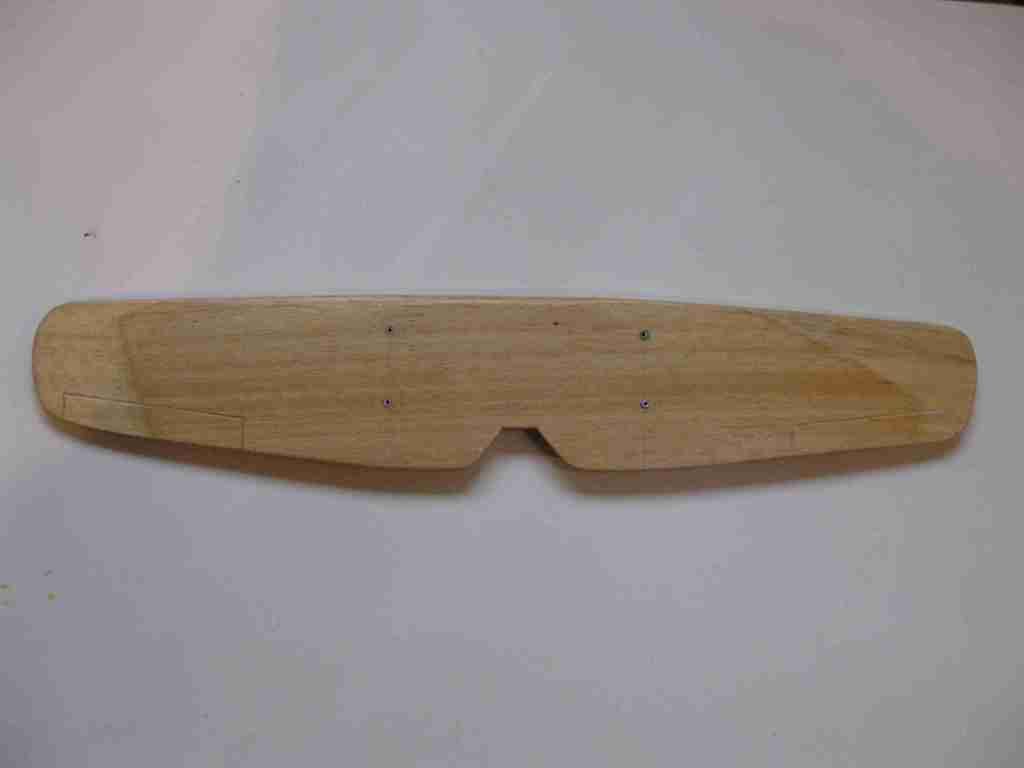
I have read the comments made elsewhere about ‘cupping’ of the plywood between the ribs. This, indeed, will occur over time, especially if the wing is subject to wetting and drying – it happens to most timbers. However, I would suggest that, in the case of the EV which only appeared a few weeks before the armistice, it is unlikely that the aircraft would have suffered that degree of wear and tear in service. Maybe eighteen months later, after having been abandoned in the open air, it would be a real possibility. Anyway, I decided not to depict this phenomenon and simply sanded the wing surface smooth. Several coats of wood seal left the surface just right for streaky paint.

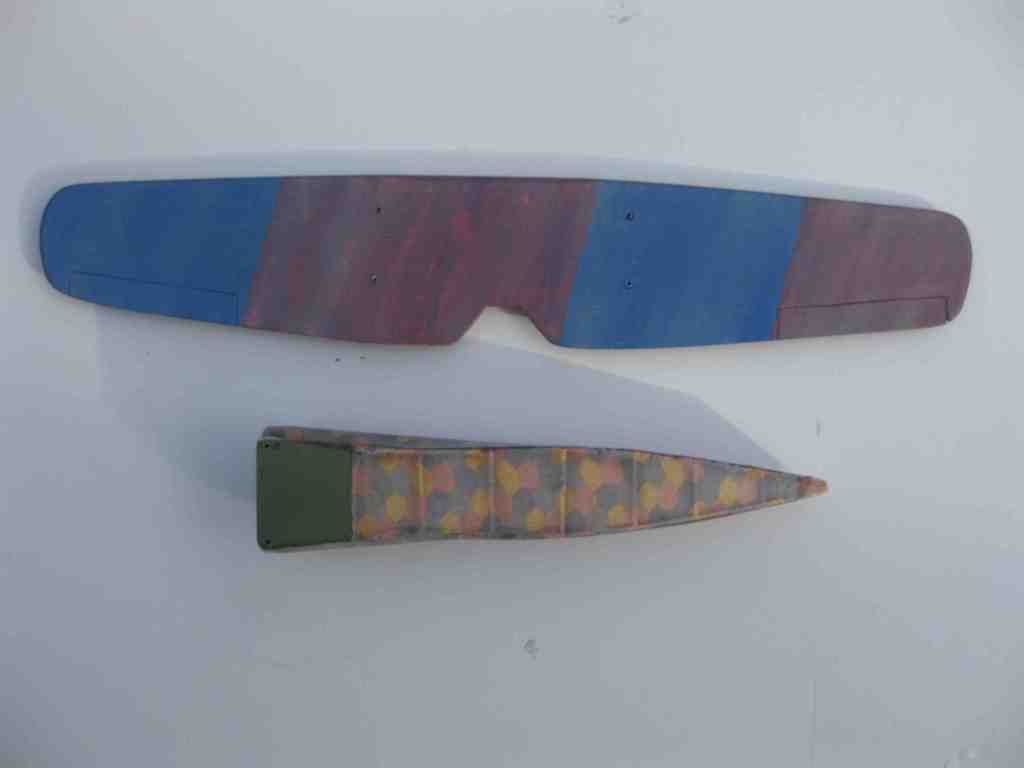
Having read the old Aerodrome correspondence years ago, together with most of the discussions on this and other sadly departed websites, I am fully aware of the debate re three-colour wings – six colours if you include top and bottom. I was always an admirer of P. Endsleigh Castle’s profiles of WW1 aircraft including the EV with the olive green top wing. In fact, I’ve made a few in that colour over the years. The weight of current opinion seems to be the three-colour camo. promoted by the late Dan-San Abbot and on the strength of that, I will paint my wooden wing in that way.

 However, I would love to hear any more definitive evidence than a grainy photo with shadows on the wing. It just doesn’t seem logical, that late in the war, for painters to spend time putting on three colours when one will do. Especially as no other aircraft was similarly treated at that time. After all, the shortage of paint was the problem and not the need for camouflage, especially when the first thing the front line pilots would do was to paint them in bright colours.

Please forgive all the above scepticism – it comes with age. Anyway, I show below the wings painted streaked camouflage, based on the colours of Ronny Bar’s profiles. The photos also show the fuselage alongside covered in four-colour lozenge fabric by ‘Wood & Wire’. Note how the framework shows through the semi-transparent and very fragile decals.

The top colours are:- green, XA1002 Xtracrylix RAF dark earth and the brown,  XA1225 Xtracrylix RLM 82 Hellbrun.


I had two goes at the underside. The first attempt looked O.K. but I decided that it was too dark, especially the blue which, I would have thought should look something like a normal sky colour. As the wing was solid wood, I just sanded all the paint off, resealed it and painted it again. This time using a mixture of Vallejo 70961 sky blue and 70918 ivory for the blue. For the ‘purple’ I used Vallejo 70957 flat red, 70962 flat blue and 70918 ivory.


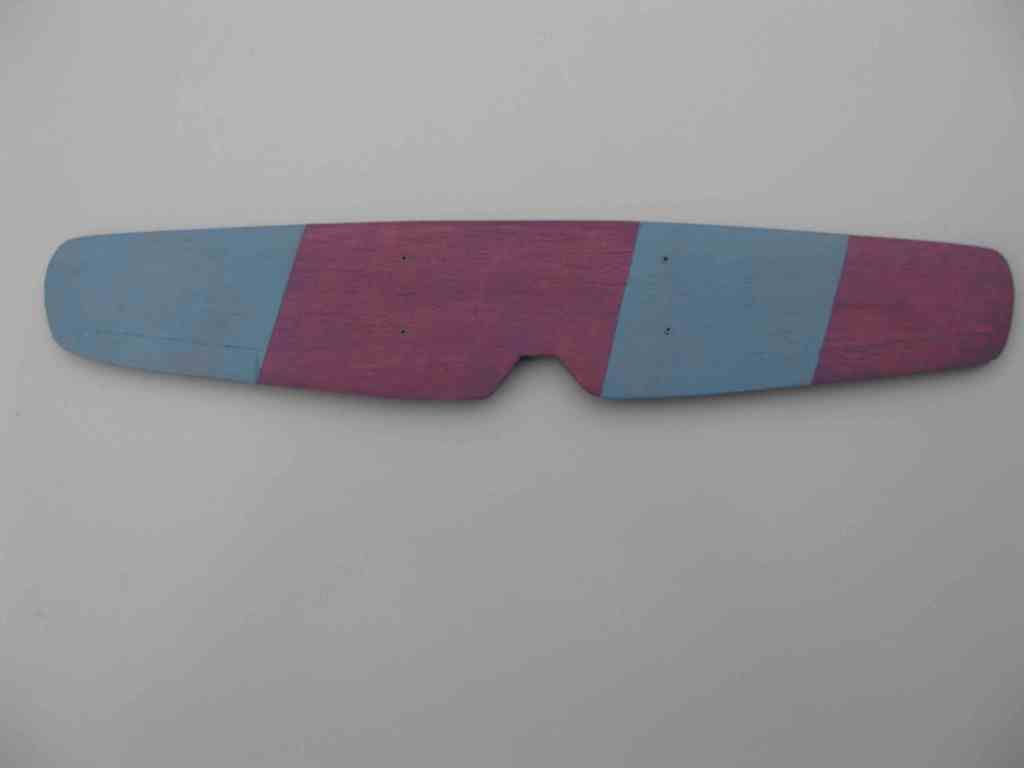
Incidentally, my normal paint of choice for spraying is Tamiya acrylic but I have found that it does not like being brush-painted. If you brush it too much, it tends to strip off. The Vallejo and Xtracrylix paints don’t do this, hence my choice. In retrospect, I guess that the junction between the colours is too sharp and would probably have benefitted being slightly blurred.


I hope that you like the result so far.

Les

Les

Offline RAGIII

  • Hero Member
  • *****
  • Posts: 18847
Re: You too can build a Fokker EV
« Reply #11 on: March 26, 2017, 08:33:05 PM »
Very nicely done wing! Like you I often wonder if the 4 color camo is really correct for the EV. I was convinced in the Old Drome days but still.....
RAGIII
"A man has to know his limitations": Harry Callahan

"Don't slop it on" Lynda Geisler

Offline jamieg

  • Full Member
  • ***
  • Posts: 190
Re: You too can build a Fokker EV
« Reply #12 on: March 26, 2017, 11:27:31 PM »
Very nicely done wing! Like you I often wonder if the 4 color camo is really correct for the EV. I was convinced in the Old Drome days but still.....
RAGIII

I was never convinced about the undersurfaces being in two different colours or streaked. It just does not match any other Fokker practice. On the other hand, a three colour streaked upper surface would make some sense. Since the wings were plywood, the question also arises as to how the wings were treated before the streaking was done.

Offline Juan

  • Hero Member
  • *****
  • Posts: 2457
  • All gave some, some gave all.
Re: You too can build a Fokker EV
« Reply #13 on: March 27, 2017, 12:09:42 AM »
Looking really good, wasn't around back then to comment on actual colors, but like where you are going with you build.  Look forward to your progress.

Offline jagdbaron

  • Newbie
  • *
  • Posts: 12
Re: You too can build a Fokker EV
« Reply #14 on: March 31, 2017, 12:07:11 AM »

After an absence, painting and decorating the bedroom, I have made a small amount of progress. The wings now have their crosses.


                                              and I have assembled the fuselage, cowl, engine, (Master) spandaus and, again, added the markings.


I think that it looks O.K. I'm pleased at the way that the fuselage framework shows through the lozenge fabric. The said fabric is extremely fragile though. About as robust as gossamer. Just touching it causes parts to peel away, especially at changes in direction.

I am learning all the pitfalls this time, perhaps if I have the willpower to do another, I'll get it right. In the meantime, the poor quality of my photos helps to hide most of the shortcomings. Incidentally, I have been having real difficulties in reducing the photo resolutions to suit the requirements of the site, and apologise that the colours are a little distorted; they look a lot better in real life.

Next, I'll mount the wing. I think that this would be best done upside down, with the wing resting on the work bench. Being partly scratch built it will be tricky to get the exact position of the wing correct.

At least this thread has achieved its desired effect; I knew that if I embarked on this, someone would bring out another 1/32 kit of the EV/DVIII. I know that it's not Wingnuts but,'owt's better'n nowt' as they say in Yorkshire.

Les

Les