Author Topic: Gotha GIII (1/72 - Roden)  (Read 10956 times)

Offline RAGIII

  • Hero Member
  • *****
  • Posts: 18840
Re: Gotha GIII (1/72 - Roden)
« Reply #30 on: December 30, 2016, 09:20:02 PM »
You have certainly made great progress on your Gotha! Lovely work all around. The green looks outstanding as do the engine nacelles. That DH2 should certainly challenge you and keep you busy for a while!
RAGIII
"A man has to know his limitations": Harry Callahan

"Don't slop it on" Lynda Geisler

Offline chowhound

  • Full Member
  • ***
  • Posts: 124
Re: Gotha GIII (1/72 - Roden)
« Reply #31 on: December 31, 2016, 03:26:06 AM »
New pictures!

Since the last update I was diligent. The engine nacelles were freed from some ventilation slots, and got a washing. Then I dared to the decals. As is well known, the decals of Roden are the last crap. So here again. I've got the skull on the bow without major problems. Then the anger went off. The side lettering has been divided into individual parts. On the one hand I had nine fragments at the end. Of course, a silver could not be prevented despite the use of Future and Decal medium. In order to mitigate the damage, I then worked on the silvery surfaces with my special brush (a single hair). After the decals were dried and sealed, the engine nacelles and the lower wings were glued to the fuselage. Now everything has to dry well, and then it starts with the spars.


Jürgen
Every artist was first an amateur.
Ralph Waldo Emerson (1803-1882)

Offline jeroen_R90S

  • Hero Member
  • *****
  • Posts: 1060
Re: Gotha GIII (1/72 - Roden)
« Reply #32 on: December 31, 2016, 06:04:32 AM »
I can relate to those decals as well, it appears the flat Roden ones are worse than the gloss ones. They aren't the best, too, but at least don't fall apart. I coated them with Dutch equivalent Future and they held long enough to get them on the model, mostly... I also had to touch up.

I built the G.II and may have the remaining G.III decals, if you like a re-try I can mail them to you if you want?

I look forward to your approach for getting the top wing on!

Happy 2017,

Jeroen

Offline chowhound

  • Full Member
  • ***
  • Posts: 124
Re: Gotha GIII (1/72 - Roden)
« Reply #33 on: December 31, 2016, 06:13:49 AM »
Hi Jeroen,
thanks for your offer, but no longer necessary. The decals are so far still quite good. 8)

I wish you also a happy 2017

Jürgen
Every artist was first an amateur.
Ralph Waldo Emerson (1803-1882)

Offline chowhound

  • Full Member
  • ***
  • Posts: 124
Re: Gotha GIII (1/72 - Roden)
« Reply #34 on: January 03, 2017, 06:07:58 AM »
And as in the old year, it continues in the new year.

This time, the spars were on.
First, I glued the spars to the lower wing halves and allowed to dry well. During the dry phase, I reworked the engine nacelles again. The washing was just too strong.
Now came the most difficult part. Place the upper wing on the spars. According to the plan, I had glued the upper wing of the three parts together. I should not have done that. Since the spars are very thin and therefore wobbly, I simply could not manage to align the upper bearing surface. The gluing was not to be thought of. Thereupon I quickly disassembled the wing. With the individual parts it went quite well. I finally glued the middle piece with the two half-wings, and inserted the last spars. Now it's time to wait until everything is well dried, and then go on with the rigging.


Cheers
Jürgen
Every artist was first an amateur.
Ralph Waldo Emerson (1803-1882)

Offline Des

  • Administrator
  • Hero Member
  • ******
  • Posts: 9325
    • ww1aircraftmodels.com
Re: Gotha GIII (1/72 - Roden)
« Reply #35 on: January 03, 2017, 07:13:55 AM »
Coming together very nicely Jürgen, the skull decal looks very impressive.

Des.
Late Founder of ww1aircraftmodels.com and forum.ww1aircraftmodels.com

Offline Juan

  • Hero Member
  • *****
  • Posts: 2456
  • All gave some, some gave all.
Re: Gotha GIII (1/72 - Roden)
« Reply #36 on: January 03, 2017, 09:15:26 AM »
Very nice, love what you have accomplished so far.  Are you using the kit decals?  Cheers

Offline chowhound

  • Full Member
  • ***
  • Posts: 124
Re: Gotha GIII (1/72 - Roden)
« Reply #37 on: January 03, 2017, 03:18:30 PM »
@krow113,
the "painting" over the windows is liquid mask. If you use that, you can paint or airbrush over these parts, and when finished pull it off like a film.
@Juan,
yes, these are the (damn) original decals. In Germany, we say "ab in die Tonne damit". Means, this parts are for the garbage can. ;D
@all,
I am glad you enjoyed it so far. Thank you!

Cheers
Every artist was first an amateur.
Ralph Waldo Emerson (1803-1882)

Offline Juan

  • Hero Member
  • *****
  • Posts: 2456
  • All gave some, some gave all.
Re: Gotha GIII (1/72 - Roden)
« Reply #38 on: January 04, 2017, 01:11:25 AM »
Hi Jürgen, you are to be commended for using the "Damn" kit decals, I know some of the Roden decals are meant for the garbage can.  Really enjoy what you have done and look forward to your progress.     :D

Offline Manni

  • Hero Member
  • *****
  • Posts: 1768
    • Der Militärmodellbauer
Re: Gotha GIII (1/72 - Roden)
« Reply #39 on: January 04, 2017, 04:11:40 PM »
Nice Gotha with an interesting scheme. Looking forward what's coming up next.
Manni
"Ich hab' da mal was vorbereitet.": Jean Pütz
"Warum noch mehr Bausätze?!?": meine Frau

Offline chowhound

  • Full Member
  • ***
  • Posts: 124
Re: Gotha GIII (1/72 - Roden)
« Reply #40 on: January 05, 2017, 04:01:20 PM »
And now begins the most difficult part, at least for me. The rigging! The Gotha does not have just a few tension wires, and each wire individually, would be a "never ending story". There are three of Roden's plans, but they are very confusing, and therefore hard to use. So I evaluated all the available images, and created my own plan. Here are two pictures of the new plan.


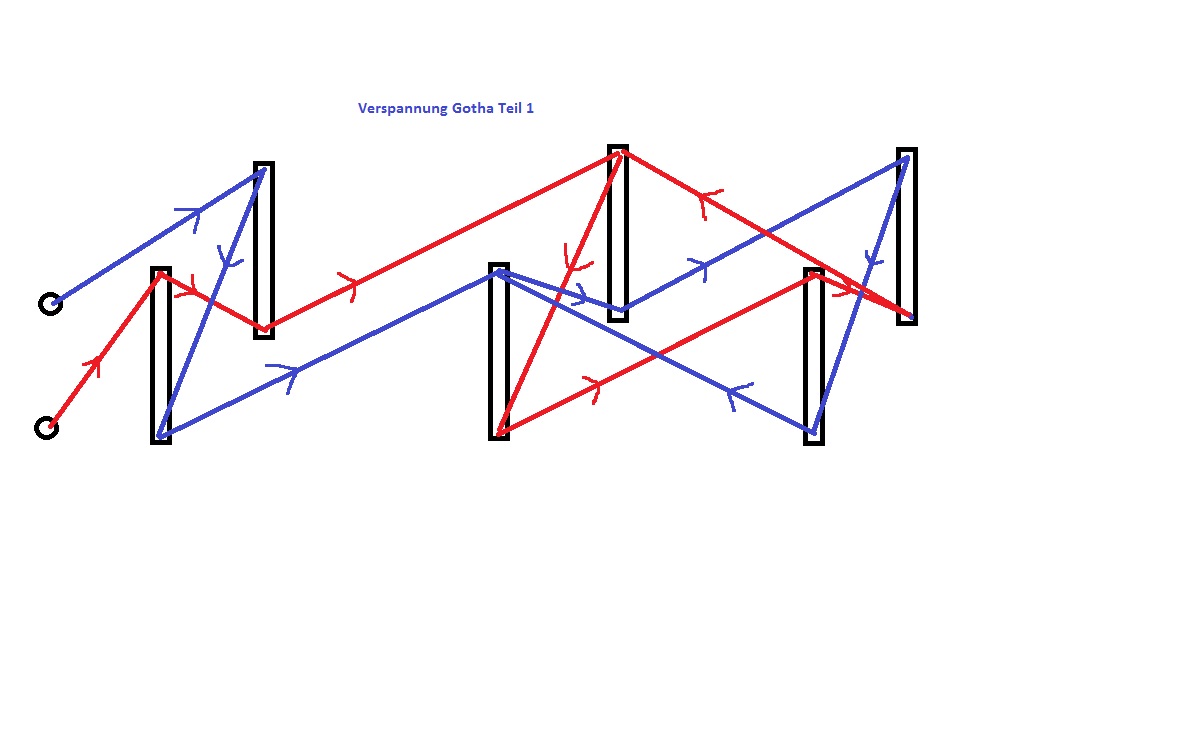
I use knitting in elastic from Prym for the tension wires. Sorry WNW, but your EZ-Line is simply too expensive for me. Especially since EZ-Line is nothing else but the material of Prym. As you can see from my plan, a majority of the main span wires are produced on a half of the span with only two tension wires. It's a little bit tricky to work with a long wire, but it works! Here I can present you my rigging work until now. The silver of the wires I did with Rub 'N' Buff. Some of you may know the stuff. The turnbuckles on the wires are still coming. Since I'm still superior how I manage this. At 1/72 is not quite easy, without which it looks bad.


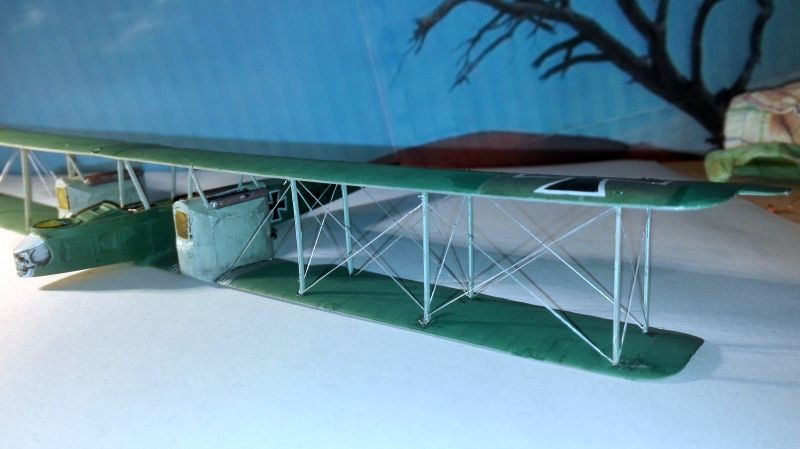
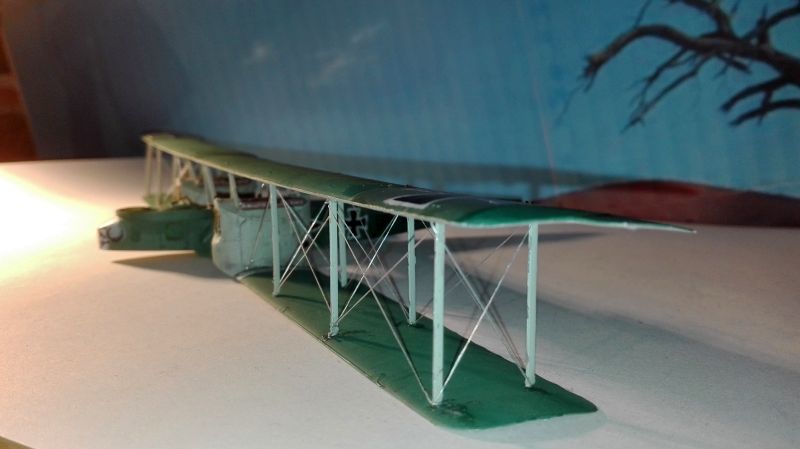
I hope you like my work on the tension. It is, after all, the first time I have dared to do such a complicated job. ;)

Will be continued

Jürgen


Every artist was first an amateur.
Ralph Waldo Emerson (1803-1882)

Offline RAGIII

  • Hero Member
  • *****
  • Posts: 18840
Re: Gotha GIII (1/72 - Roden)
« Reply #41 on: January 06, 2017, 01:02:59 AM »
Excellent progress! You have done a great job of getting those decals in place and they look terrific, especially the Skull! The rigging is top notch!
RAGIII
"A man has to know his limitations": Harry Callahan

"Don't slop it on" Lynda Geisler

Offline IanB

  • Hero Member
  • *****
  • Posts: 2439
Re: Gotha GIII (1/72 - Roden)
« Reply #42 on: January 07, 2017, 09:49:19 AM »
Nice work, the wires all look nice and taut from here!

Ian

Offline jeroen_R90S

  • Hero Member
  • *****
  • Posts: 1060
Re: Gotha GIII (1/72 - Roden)
« Reply #43 on: January 08, 2017, 12:23:51 AM »
Looking good! :) If I remember i used 0,08mm fishing line on mine to "pull" the wings into more dehidral since they seemed to flop as much as a birds. It's been a few years since I did mine, but the dehidral is still there -although when I pick it up by it's nose, some lines still go slack.

Nice work, I went for the wood/linen G.II, but seeing this green one with the skull kind of gets me thinking of doing another!

Jeroen

Offline chowhound

  • Full Member
  • ***
  • Posts: 124
Re: Gotha GIII (1/72 - Roden)
« Reply #44 on: January 19, 2017, 07:10:56 AM »
Finally, I got the main rigging. For those interested, there have been 2 meters of material processed so far. Furthermore, I have attached the chassis and the missing ailerons and elevators. Next action will then be the control cables, and other little parts. But I'll be back in the next update.


Jürgen
Every artist was first an amateur.
Ralph Waldo Emerson (1803-1882)