Author Topic: Voisin III  (Read 47464 times)

Offline Des

  • Administrator
  • Hero Member
  • ******
  • Posts: 9325
    • ww1aircraftmodels.com
Voisin III
« on: April 18, 2012, 07:05:57 PM »
After a month of a very severe illness, I am finally back on my feet and ready to continue with my Voisin. Please bear in mind that this is my first ever scratch build.

I will start off by posting some images of my progress so far, most of you would have seen these photos but for any new comers this is what I have done.

The fuselage frame is made up of evergreen strips, I followed the plans fairly precicely and tried to keep all dimension within scale.


The frame was painted with a base coat of Gunze acrylic then the wood look with oil paints. The fuel tank is made from 0.05mm plastic card, this was cut to size following the plans then bent and glued together using plastic glue. The mounting plates on the side of the tank is made from coke can metal bent to shape then fitted to the sides of the fuel tank.


« Last Edit: April 18, 2012, 07:53:26 PM by Des »
Late Founder of ww1aircraftmodels.com and forum.ww1aircraftmodels.com

Offline Des

  • Administrator
  • Hero Member
  • ******
  • Posts: 9325
    • ww1aircraftmodels.com
Re: Voisin III
« Reply #1 on: April 18, 2012, 07:14:57 PM »
I used 0.12mm monofilament for the fuselage rigging, turnbuckles are also fitted to each of the rigging lines. The bulkhead forward of the fuel tank is painted the same as the frames. The rear engine mount is made from 0.5mm plastic card.


I have started to fit the details inside the cockpit. The rudder bar is mounted, the control column, throttle lever and starting magneto are also fitted.

Late Founder of ww1aircraftmodels.com and forum.ww1aircraftmodels.com

Offline Des

  • Administrator
  • Hero Member
  • ******
  • Posts: 9325
    • ww1aircraftmodels.com
Re: Voisin III
« Reply #2 on: April 18, 2012, 07:24:39 PM »
This photo shows the under side of the fuselage, I am using 0.5mm plastic card for the fuselage covering. As you can see there are lots of openings on the bottom of the fuselage, guess the pilot wanted to see where he was going.


Here you see most of the cockpit interior finished. I made all the instruments using different size brass tubes and airscale decals. The seats are cover with real leather, a little bit fancy but appropriate for such an elegant aeroplane. The cotrol rigging is conected to the control column and rudder bar.

Late Founder of ww1aircraftmodels.com and forum.ww1aircraftmodels.com

Offline Des

  • Administrator
  • Hero Member
  • ******
  • Posts: 9325
    • ww1aircraftmodels.com
Re: Voisin III
« Reply #3 on: April 18, 2012, 08:03:29 PM »
The seat belt is now fitted along with some electrical wiring. Fuselage sides are added using 0.5mm plastic card, the compound curve section on the nose is made from a section cut from a 2 litre Pepsi bottle. The beading around the top of the fuselage is made from insulation from small electrical cable, the wires were removed and the platic tube cut down one side. The interior is now finished.


The machine gun is a left over from a Wingnut kit, it has been modified to look like the gun used on the Voisin. I made a bag to hang on the side to collect the spent shells. The frame to hold the gun is made from small diameter brass tube.


Late Founder of ww1aircraftmodels.com and forum.ww1aircraftmodels.com

modelmaker

  • Guest
Re: Voisin III
« Reply #4 on: April 18, 2012, 08:11:45 PM »
Fantastic Des I've been looking forward to following this build again,can't wait for an Update!

Sean

Offline Des

  • Administrator
  • Hero Member
  • ******
  • Posts: 9325
    • ww1aircraftmodels.com
Re: Voisin III
« Reply #5 on: April 18, 2012, 08:13:48 PM »
Here are most of the components for the undercarriage, I have used mostly brass tube. The undercarriage on this bird is quite unusual, it is very lanky, has four wheels, no steering and brakes on the rear wheels, very thin tyres up front with chunky rear wheels. As can be seen in the second photo, the undercarriage is very strange.


I have done the undercarriage rigging, each line has a turnbuckle so rigging took some time to complete. Even without the rigging the undercarriage was very strong, it will be plenty strong enough to hold the weight of the comleted model.

Late Founder of ww1aircraftmodels.com and forum.ww1aircraftmodels.com

Offline Des

  • Administrator
  • Hero Member
  • ******
  • Posts: 9325
    • ww1aircraftmodels.com
Re: Voisin III
« Reply #6 on: April 18, 2012, 08:58:45 PM »
The undercarrige is now done. The front wheels are made up from Toms Modelworks PE spoke wheel set, a bit fiddly to make up but quite strong once all glued together. The tyres are made from electrical cable insulating tube, CA holds it very well to the rims. The rear wheels are left over from a Wingnuts kit, they just happened to be the perfect size, I turned up the brake drums from brass rod and fitted them to the inside of the wheels.


Late Founder of ww1aircraftmodels.com and forum.ww1aircraftmodels.com

Offline Rob Hart

  • Hero Member
  • *****
  • Posts: 696
Re: Voisin III
« Reply #7 on: April 18, 2012, 10:30:29 PM »
What a great project. Superb craftsmanship! You should consider writing a 'how to do it' book on building WWI aircraft models.

Offline Des

  • Administrator
  • Hero Member
  • ******
  • Posts: 9325
    • ww1aircraftmodels.com
Re: Voisin III
« Reply #8 on: April 18, 2012, 11:00:20 PM »
Thanks Rob, but I think I will stick to building models, writing books is not my fortè.

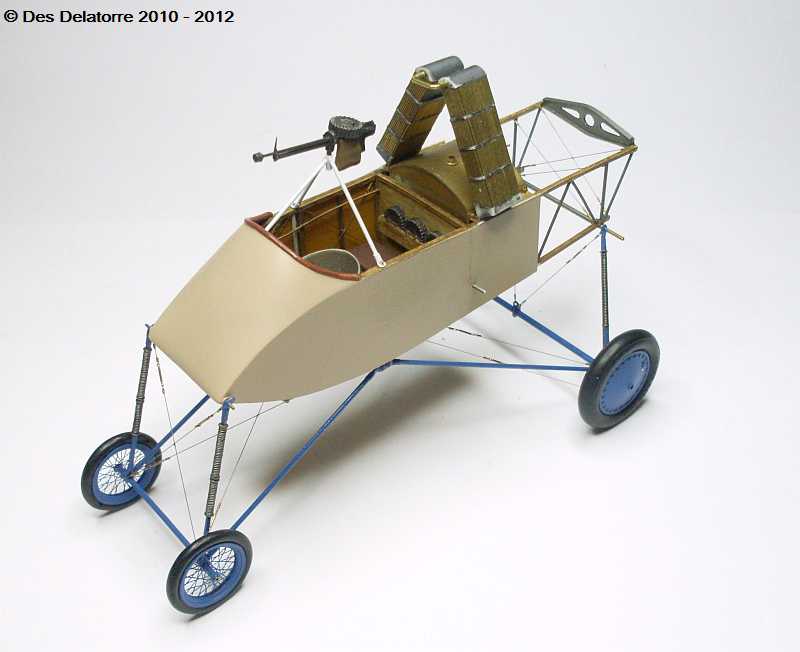
The radiators on the Voisin are quite large, there are two of them and they stand nearly upright behind the observer. I made these using 0.5mm plastic card, just a simple box section with straps around them, a shaped top was fitted, this was made from a piece of scrap plastic. The radiator core is made from lengths of 0.4mm brass tube, lots of them, these are held in place with CA. I have left the core natural brass colour.


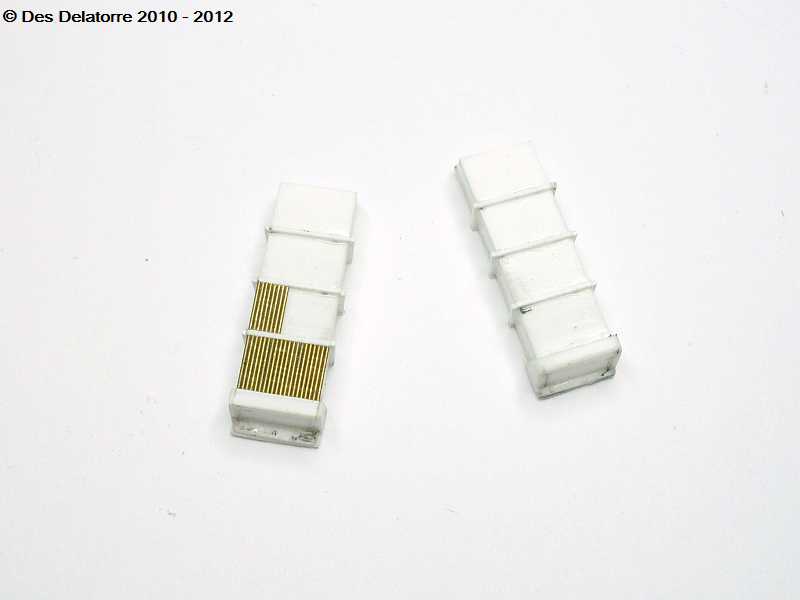
These photos show the radiators just sitting roughly in position, the metal parts have been painted with Mr Metal Color Stainless and lightly buffed, I will leave the brass tubes as natural brass. Next job will be to manufacture an engine, no ordinary engine but a nine cylinder water cooled radial engine.


Late Founder of ww1aircraftmodels.com and forum.ww1aircraftmodels.com

Offline phs Paddy

  • Sr. Member
  • ****
  • Posts: 325
Re: Voisin III
« Reply #9 on: April 18, 2012, 11:05:01 PM »
Alright Des! Wonderful to see you up and running again on this grand machine doing that Des magic. The new forum is now revving up for sure.  :)

All the best,
Paddy
In mathematics you don't understand things, you just get use to them. Johann von Neumann 1903-1957

Offline ta152c

  • Full Member
  • ***
  • Posts: 196
  • My threads are doing iron man numbers
Re: Voisin III
« Reply #10 on: April 18, 2012, 11:12:16 PM »
Sterling work, simply beautiful.

Regards :)
"I hope he burned all the way down" - Mannock on hearing of the death of Manfred Von Richthofen, 1918.

Offline Des

  • Administrator
  • Hero Member
  • ******
  • Posts: 9325
    • ww1aircraftmodels.com
Re: Voisin III
« Reply #11 on: April 18, 2012, 11:48:41 PM »
The engine I need to make is a Salmson M9, it is a 130hp 9 cylinder water cooled radial. I have no plans for this engine or any dimensions, just some photos and a few drawings, so a lot of it will be guess work.
I started by turning the crank case from a piece of 16mm aluminium rod, it has quite a long propeller shaft which is tapered, these pictures show the crank case in its very basic form. One thing I like about aluminium, it turns beautifully and is the correct natural colour.


Late Founder of ww1aircraftmodels.com and forum.ww1aircraftmodels.com

Offline Pete Nottingham

  • Hero Member
  • *****
  • Posts: 906
  • I chose the wrong week to stop sniffing glue
Re: Voisin III
« Reply #12 on: April 19, 2012, 05:44:23 AM »
Great work as usual Des, a pleasure to see.

Cheers

Pete.

Offline Epeeman

  • Hero Member
  • *****
  • Posts: 1419
Re: Voisin III
« Reply #13 on: April 19, 2012, 08:31:48 AM »
Amazing work, Des -

I would not know where to begin on a scratch build........

Dave
As we say in fencing, what's the point?

Offline Whiteknuckles

  • Hero Member
  • *****
  • Posts: 1334
Re: Voisin III
« Reply #14 on: April 19, 2012, 08:51:30 AM »
Awesome work Des, have been following this build with much interest, great stuff mate ;)


......I would not know where to begin on a scratch build........

That's actually a very good question - did you start with the frame due to that generally being the initial steps with most kits? (Thinking about it, I guess it is logical?)

Andrew
Eternal Apprentice