Author Topic: Pegasus Bristol M1.C 1:72  (Read 6698 times)

Offline IanB

  • Hero Member
  • *****
  • Posts: 2441
Pegasus Bristol M1.C 1:72
« on: October 11, 2013, 12:52:37 AM »
I know....I have way too much on my bench already but....
I teamed up on another forum for a group build with John ("Bolman", a newbie here) for this build. This will definitely be the last new start until ALL of my in progress builds are done.... ;D


 I've wanted to build this one for a while so couldn't put it off any longer. The kit is very basic (although the Datafile comments state "superb detail" - how far we have come since the 80's!) with no interior detail, no metal parts and no decals. In true Pegasus style the undercarriage legs are to be made from stock.

The wings needed quite a bit of work. They are too thick and the wrong shape, but apart from that pretty good!  ??? 
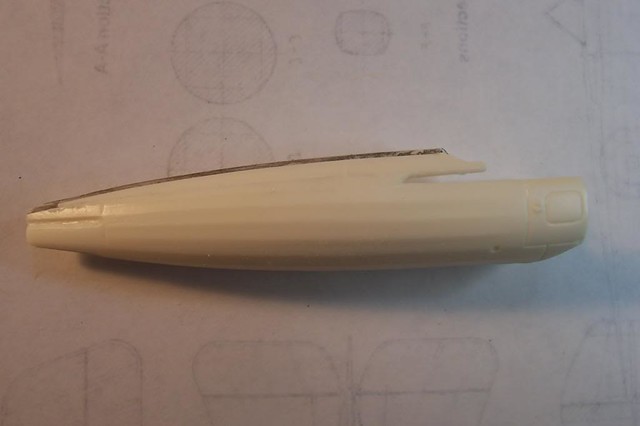
The ailerons were removed and new ones made of the correct shape, the fore and aft wing roots and tips were reshaped, and the wing root cut-outs had plastic card inserts added to the outer edge which were then filed out to give the correct slope from the first rib at the top surface of the wing, out to the second rib on the lower surface. The front and rear edges have also been reshaped for the correct curvature. The first pic shows the uncorrected wing root cutouts and top decking, the second is after those corrections.


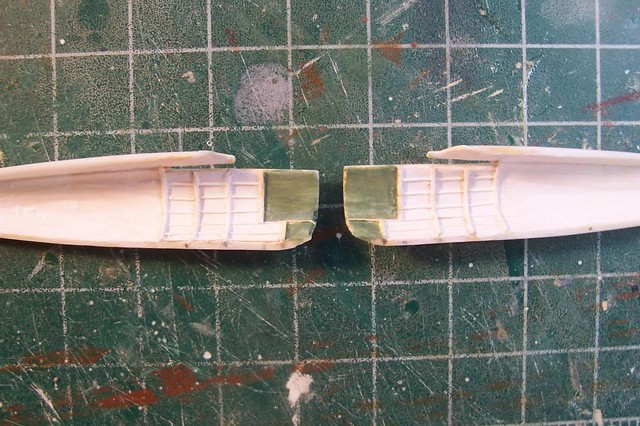
The fuselage was a little too wide and too deep. Sanding the joining edges took care of the width. The error on the depth appears to be above the wing level, so I carefully cut the top off each half, sanded it down to correct the error and reattached the top decking. The forward part is moulded with the wings so a couple of saw cuts just above the wing removed that piece for the same treatment. The pics below show where the cut was made (marked by the pencil line) and the first corrected half up against the original (I marked the joining edge with pencil for clarity) to show how much of a reduction was made.


Detailing of the interior has been started (after thinning it out a little!). This will be painted before making up a subassembly for the seat (Eduard PE) and flight controls.


The smaller parts have also received some treatment. A new fin and rudder has been made from stock (the kit item is too small), although the horizontal tail surfaces are ok but too thick so they've been sanded down.


I have Aeroclub items for the engine, prop, Vickers gun and wheels. The kit prop/spinner was tackled by removing the prop blades, sanding down the front and back to get the correct depth, then drilling the hole in the front and hollowing it out. Slots were then cut in to fit the prop and will be tweaked to fit properly once it's all together. The kit cowling is totally unusable but I lucked out - finding one that fits perfectly in my spares box. I've no idea which kit it came from as it was part of a job lot of kits/spares I bought from a forum member! It needed a little thinning, the front lip was reduced and the lower edge removed, now it fits the Aeroclub engine nicely!


Thanks for looking!

Ian
ps does anyone know a paint match for the Tropical Red/Brown and undersurface blue?
« Last Edit: August 16, 2019, 05:15:51 PM by IanB »

Offline Procopius

  • Jr. Member
  • **
  • Posts: 71
Re: Pegasus Bristol M1.C 1:72
« Reply #1 on: October 11, 2013, 12:56:24 AM »
Oh cool! I've quite fallen in love with the look of the M1.C, and have been intrigued by the possibility of building it in 1/72. I'm definitely excited to follow your build of it.
"Kill the sods, the Hunnerinoes, at all costs. Anywhere and everywhere!"
-- Major Keith "Grid" Caldwell, 74 (Tiger) Squadron

Offline RAGIII

  • Hero Member
  • *****
  • Posts: 18845
Re: Pegasus Bristol M1.C 1:72
« Reply #2 on: October 11, 2013, 03:39:53 AM »
Ian,
Glad to see you put this one up here! I am looking forward to your progress after your terrific start!
RAGIII
"A man has to know his limitations": Harry Callahan

"Don't slop it on" Lynda Geisler

Offline IanB

  • Hero Member
  • *****
  • Posts: 2441
Re: Bristol M1.C, Pegasus 1:72
« Reply #3 on: October 13, 2013, 12:39:07 PM »
A little update, interior now almost done!
 I've made up the framework to hold the seat (which will be added after the wings as it sits too high to slide the wings in with it in place) and flight controls. It's all painted and ready to fit, but that will be a tricky operation. There is a partition between pilot and fuel tank which has to be attached to the wing assembly. With the interior in place, there's no room for the wings with the partition attached to slide into place, so it'll be a dual operation - slide the wings into place but don't secure them, leaving the front free to be lifted up to slide the interior into place, then secure the wings!


The fuselage joints have been filled - I think they're all ok but it will take a coat of primer to be sure, and all the rigging holes have been drilled. Almost ready to put the major assemblies together!

Ian
« Last Edit: August 16, 2019, 05:18:08 PM by IanB »

Offline Des

  • Administrator
  • Hero Member
  • ******
  • Posts: 9325
    • ww1aircraftmodels.com
Re: Pegasus Bristol M1.C 1:72
« Reply #4 on: October 13, 2013, 01:11:03 PM »
She's coming together very nicely Ian, should be a really neat looking model when completed, have you decided on a colour sheme yet?

I built this aircraft in 1:32 scale from Alley Cat, don't know how you guys do it in 1:72., you do amazing work.

Des.
Late Founder of ww1aircraftmodels.com and forum.ww1aircraftmodels.com

Offline coyotemagic

  • Hero Member
  • *****
  • Posts: 7710
  • "Here's to not buggering it up." -Winston Chuchill
    • My Models
Re: Pegasus Bristol M1.C 1:72
« Reply #5 on: October 13, 2013, 02:13:10 PM »
Brilliant work, Ian.  She's shaping up beautifully.
Cheers,
Bud
"All men dream: but not equally. Those who dream in the dark recesses of the night awake in the day to find all was vanity. But the dreamers of day are dangerous men, for they may act their dreams with open eyes, and make it possible." -T. E. Lawrence

Offline Zabu

  • Hero Member
  • *****
  • Posts: 681
Re: Pegasus Bristol M1.C 1:72
« Reply #6 on: October 13, 2013, 02:22:27 PM »
Very nice job there Ian, making all those corrections. Your tiny cockpit looks amazing.

I have one in the stash too so i'll sure follow your buil thread.

Cheers

Offline Dal Gavan

  • Sr. Member
  • ****
  • Posts: 469
Re: Pegasus Bristol M1.C 1:72
« Reply #7 on: October 13, 2013, 10:31:37 PM »
That's looking good, Ian, very good indeed. 

Dal.   

Offline IanB

  • Hero Member
  • *****
  • Posts: 2441
Re: Pegasus Bristol M1.C 1:72
« Reply #8 on: October 13, 2013, 11:16:15 PM »
Thanks all.
Des - I shall be doing one of the 150 Sqn machines in Salonika, probably C4912. Do you have a good paint match from your build for the underside blue and PC12 by any chance? Do Alley Cat recommend anything?

Offline Ernie

  • Hero Member
  • *****
  • Posts: 3961
  • "Once more into the breach"
Re: Pegasus Bristol M1.C 1:72
« Reply #9 on: October 13, 2013, 11:49:19 PM »
Great work, Ian. You are making super progress on a kit that can't be
easy to work with.  Very interesting build to follow.   Thanks for sharing it!

Cheers,
Ernie :)
The new old guy, take two...

Offline RAGIII

  • Hero Member
  • *****
  • Posts: 18845
Re: Pegasus Bristol M1.C 1:72
« Reply #10 on: October 13, 2013, 11:56:20 PM »
Terrific work Ian! You are progressing rapidly! Your interior looks awesome as do the corrections you have made!
RAGIII
"A man has to know his limitations": Harry Callahan

"Don't slop it on" Lynda Geisler

Offline IanB

  • Hero Member
  • *****
  • Posts: 2441
Re: Pegasus Bristol M1.C 1:72
« Reply #11 on: October 14, 2013, 02:30:59 AM »
Thanks for all the kind comments and positive feedback, I'm really enjoying this build!
The fuselage and wings have been mated, with the subassembly successfully slotted in (the only casualty was the jostick and rudder bar which popped out, shouldn't be too hard to get back in). There will be a lot of work filling around the wing joints, and I had to add a brass spacer in the nose to hold the fuselage sides apart the correct distance. There will also be a fair bit of work needed on the nose to line everything up before adding the firewall and engine/cowling.


Ian
« Last Edit: August 16, 2019, 05:20:45 PM by IanB »

Offline xmald

  • Hero Member
  • *****
  • Posts: 1093
Re: Pegasus Bristol M1.C 1:72
« Reply #12 on: October 14, 2013, 02:50:29 AM »
Great job! You are really making a lot of progress on this one! I`ve recently bought one in 1 48th by Blue Max though I have a big pile of models waiting to be build this one is high on the priority list.
When it comes to the PC12 there is a Misterkit paint look here: http://modelskills.co.uk/27-british
but be sure that PC 12 is the one that you want to use - check this thread here - it`s about Triplanes I know but it may shed some light on your scheme too:
http://www.britmodeller.com/forums/index.php?/topic/234940405-pc-12-paint/
Best regards
Filip

Offline IanB

  • Hero Member
  • *****
  • Posts: 2441
Re: Pegasus Bristol M1.C 1:72
« Reply #13 on: October 14, 2013, 11:03:41 AM »
Thanks Filip,
 It is, of course, the Tropical red brown I'm looking for....

Ian

Offline Procopius

  • Jr. Member
  • **
  • Posts: 71
Re: Pegasus Bristol M1.C 1:72
« Reply #14 on: October 14, 2013, 01:41:20 PM »
I have nothing constructive to add, but I'm in awe of your abilities here.
"Kill the sods, the Hunnerinoes, at all costs. Anywhere and everywhere!"
-- Major Keith "Grid" Caldwell, 74 (Tiger) Squadron